I’ve enjoyed your photography that I’ve found on your three websites. I especially enjoyed your photos of the Sierras. While looking at your photo “RitterBannerEdizaFlowers2007_07_25.jpg” [see below] the question comes to mind, “How did he get everything from 12 inches to infinity in focus?”
(Greg also noted that current Canon EF lenses generally do not include a DOF scale.)
Thanks for writing, Greg.
The main technique in this photo is the use of a short focal length wide angle lens. It (along with similar photos in my gallery) was shot with the Canon EF 17-40mm f/4 L lens, which is an ultra-wide angle (UWA) lens on the full-frame Canon 5D. Such UWA lenses can produce an extraordinary depth of field – it may not be quite “12 inches to infinity,” but it is pretty close.
In addition, one can shoot at smaller apertures on a full frame DSLR compared to the crop sensor DSLRs. On a crop body you generally avoid apertures smaller than f/8 or so, especially if you are planning to make a large print. At smaller apertures, diffraction decreases the maximum sharpness of the image. You get greater depth of field, but the cost is that the sharpest portions of the image in the plane of focus actually become less sharp than at optimal apertures. With a larger sensor (or larger film), diffraction doesn’t become significant at f/8. I conducted some experiments with my L lenses and 5D and discovered that sharpness in the plane of focus is at least as good at f/11 as it is at f/8, and that focus plane sharpness at f/16 is virtually indistinguishable from f/8 and f/11.
So, by combining a very wide angle lens (I believe it was 17mm in this photo) with a very small aperture (f/16 most likely) and focusing just beyond the closest object in the frame, I can achieve very wide DOF.
There are a few other tricks that one can employ. Faced with scenes that have an extremely wide dynamic range, I often take two exposures with one set for the darker areas and the other for the bright areas. In a situation where the foreground is dark and the distant objects light, I can also slightly shift the focus between the two exposures. (I combine the two images in post-processing; this is more or less equivalent to using ND grad filters at the time of the exposure though it permits more flexibility at the expense of an extra exposure.)
– Dan
BTW, Greg also reminded me of an interesting SF Bay Area show that is about to close:
P.S. You had an earlier post about the Yosemite art exhibit at Stanford. I’d like to bring to your attention another Yosemite exhibit that is currently running through Aug 26 (ends soon!) at the Oakland Museum (http://www.museumca.org/). This is an enjoyable exhibition that covers the art of Yosemite from native american basketry, to mid-19th century painters, to photography; highly recommended!
A reader sent a nice message today which included the following:
I am always amazed by the detail of your photographs, the sharpness (I sometimes wish you’d elaborate a bit more on your settings of the shot ).
Thanks for the nice comment about detail and sharpness. Let me give a little overview of some of what I do. (Of course, to really see this you would have to look at a print. :-)
Almost all of the photopraphs were made with either an 8 megapixel Canon 350D/XT or more recently with a 12 megapixel Canon 5D.
I use high end Canon lenses – 17-40mm f/4 L, 24-105mm f/4 IS L, 70-200mm f/4 L, 50mm f/1.4.
I tend to shoot at smaller apertures unless the depth of field requirements of the shot (or limited light and moving subjects) require larger apertures. For sharpness across the frame, I generally shoot at f/8 on the crop sensor 350D and at f/11 or f/16 of the full frame 5D.
In most cases I shoot from a tripod and use a remote release and mirror lockup.
I post-process photographs and appropriately “work” the images using methods comparable to those used by traditional film photographers (dodging, burning, contrast selections, etc.) and some that are available in Photoshop (localized levels, saturation, color balance, and others).
I apply two stages of sharpening to the full size images. First I apply “smart sharpening” to produce the greatest micro detail, while being careful to avoid unnatural sharpening artifacts. Then I apply some unsharp masking to provide “local contrast enhancement.”
After downsizing the images for posting here, I do one more subtle unsharp mask operation to slightly increase detail in the smaller .jpg versions posted on the web.
Whew!
And that’s only a general summary. Individual images require different processing and different techniques. For example, it would not have been appropriate to do a lot of sharpening in my recently-posted photograph of evening rain in Yosemite Valley. On the other hand, in order to produce the best image it is sometimes necessary to use even more extensive post-processing techniques, such as in recent photos of early morning on the floor of Yosemite Valley, where the scene had an extremely wide dynamic range.
I’m usually happy to explain more about a particular image if you are interested, so just ask! :-)
—–
(Note: This article was originally posted in 2007 and I should probably update the test using newer gear – though the point of the test and the post remains. In addition, see some additions/comments in the final section… and disregard the advice to use f/11 as a standard aperture if all else is equal. Note also that these conclusions are not purely about diffraction blur, but about the overall performance of a particular lens for a particular subject.)
Last month I wrote about a set of tests (“Full Frame Lens Test“) that I conducted with my lenses and my Canon 5D body. My object was simply to better understand how the camera/lens combinations would behave so that I could make better decisions about appropriate lenses and apertures while making photographs.
One discovery was that, compared to using a crop sensor DSLR, I can get excellent results when I shoot at smaller apertures with good lenses on the full frame body. I tended to avoid apertures smaller than about f/8 on the crop sensor camera, but there seems to be little or no real liability in using f/11 or even f/16 on full frame.
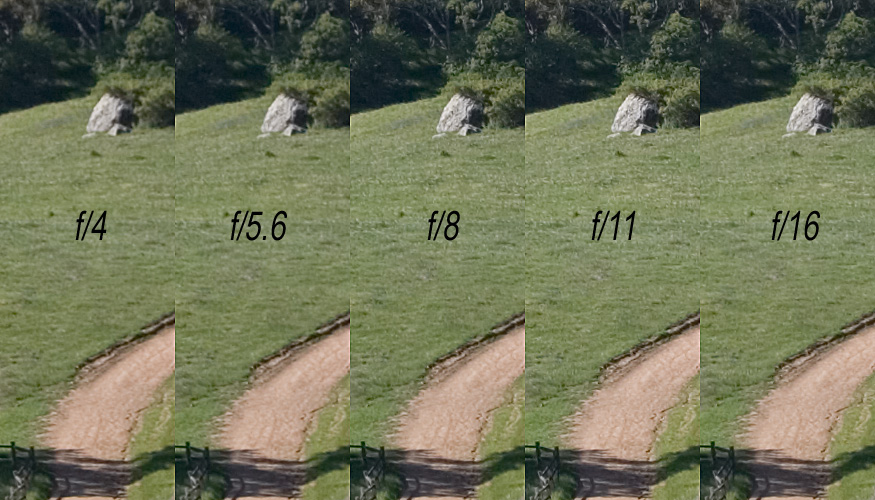
To illustrate I put together the following composite image. (The image appears in reduced form on this page. Click the link to see the full size version.)
A sequence of text photographs illustrating diffraction blur at several apertures on a full frame camera
The example includes five versions of a small section from near the center of a photograph taken with the Canon EOS 5D using the EF 24-105mm L IS lens at a 50mm focal length. The camera was on a tripod, MLU and a remote release were used, and the AF was turned off. The images are 100% crops – in other words, actual pixel size is displayed in these tiny excepts from the much larger original images. (You would virtually never view a print at this magnification. These are equivalent to tiny sections from a print that might be about 5 feet wide!) The images have been slightly sharpened in post-processing, but are otherwise unaltered.
I shot at apertures of f/4, f/5.6, f/8, f/11, and f/16. In terms of the sharpness of this portion of the image, I am quite certain that all five examples are plenty sharp for making prints. That said, there are some differences. To my eye:
The f/4 and, to some extent, the f/5.6 versions are slightly but noticeably softer at this magnification.
The f/8 and f/11 versions seem to me to have approximately equal sharpness. Some parts of the f/8 image seem slightly sharper, but other parts of the f/11 image seem sharper. In the end they are pretty darn equivalent, though I’d maybe give the f/11 a very slight edge overall.
The f/16 image may be slightly less sharp than the f/8 and f/11 versions, but the difference would not be noticeable in a print, even a rather large one. In any case, f/16 appears sharper than either f/4 or f/5.6.
After doing this test I no longer hesitate to shoot at f/11 or f/16. Not only does this give me the possibility of getting greater depth of field when I need it, but it also means that I can compensate for corner softness on some lenses (e.g. the 17-40mm) by using a smaller aperture without fear of losing center sharpness.
(Addition: 4/23/07 – Other Canon L lenses seem to give similar results, including my 17-40mm f/4 L and my 70-200mm f/4 L.)
Added 2/23/08:
In response to a question in a photo forum I put together a sample image showing corner sharpness from the same original images used in the example above. (The earlier example shows 100% crops from near the center of the frame.)
(image temporarily unavailable)
Technical info: Shot using a Canon 5D with the Canon EF 24-105mm f/4 L IS lens at a 50mm focal length. In aperture priority mode, the aperture was changed manually between shots. Initial focus was with AF, which was then switched off before shooting the series. Camera was on a tripod and MLU and remote release were used. Shots were converted from RAW with ACR and no additional post-processing applied. Print made at this resolution would be approximately five feet wide. The crop is from the far lower left corner of the frame.
In addition to noting the softer image in the corner at f/4, also note that the image is a bit darker due to the expected increase in corner light fall-off (“vignetting”) at the largest aperture. Sharpest version in this series shot with a FF body seems to be at f/11 as in the center crop example above. But note that f/8, f/11, and f/16 are not very different in overall sharpness – and in the end any of these apertures would produce a very sharp print.
In response to another forum discussion, I have added another example, this time using the Canon EF 50mm f/1.4 lens and showing performance at f/5.6, f/8, f/11, and f/16. In other respects the test is the same as described already in this post. This image is seen to the right and below.
(image temporarily unavailable)
Conclusions: Based on this set of images and other taken with different lenses under similar conditions, I have come to some conclusions that work for me with my Canon lenses and full-frame Canon 5D body. (See some notes below this bullet list that clarify some of the context of the original conclusions. In short, I have left the original conclusions here, though they wold be different with modern cameras and lenses.)
In general the sharpest whole aperture seems to be around f/11. (But see the “NOTE” below.)
It is very difficult to distinguish any resolution differences at f/8 or f/16 – there are subtle differences when viewing the test images at 100% magnification on my monitor but these are essentially invisible in prints.
f/5.6 or f/22 will tend to be a bit less sharp, though perhaps not for the same reasons. At f/5.6 I begin to notice a bit more of the diminished sharpness as a lens is opened up – more on some lenses than on others. At f/22 the effects of diffraction become just a bit more noticeable. However, if the shot demands it I do not hesitate (much) to use either of these apertures as the very slight decrease in sharpness is quite tiny if visible at all in a print and both provide some other advantages in certain situations. (I’ll even use the largest f/4 aperture on the test lens when isolating the subject is important or when low light demands it – and the results will typically be just fine.)
At larger apertures the performance becomes more tied to the particular lens so it is more difficult to make any generalizations beyond the fact that vignetting increases and sharpness will be less optimal.
The smaller apertures decrease any corner light fall-off (“vignetting”) or softness, generally to a point where both are insignificant.
With all of this in mind, unless I have a reason to select some other aperture I typically use f/11 as my general starting point when shooting with my full-frame DSLR body.
NOTE: Today, with higher quality lenses and sensors with much higher resolution, I would no longer recommend using f/11 as the default aperture. While it certainly is possible to make very sharp photographs at f/11 on a full frame camera, today’s higher resolution sensors move the diffraction-limited aperture to a larger setting. Depending on the lens and the situation, f/5.6 or f/8 would be better defaults, depending on your gear.
G Dan Mitchell is a California photographer whose subjects include the Pacific coast, redwood forests, central California oak/grasslands, the Sierra Nevada, California deserts, urban landscapes, night photography, and more. Blog | About | Flickr | Twitter | Facebook | Google+ | 500px.com | LinkedIn | Email
From time to time I shoot indoor theatrical or musical performances where the use of flash would be inappropriate… and probably get me ejected from the theatre! From what I understand, many people like to photograph these subjects with primes (for their wider apertures) or with wide aperture zooms. I have successfully shot such subjects with the former, but I don’t own the latter.
Newer DSLRs that have image stabilization and can produce good low-noise images at higher ISO values let us push the limits of natural light photography in these situations.
This example was shot with my EF 24-105mm f/4 IS zoom on a tripod and with image stabilization. (I leave the ballhead somewhat loose and sometimes use the tripod as a monopod.) I can often shoot in the 1/25 to 1/60 of a second shutter speed range and get good results as long as my subjects aren’t moving too fast.
Photographer and visual opportunist. Daily photos since 2005, plus articles, reviews, news, and ideas.
Manage Consent
To provide the best experiences, we use technologies like cookies to store and/or access device information. Consenting to these technologies will allow us to process data such as browsing behavior or unique IDs on this site. Not consenting or withdrawing consent, may adversely affect certain features and functions.
Functional
Always active
The technical storage or access is strictly necessary for the legitimate purpose of enabling the use of a specific service explicitly requested by the subscriber or user, or for the sole purpose of carrying out the transmission of a communication over an electronic communications network.
Preferences
The technical storage or access is necessary for the legitimate purpose of storing preferences that are not requested by the subscriber or user.
Statistics
The technical storage or access that is used exclusively for statistical purposes.The technical storage or access that is used exclusively for anonymous statistical purposes. Without a subpoena, voluntary compliance on the part of your Internet Service Provider, or additional records from a third party, information stored or retrieved for this purpose alone cannot usually be used to identify you.
Marketing
The technical storage or access is required to create user profiles to send advertising, or to track the user on a website or across several websites for similar marketing purposes.