Category Archives: Equipment

Answering a Question: Lenses for Detail Photographs at Zabriskie Point

Rajan emailed to say that he is heading to Death Valley soon to do some photography, including some at the Racetrack, and to ask a question about shooting at iconic Zabriskie Point:

“… if I wanted to get the details of the folds at Zabriskie point, would the 300mm f/4 work or would it be too close? If not, would the 70-200mm f/2.8 offer a better zoom out?”

I thought I’d share my response here so that others who might be interested can see the answer as well.

Zabriskie Points is, indeed, an icon. It has been photographed a few gazillion times. But if you are going to Death Valley for the first time, I would be the last person to tell you not to shoot there. Zabriskie Point is iconic for good reason, and being there between the pre-dawn first light and an hour or so after sunrise is an experience not to be missed – especially on a morning when sunrise light comes in beneath clouds and there is still snow on the summits of the Panamint Range across the Valley.

Even though I’ve photographed there a number of times, I still return. But my approach to this subject has changed, mainly in that I spend little or no time shooting the familiar Manley Beacon view. Instead, I like to use a long lens and watch carefully for interesting patterns, textures, and forms in the nearby eroded folds as the light continuously changes as the day begins. The half dozen or so photographs of the Zabriskie area from my most recent trip that please me the most focus on details of these formations. And this plays right into Rajan’s question.

I shoot a full frame DSLR, and almost all of the recent photographs were made with a 70-200mm zoom, most often shot at or near the longest focal length. For these sorts of shots I could have made use of a slightly longer lens – perhaps the 300mm prime or possibly my 100-400mm zoom. If I had a 200mm prime I could have done quite a bit of interesting work with that as well.
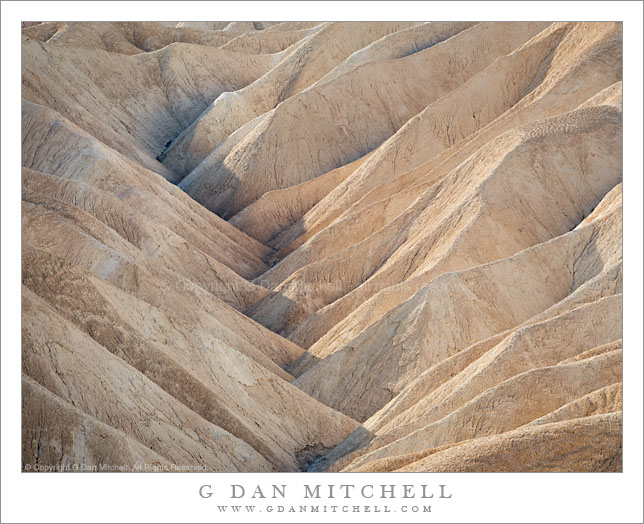
Gully, Morning Light, Zabriskie Point
Gully, Morning Light, Zabriskie Point. Death Valley National Park, California. April 3, 2009. © Copyright G Dan Mitchell – all rights reserved.

With that in mind, if you shoot a cropped sensor camera and are thinking about photographs somewhat like mine (check my posts from the past couple of weeks for some examples) the 70-200mm zoom should work quite nicely. While the 300mm could be useful, if I were shooting a cropped sensor body I don’t think I would need it, given the smaller angle of view from these cameras at a given focal length.

I’ll offer a few other suggestions:

  • Arrive quite early. I usually arrive well before dawn when it is still rather dark. I want plenty of time to get myself into position and to get my gear set up and ready. If you get there when the light is good you will have already missed some great opportunities.
  • Don’t focus exclusively on the very impressive show in front of you, but also scan to your left and right and even behind you.
  • Plan your shooting relative to the progression of the light from the rising sun across the scene. The first dawn light will strike the peaks of the Panamints and then spread across most of the range. Then it starts to work its way across the Valley while the nearby formations remain in shadow. Next the light will begin to hit the nearby ridges to your right and then Manley Beacon. (In my view, the best light on Manley Beacon lasts a very short time, so if you plan to photograph it be ready. Eventually the light will begin to do its magic on the folded, curved eroded formations below Zabriskie – and this stage lasts the longest of all and, I think, provides the greatest variety of subjects.
  • During this last part of “the show”  I like to shoot the details of the folds with a longer lens. While you’ll naturally be focusing your attention in the direction of Death Valley, start paying a lot of attention to what is happening to your left – the tops of the curved ridges start to pick up some very wonderful light.
  • Don’t leave too soon. Long after many of the dawn photographers have left – no doubt heading back to Furnace Creek for a nice breakfast and coffee – interesting stuff continues to happen on the eroded folds and gullies. Brighter light reflects back into shaded gullies, better light penetrates down into the lower sections of the washes, tops of folds catch angling light, and so forth.

Good luck with your trip, Rajan!

Canon EOS 5D Mark II: Live View and Night Photography

I have shot a few thousand frames with my Canon EOS 5D Mark II now. I’ve photographed a variety of subjects including a few days of rainy professional bicycle stage racing, several landscape subjects, and a productive evening of night photography with The Nocturnes at Mare Island Naval Shipyard. I plan to eventually write up something resembling a comprehensive report on my experience, but so far there hasn’t been time. With that in mind, here is a short piece on one new feature in this camera and my experience with it.

Among the photographic subjects that interest me is night photography, often of urban and industrial subjects, but occasionally of wild landscapes also. There are a number challenges to shooting in very dark conditions, but one of the more interesting is getting good focus in conditions where auto-focus often can’t find a target to work with and where it is too dark to manually focus. (I wrote a bit about this in a recent piece: “Hints for Night Photography.”)

During my last Mare Island shoot I discovered that Live View provides a very useful option for focusing at night. On the 5D II, the Live View mode raises the mirror and lets you look at a “live view” of your scene on the rear LCD. In very dim light the trick is to find something that might provide a manual focus target, center the rectangular LCD indicator over that “something,” zoom in to 10x magnification on this object, and then focus manually on the LCD image. I was amazed at the low light levels at which this works quite well. A vertical line in a wall, the edge of a window, a bit of cyclone fence, or a small light – any of these become decent manual focus targets using Live View.

When I started my Mare Island evening shoot, using this camera for the first time at night, I mostly did things the old fashioned way. By the end of the evening, in any very dim situation I was successfully and much more quickly getting good focus using Live View. I’m confident that night photographers are going to find that this is a very powerful and useful feature.

One Can Dream, Right?

For a report on an entirely different category of camera than most of us use, take a look at Michael Reichmann’s review of the Phase One P65+, 645 Camera, and Lenses. This is a medium format system that includes a Phase One/Mamiya medium format body, a 60MP true medium format digital back, and a lens system. Today it costs as much as a very, very nice car. One can hope that something equivalent may eventually be available for a price that the rest of us can contemplate affording.

Canon EOS 5D II: Notes on Today’s Photograph

Since today’s photograph (“Redwood Forest, Morning“) was one of the first landscape photographs I shot with my new Canon EOS 5D II, I was interested to see how the camera would perform and what print quality might look like.

This photograph was a bit trickier than may be apparent. It was overcast and early in the morning, I was in the bottom of a deep valley, the wind was blowing, and the light was constantly changing. In addition I used a 85mm lens (the excellent EF 85mm f/1.8) on a full frame DSLR, so I had to shoot at a rather small aperture for DOF reasons, necessitating a very slow shutter speed in order to work at my preferred ISO 100.

With all of those challenges, when I made the first small test print of this photograph last night I was very impressed with the level of detail in the photograph and I’m certain that it will work as a very good sized print – in fact, this particular image almost needs to displayed large.

When a new camera body is introduced there always seems to be a string of reports of poor performance. Sometimes there is some truth to the reports, but it is my opinion that many of the reports are the result of poor technique, unrealistic expectations,  obsession with “issues” that are irrelevant in actual photographs, and general mistrust of any Big Company that sells expensive camera equipment. I read these reports and think about them a bit, but I don’t assume that they are correct until I see evidence – preferably evidence that I produce myself. The first direct evidence comes from looking closely at photographs on the monitor as I work on them in ACR and then in Photoshop, but the real evidence comes when I make a print. After doing both of the above – and contrary to some rumors you may hear – there are no issues with noise in the shadows and the overall image – even with the increased number of photosites – seems excellent in every way to me.

Does my Canon EOS 5D II produce excellent image quality? Yes. Am I seeing unusual or troubling amounts of noise? No. Are banding problems in the shadows impairing my photographs? No. Do carefully made photographs using this equipment have the potential to produce excellent prints? Yes.

Am I pleased with the results from my 5DII at this point? Yes.