… On this trip I lost something which previously I never gave much of a second thought to and which I’ve since realized is one of the most critical components of my photographic arsenal. What could possibly be so key and why?
The answer — my cable release.
Keep in mind I’m not just talking about the impact of losing a piece of equipment. I’m talking about losing something that is an extension of ones mind and body critical to the creative process….
(Click his title link to read the full post at his blog.)
I understand. Not only about forgetting something, but about how important this silly little thing called a cable release is to the process of making a photograph. There is something about setting up the shot and then waiting, cable release in hand, as light changes, clouds move across the ridge, people move in and out of position… and you stand back or to the side of the camera watching and waiting… and holding the cable release.
In photography forums I often read posts that dismiss a lens because “it vignettes.” The assumption seems to be that really good lenses don’t vignette. I’m afraid that searching for lenses that don’t vignette is a hopeless quest.
Vignetting (or “fall-off”) in the corners of the frame is a fact of life with essentially all lenses. As I understand it, this is simply a condition that can’t be completely eliminated in the design of normal camera lenses – though there are ways to reduce it. So the question really is not “does my lens vignette?” It does. More useful questions are: “How much does the lens vignette?” and “How apparent is vignetting at different apertures?” and “How do the vignetting characteristics of this lens affect my photography?”
Canon EF 50mm f/1.4 lens at f/1.4 and f/4
I have four excellent Canon lenses: 17-40mm f/4 L, 24-105mm f/4 IS L, 70-200mm f/4 L, and 50mm f/1.4 prime. I looked at all of them when I did my recent Full Frame Lens Test. I confirmed that all four can produce really excellent results… and that all four produce noticeable vignetting in certain circumstances, especially in test conditions. (Results posted at various lens test sites on the web will confirm this.)
But is this a problem? Generally, no – though it is important to understand the vignetting characteristics of your lenses if you want to take advantage of this characteristic when appropriate and minimize it when you don’t. The body you use also makes a big difference. Fall off from a given lens will be more visible on a full frame sensor than on a crop sensor.
Stopping down greatly reduces the effect with all of my lenses. On some of them (e.g. – the 50mm prime and the 70-200mm zoom) light fall off becomes very minor when stopped down just a bit. It does not diminish quite as quickly on the 24-105, and the 17-40 can show the effect at apertures as small as f/8, depending upon subject.
Given that vignetting is a fact of life, how can we deal with it? There are actually quite a few approachs that can be used individually or together in different situations.
Vignetting can often be effectively reduced or even eliminated in post processing. When necessary I use adjustments in ACR or Photoshop to reduce the effect.
Shooting at smaller apertures can minimize or virtually eliminate the effect. Since I often shoot from a tripod I tend to use slower shutter speeds at smaller apertures. Fortunately, full frame DSLR cameras can use smaller apertures than crop sensor cameras; at f/11 or f/16 vignetting effects are rarely visible.
In many situations vignetting is actually a pleasing effect. My theory is that vignetting often simulates the way we see with our eyes – we are more aware of objects in the center of our field of vision and less aware of those in peripheral areas. Vignetting can de-emphasize the peripheral area and draw attention to the center. (In some images I intentionally add a bit of vignetting for this purpose.)
Vignetting that is cleary visible when the subject is a perfectly uniform test target is often completely invisible in photographs of detailed subjects. In other words, the lens vignettes but you can’t see it. (This is a good illustration of the principle that what happens in photographs is more important than what happens in tests.)
So, vignetting is a fact of photographic life – for better or worse. Searching for a lens that does not vignette is hopeless. It makes a lot more sense to understand vignetting and learn how to work with the vignetting characteristics of your lenses.
(Note: This article was originally posted in 2007 and I should probably update the test using newer gear – though the point of the test and the post remains. In addition, see some additions/comments in the final section… and disregard the advice to use f/11 as a standard aperture if all else is equal. Note also that these conclusions are not purely about diffraction blur, but about the overall performance of a particular lens for a particular subject.)
Last month I wrote about a set of tests (“Full Frame Lens Test“) that I conducted with my lenses and my Canon 5D body. My object was simply to better understand how the camera/lens combinations would behave so that I could make better decisions about appropriate lenses and apertures while making photographs.
One discovery was that, compared to using a crop sensor DSLR, I can get excellent results when I shoot at smaller apertures with good lenses on the full frame body. I tended to avoid apertures smaller than about f/8 on the crop sensor camera, but there seems to be little or no real liability in using f/11 or even f/16 on full frame.
To illustrate I put together the following composite image. (The image appears in reduced form on this page. Click the link to see the full size version.)
A sequence of text photographs illustrating diffraction blur at several apertures on a full frame camera
The example includes five versions of a small section from near the center of a photograph taken with the Canon EOS 5D using the EF 24-105mm L IS lens at a 50mm focal length. The camera was on a tripod, MLU and a remote release were used, and the AF was turned off. The images are 100% crops – in other words, actual pixel size is displayed in these tiny excepts from the much larger original images. (You would virtually never view a print at this magnification. These are equivalent to tiny sections from a print that might be about 5 feet wide!) The images have been slightly sharpened in post-processing, but are otherwise unaltered.
I shot at apertures of f/4, f/5.6, f/8, f/11, and f/16. In terms of the sharpness of this portion of the image, I am quite certain that all five examples are plenty sharp for making prints. That said, there are some differences. To my eye:
The f/4 and, to some extent, the f/5.6 versions are slightly but noticeably softer at this magnification.
The f/8 and f/11 versions seem to me to have approximately equal sharpness. Some parts of the f/8 image seem slightly sharper, but other parts of the f/11 image seem sharper. In the end they are pretty darn equivalent, though I’d maybe give the f/11 a very slight edge overall.
The f/16 image may be slightly less sharp than the f/8 and f/11 versions, but the difference would not be noticeable in a print, even a rather large one. In any case, f/16 appears sharper than either f/4 or f/5.6.
After doing this test I no longer hesitate to shoot at f/11 or f/16. Not only does this give me the possibility of getting greater depth of field when I need it, but it also means that I can compensate for corner softness on some lenses (e.g. the 17-40mm) by using a smaller aperture without fear of losing center sharpness.
(Addition: 4/23/07 – Other Canon L lenses seem to give similar results, including my 17-40mm f/4 L and my 70-200mm f/4 L.)
Added 2/23/08:
In response to a question in a photo forum I put together a sample image showing corner sharpness from the same original images used in the example above. (The earlier example shows 100% crops from near the center of the frame.)
(image temporarily unavailable)
Technical info: Shot using a Canon 5D with the Canon EF 24-105mm f/4 L IS lens at a 50mm focal length. In aperture priority mode, the aperture was changed manually between shots. Initial focus was with AF, which was then switched off before shooting the series. Camera was on a tripod and MLU and remote release were used. Shots were converted from RAW with ACR and no additional post-processing applied. Print made at this resolution would be approximately five feet wide. The crop is from the far lower left corner of the frame.
In addition to noting the softer image in the corner at f/4, also note that the image is a bit darker due to the expected increase in corner light fall-off (“vignetting”) at the largest aperture. Sharpest version in this series shot with a FF body seems to be at f/11 as in the center crop example above. But note that f/8, f/11, and f/16 are not very different in overall sharpness – and in the end any of these apertures would produce a very sharp print.
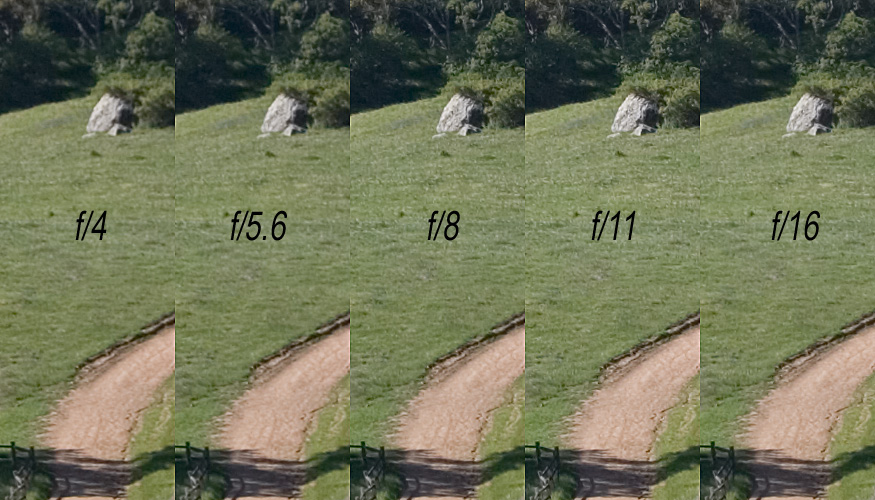
In response to another forum discussion, I have added another example, this time using the Canon EF 50mm f/1.4 lens and showing performance at f/5.6, f/8, f/11, and f/16. In other respects the test is the same as described already in this post. This image is seen to the right and below.
(image temporarily unavailable)
Conclusions: Based on this set of images and other taken with different lenses under similar conditions, I have come to some conclusions that work for me with my Canon lenses and full-frame Canon 5D body. (See some notes below this bullet list that clarify some of the context of the original conclusions. In short, I have left the original conclusions here, though they wold be different with modern cameras and lenses.)
In general the sharpest whole aperture seems to be around f/11. (But see the “NOTE” below.)
It is very difficult to distinguish any resolution differences at f/8 or f/16 – there are subtle differences when viewing the test images at 100% magnification on my monitor but these are essentially invisible in prints.
f/5.6 or f/22 will tend to be a bit less sharp, though perhaps not for the same reasons. At f/5.6 I begin to notice a bit more of the diminished sharpness as a lens is opened up – more on some lenses than on others. At f/22 the effects of diffraction become just a bit more noticeable. However, if the shot demands it I do not hesitate (much) to use either of these apertures as the very slight decrease in sharpness is quite tiny if visible at all in a print and both provide some other advantages in certain situations. (I’ll even use the largest f/4 aperture on the test lens when isolating the subject is important or when low light demands it – and the results will typically be just fine.)
At larger apertures the performance becomes more tied to the particular lens so it is more difficult to make any generalizations beyond the fact that vignetting increases and sharpness will be less optimal.
The smaller apertures decrease any corner light fall-off (“vignetting”) or softness, generally to a point where both are insignificant.
With all of this in mind, unless I have a reason to select some other aperture I typically use f/11 as my general starting point when shooting with my full-frame DSLR body.
NOTE: Today, with higher quality lenses and sensors with much higher resolution, I would no longer recommend using f/11 as the default aperture. While it certainly is possible to make very sharp photographs at f/11 on a full frame camera, today’s higher resolution sensors move the diffraction-limited aperture to a larger setting. Depending on the lens and the situation, f/5.6 or f/8 would be better defaults, depending on your gear.
G Dan Mitchell is a California photographer whose subjects include the Pacific coast, redwood forests, central California oak/grasslands, the Sierra Nevada, California deserts, urban landscapes, night photography, and more. Blog | About | Flickr | Twitter | Facebook | Google+ | 500px.com | LinkedIn | Email
I took some new gear on my recent Death Valley trip, including my Canon 5D and my Induro C313 tripod. Here are some reflections on this equipment after using it extensively for the first time:
Induro C313 Tripod – Last month I wrote about my quest for a new tripod to augment the smaller and lighter tripod I already own for backpacking and hiking. I had looked at the excellent Gitzo tripods and was probably headed toward purchasing one of those when I read Michael Reichmann’s review of the Induro C413, which was largely very positive. (He noted two issues, neither of which concerns me.) I was able to get my hands on several models at Keeble and Schuchat Photography in Palo Alto and was impressed with the quality of the tripods. Despite some concerns about buying a product with almost no track record, I finally picked up the C313 model.
THe C313 has large diameter three-section carbon fiber legs. With the legs fully extended, the center column all the way down, and with my Acratech ballhead attached, the camera is a few inches too tall for me to look through the viewfinder. This is about right since on uneven ground with some of the legs shortened the camera can still be at eye level. The legs have a welcome anti-rotation feature which makes setup a bit easier. The legs can be adjusted to three different angles to further accommodate uneven ground or to position the camera lower.
The good news is that there isn’t a lot to say about my experience with the tripod – it pretty much just worked effectively as expected. While not cheap it does cost a bit less than an equivalent Gitzo, and it seems to be to do the job just as well. Overall, I’m very pleased with the tripod.
Canon 5D – I acquired a used 5D about a month before this trip, so I have had some opportunities to use the camera and learn about its features and capabilities. Much of what I experienced on this trip confirmed what I have learned about it:
My lenses are capable of producing noticeably sharper images on this camera than on the 8MP 1.6x crop sensor DSLR. This is partly due to the somewhat higher number of photo-sites on this 12MP camera, but I think it is also because the photosites are larger.
The angle of view of a particular focal length is considerably wider on full frame. This was not a surprise. However, my 17-40 becomes a truly wide angle zoom on this camera – it was a “normal” wide to slight telephoto on the previous body. The 24-105 now seems to go equally far into the wide and telephoto ranges. I especially enjoyed working with the new wide angle capabilities of my 17-40.
Vignetting (darkening of the image corners) and corner softness are more apparent, especially with the 17-40mm lens, but with the 24-105mm as well. Shooting landscapes with wide expanses of sky at f/4 with either of these lenses leaves noticeable vignetting. Fortunately, for several reasons this turns out to be a fairly minor issue. I rarely do these sorts of shots wide open, and the issue largely goes away by f/8 – with the exception of some corner softness issues on the 17-40mm lens, but read on…
I can now use significantly smaller apertures. I would rarely shoot with smaller apertures than about f/8 on the crop sensor camera – at smaller apertures the increase in DOF was cancelled by the decrease in sharpness caused by didiffraction. However, I discovered before the trip that there was virtually no discernible decrease in sharpness at f/11 or even f/16 with the same lenses on the full frame 5D. I also found out that the corner issues, particularly on the 17-40mm lens, were essentially eliminated at the smaller apertures. Consequently I made great use of f/11 and f/16 on this lens and got great depth of field and sharpness that I could not have achieved with my previous camera.
Dust is an issue. I haven’t had the camera long enough to know if it is something about the 5D, shooting at smaller apertures, or just the fact that I was in one of the dustiest places in the world – oh, and I drove nearly 100 miles on dirt and gravel roads. However, I have some dust in every shot I took. Fortunately, cloning the dust spots out in Photoshop is not a big deal – and probably still a lot less trouble than retouching film would be!
One final observation. I kept my Canon 350D/XT body when I got the 5D. Being much smaller and lighter than the 5D it could be useful in situations where I don’t want to be saddled with bulky/heavy equipment, the crop sensor body gives me more “reach” with my longer lenses, and it could serve as a back up camera. I brought the camera along on the Death Valley trip.
My opinion of the 350D has not changed. I continue to maintain that this little camera is capable of making excellent images and that its small size and weight are advantages in many circumstances. I believe that it may well be one of those cameras that eventually comes to be regarded as something of a “classic.”
However… I didn’t even remove the 350D from the bag once on this trip. I’m rethinking its place in my equipment bag. While I might still use it on rare occasions, I don’t think that I’ll be inclined to forego the use of the 5D as often as I thought I might. I’m beginning to think about selling it…
—–
Photographer and visual opportunist. Daily photos since 2005, plus articles, reviews, news, and ideas.
Manage Consent
To provide the best experiences, we use technologies like cookies to store and/or access device information. Consenting to these technologies will allow us to process data such as browsing behavior or unique IDs on this site. Not consenting or withdrawing consent, may adversely affect certain features and functions.
Functional
Always active
The technical storage or access is strictly necessary for the legitimate purpose of enabling the use of a specific service explicitly requested by the subscriber or user, or for the sole purpose of carrying out the transmission of a communication over an electronic communications network.
Preferences
The technical storage or access is necessary for the legitimate purpose of storing preferences that are not requested by the subscriber or user.
Statistics
The technical storage or access that is used exclusively for statistical purposes.The technical storage or access that is used exclusively for anonymous statistical purposes. Without a subpoena, voluntary compliance on the part of your Internet Service Provider, or additional records from a third party, information stored or retrieved for this purpose alone cannot usually be used to identify you.
Marketing
The technical storage or access is required to create user profiles to send advertising, or to track the user on a website or across several websites for similar marketing purposes.