As I wander around the net and poke my nose into various photography forums I often read questions about how this, that, or the other thing works. I also read a lot of wild speculation and theorizing about various issues that may (or may not) be relevant to the quality of ones photographs. One thing that strikes me about many of these questions is that the photographer could easily determine the answer for him/herself. Now, I’m not one to discourage people from asking questions – often it is a lot more efficient to just get the answer than to test. But in other cases, there is a certain subjective element to the answer, and one cannot expect to get a single, objective and definitive answer from an online forum. In these cases some simple testing can be the best approach.
A day or two ago I saw (yet another) post asking what is the slowest shutter speed that I can hand hold? We’ve all heard the old rule of thumb: You can hand hold at a shutter speed of one over the focal length, or 1/50 second with a 50mm lens. (As an aside, to the extent that this formula provides some guidance for 35mm or full frame SLRs, it needs to be adjusted upwards by the crop factor for cropped sensor cameras. Just thought you’d want to know… ;-)
The actual answer to the minimum shutter speed question is a bit more complicated. Not everyone is equally steady with the camera. Technique also makes a difference, as do the circumstances of the shot. The subject can make a difference as well: while it is likely that any blur from camera motion will be unacceptable in a landscape, some motion blur in the subject can enhance the effect of, for example, certain sports photographs. The size of the final image is relevant: blur that is invisible in a 600 pixel online jpeg may be unacceptable in a 12″ x 18″ print. And so forth…
So, what to do? Test.
Put a lens on your camera and make a series of test photographs. For this particular test I’d recommend several exposures at each shutter speed – there not a simple binary division between speeds that work and shutter speeds that don’t. Instead, there will be a range at which your success rate becomes too low, and shooting perhaps 3-5 frames at each shutter speed helps reveal this. Repeat at different focal lengths. When you inspect the resulting photographs – keeping in mind how they might actually be used – you’ll learn a ton about how to use the variable of shutter speed in your photography. In fact, your knowledge will go way beyond the simple “rule of thumb.”
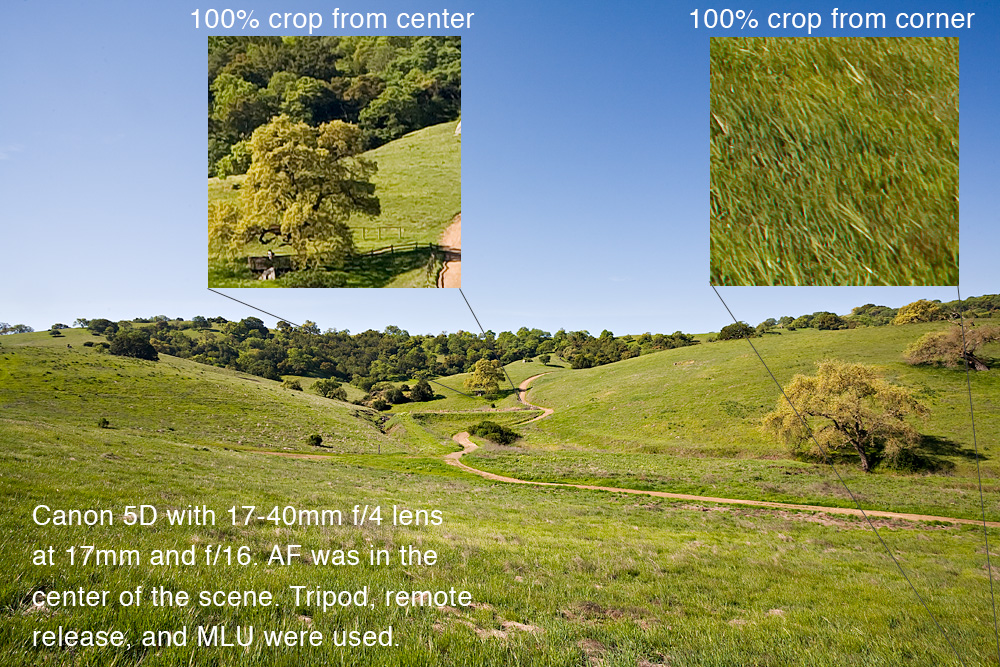
To carry on with the main subject, shutter speed is certainly not the only thing you can test. There are a ton of photography myths that seem to live on unchallenged. Some deserve to be challenged, and your own testing is a good way to determine whether they are useful rules or nonsense or something in between. I often hear that statements about aperture and image quality such as the following: “my lens is sharp across the frame wide open,” “f/8 is the sharpest aperture”, “you can’t shoot smaller than f/11 because you’ll get diffraction blur,” or “that lens is no good because it vignettes wide open.” Every one of these statements is subject to simple testing, and in each case the tester could learn something surprising and useful.
Finally, a caution. It is possible to let yourself become more of an obsessive gear nut than a photographer. I’m certainly not recommending that. The point of these exercises is simply to understand your tools better so that you can use them more effectively and creatively… to make photographs.
G Dan Mitchell is a California photographer and visual opportunist. His book, “California’s Fall Color: A Photographer’s Guide to Autumn in the Sierra” (Heyday Books) is available directly from him.
G Dan Mitchell: Blog | Bluesky | Mastodon | Substack Notes | Flickr | Email
All media © Copyright G Dan Mitchell and others as indicated. Any use requires advance permission from G Dan Mitchell.