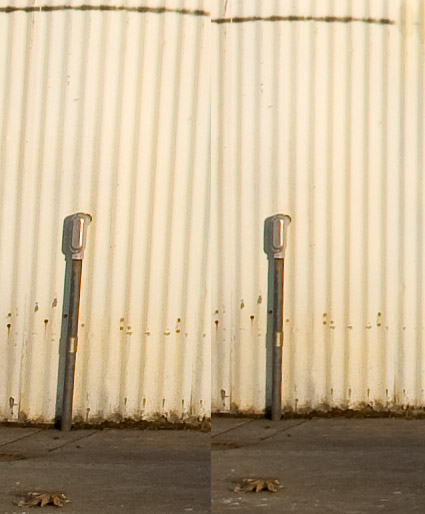
Tag Archives: sharpness

“My Photos Are Soft!”

So, you have a camera or lens that you think is not as sharp as it should be. If you are already expert at these things, what follows is not for you – you already know how to analyze the problem, you can anticipate possible causes, and you know some of the pitfalls of looking at the issue in unrealistic ways. But if you aren’t certain about how to deal with the issue, perhaps the following might help… so feel free to read on.

Perhaps you just got a new lens or a new camera and you don’t think it is performing as you expected. Or perhaps you have long suspected a problem with your equipment. On the other hand, maybe some gear that you have used with confidence for a while seems to not work as well as you recall it working in the past. It can be tempting to blame the equipment – and in some cases you may be correct – but it is a very good idea to first try to analyze and understand the problem and look for other possible causes… and solutions.

It is critical that you try to control the variables that might give rise to the issue, and then to try to a) determine if the problem is real, and b) figure out specifically what might be the cause. The range of possible causes is larger than you might imagine: problems with the camera’s autofocus (AF) system, an out of adjustment or “weak” lens, less than optimal choice of lens settings, issues with camera stability, insufficient care with the use of AF, using the wrong AF settings, aperture choices, shutter speed choices, subject motion, and more. While a real equipment problem is a possibility, it is probably at least as likely that the problem lies elsewhere. Fortunately there are ways to wade through this minefield and develop some rational understanding of what is going on.

What follows is a sort of ad hoc description of how I might approach this. It is not meant to be the only way to deal with such issues, it leaves out some possibilities, and the sequence could be changed around in some ways. Continue reading “My Photos Are Soft!”

Regarding Sharpness. And Obsession.

We have all seen the lengthy discussions about “which lens is sharpest.” While the ability of a lens to resolve detail is certainly important, it is not the only thing that is important. And in many cases, knowing which is the sharpest lens is not as important as know which among a number of sharp alternatives best suits your needs. I stumbled into another discussion of this topic online today and posted the following as my contribution. (Slightly edited here from the original post.)


Folks sometimes allow themselves to become completely distracted by “sharpness” to the point that they overlook a whole bunch of other important issues in their quest to find the holy grail of “sharp.” This can become the equivalent to realizing that good tires are important on a car, and then deciding to buy a particular car because it comes with the “best” tires… but is too big to fit in your garage, costs twice your annual income, has a terrible repair record, needs a tune-up every 750 miles, and only comes in a color your spouse hates.

For a few people doing certain types of very critical work, printing very large, working slowly and methodically, and willing to forego the compensatory advantages of other lens options, lenses like the excellent TS models, lenses from another manufacturer that only work with adapters, classic primes, and so forth might make some sense.

But just because a lens might measure a bit better to some extent in one of the areas that is measurable (e. g. “sharpness”), it does not necessarily follow that it is a better lens, nor that alternatives that may measure differently in sharpness – but are very nearly as good – will not also be excellent performers. It is also not true that these specialized lenses are required to produce large and effective prints.

It is interesting to watch people go through a process that may look something like the following at times, as they…

1. decide they need a sharper kens.
2. research lens sharpness.
3. consider only sharpness and overlook or dismiss other issues, including those mentioned in the sources analyzing sharpness.
4. decide that some lens is the “sharpest” – frequently some expensive prime, the most expensive zoom they can find, an alternative brand, a specialized TS, etc.
4.5. lust after said lens for some period. The excitement builds…
5. purchase the aforementioned Really Really Sharp Lens.
6. use the new lens and glory in it’s pure Divinely Sharp Wonderfulness, thereby confirming their wise choice.
7. share their wonder with others.
8. make more photographs, and eventually come to find out that a) in real photography the sharpness difference is rarely visible, b) there are downsides to using the sharper lens, c) the downsides sometimes compromise or lose the shot, and d) in many cases their previous “less sharp” lens proves just as useful and effective.
9. note that the new super Super Lens, while useful, begins to spend more time in the bag, and…
10. learn an important lesson or two about Lens Lust… or else repeat the cycle with a different WonderLens. :-)


To be clear, I’m not suggesting that sharpness is unimportant. I’m just encouraging people to keep things in perspective.

G Dan Mitchell Photography | Twitter | Friendfeed | Facebook | Facebook Fan Page | Email

Canon EOS 5D II: Early Observations on Image Quality

I posted earlier today about increasing availability of the Canon EOS 5D II at places like B&H, so I thought it might be useful to begin posting on some of my experiences with the camera during the couple of weeks (and perhaps a thousand frames) that I’ve had it. Here is a copy of something I posted elsewhere earlier this week, in response to a post concerning image quality from this camera:

I’ve shot with cropped sensor bodies extensively in the past. I have shot with a full-frame 5D for the past two years. I recently began shooting with a 5DII and have done a thousand or so frames with it.

I cannot see image quality problems in my images, even in those that stress the ability of the camera in ways that should produce them if they are there: shooting wide dynamic range scenes, using high ISOs (up to 1600), inspecting at large on-screen magnifications, and making careful prints.

My photos have very low noise all the way through the shadows to pure black, even in some photographs where I’ve pushed the shadows either during RAW conversion and/or via the shadow/highlight tool in post. I’m seeing very highly detailed images with smooth tonal transitions. As far as I’ve seen the 5D II has a rather substantial dynamic range – as reported in a number of tests – and it is at least as great as that of the 5D.

Let me repost a couple of 100% magnification crops that I posted elsewhere from the 5DII.

The first was shot at ISO 100 at, IIRC, f/16 using a 35mm prime with the camera on tripod. The crop is a 100% magnification section from the very far lower right corner of the shot. The dark areas were pushed slightly, too, so if there were noise anywhere it would certainly appear here – but I don’t see it even at this resolution, which would be equivalent to a print width of five or six FEET wide. Seems like pretty good resolution to me! (It also speaks well for the EF 35mm f/2 lens.)

The second example is pretty much a noise “torture test” – it is a very dark section of a much larger image. (Again a 100% crop). It was shot using a 100-400mm zoom handheld at ISO 400 in cloudy conditions. There is some noise in the shot, but that is entirely normal – and this noise would be completely invisible even in a very large print. (The pattern on the lighter fabric near the left side of the frame is that of the fabric itself.)

My observations from 100% on-screen pixel peeping are confirmed by the more important test of printing.


(If my post has helped you with a purchase decision, making your purchase from B&H through this link will help support the blog. Thanks!

A Test: Correcting Perspective in Post-Processing

Earlier today I saw a post in which the author stated that correcting for perspective in post-processing would lead to serious problems:

There is quite a bit of loss in image definition if you do a significant amount of correction for converging verticals in an image editor. You can get far better results with a view camera or a tilt/shift lens. If you only photograph for the web, then maybe the image editor approach is ok, but for reasonably large prints?

While that point of view is widely held and often repeated, in my experience a blanket statement like this is not totally correct – it may come down to the definition of “significant.” I find that in many cases the degradation of the image is so small as to be insignificant or even invisible at 100% magnification, and it is most often completely invisible even in fairly good size prints. (This is not to suggest that those making severe corrections, in architectural photography for example, would not be better served by using a tilt/shift DSLR lens or a MF or LF system.)

Rather than just accepting statements like this, I like to test them. In the past I’ve tested and written about the option of correcting for lens distortions in post- processing: A Test: Correcting Lens Distortion in Post Processing. Here I want to extend this concept to using post-processing techniques for the correction of perspective distortion and for leveling the image.

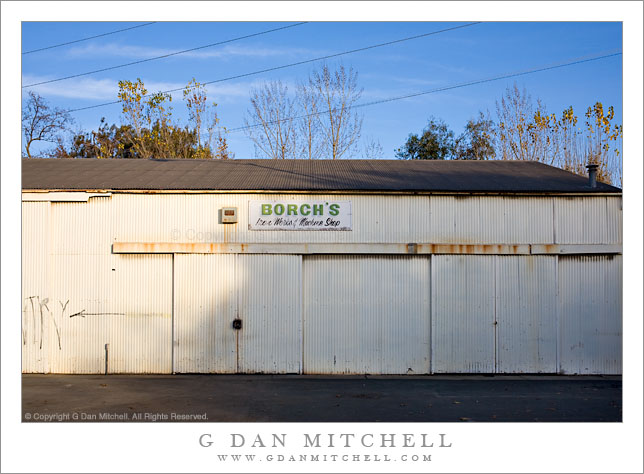
The photograph I’ll use was shot handheld using a full-frame Canon 5D with the EF 35mm f/2 lens, one of my favorites for street photography. First a small version of the final photograph:


Borch’s Iron Works and Machine Shop – old metal shop building in the downtown area of San Jose, California. © Copyright G Dan Mitchell – all rights reserved.

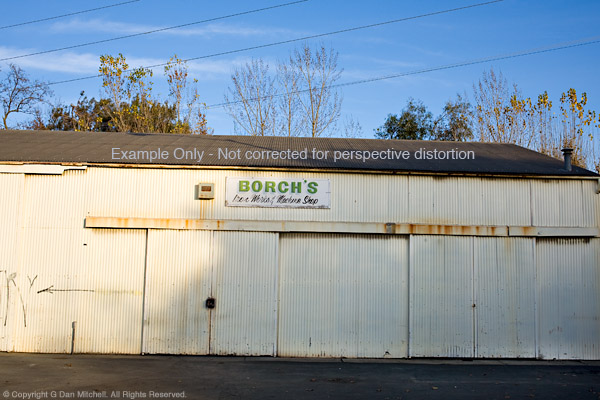
Next is the same image with the same post-processing, except that the corrections to horizontal alignment and perspective have been left out:


Borch’s Iron Works and Machine Shop – old metal shop building in the downtown area of San Jose, California. Uncorrected version. © Copyright G Dan Mitchell – all rights reserved.

Yup, that’s what happens when you shoot street and shoot handheld. ;-)

In this example we can clearly see several problems that need fixing. First, the image is not level – it tilts down to the right. Second, the vertical lines begin to converge toward the top of the image. Third, since the camera’s sensor was not perfectly parallel to the building wall, the right side of the building recedes and gets smaller as the horizontal lines become closer together toward the right edge.

In my view, the uncorrected version of this photograph is not usable. On the other hand, I’m not likely to start doing street photography with a tripod and a tilt shift lens any time soon! Correction in post seems to be a reasonable option. (And, to cut to the chase, the corrected version seen above really does make a nice print.)

The next image includes two versions of roughly the same section of the photograph at 100% magnification. The crops come from the lower left area of the full image and include the conduit on the wall in the area in full sun. I could have used a section from all the way in the corner, but given the low contrast in that area the difference between the samples would be even harder to see – so I’ll stick with the section where the conduit provides a more visible contrast and frame of reference. Depending on your monitor, this resolution is equivalent to looking at a small section from a print that would be perhaps 50″ or 60″ wide. (Hint: that would be a very big print for a DSLR original – significantly larger than almost anyone ever produces! Made many 60″ x 40″ prints recently?)


100% magnification from lower left area of ‘Borch’s Iron Works and Machine Shop’ – two versions. © Copyright G Dan Mitchell – all rights reserved.

I believe that if you know what to look for and you  inspect this 100% crop very closely you can detect a small difference in the “sharpness” of the two photographs – but it is quite subtle even when viewed at 100%. In practical terms, however, this tiny effect that is just barely visible under close inspection at 100% in side-by-side comparisons on the screen is entirely insignificant in a print. Even with a very close inspection it would be quite invisible in a print of, say, 18″ x 24″ and probably even larger. Bottom line: Both would produce very sharp prints at very large sizes and essentially no one would comment that one is sharper than the other… though quite a few might notice that the corrected image looks a whole lot less distorted in the spatial sense.

Note: Article text edited/updated for clarity on 4/27/13.

This reinforces my belief that any degradation to the image quality that occurs when lens distortion, perspective, and/or horizontal level are corrected carefully during the post-processing stage can be very minimal and in the majority of situations will be invisible in prints.


G Dan Mitchell is a California photographer and visual opportunist. His book, “California’s Fall Color: A Photographer’s Guide to Autumn in the Sierra” is available from Heyday Books and Amazon.

Blog | About | Flickr | FacebookEmail

Links to Articles, Sales and Licensing, my Sierra Nevada Fall Color book, Contact Information.


All media © Copyright G Dan Mitchell and others as indicated. Any use requires advance permission from G Dan Mitchell.