(Minor updates to this article were made in February 2019.)
Sharpening is a very important step for optimizing digital photograph files. If you let your camera save images in the common .jpg format (a compressed image format that is often used on the web) the camera is applying sharpening to the image produced by the camera sensor. If you use the raw format (a high quality format that retains the original sensor data of the exposure) you will find that the photograph looks soft until you apply sharpening during the post production phase.
Sharpening optimizes the visibility of details that are already in your photograph. It is a matter of more clearly revealing what is in the photograph than a matter of creating detail where there was none. Most sharpening works by increasing the contrast between light and dark areas in the image — what we call sharpening as actually more about adjusting the relative brightness of adjacent portions of the photograph.
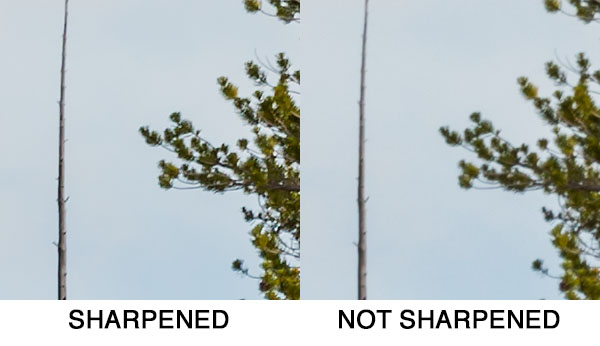
The image above is an example of a small section of a photograph.[1] It is a “100% magnification crop” of a tiny area from a much larger photograph made with a high megapixel DSLR camera. A “100% magnification crop” is an image displayed so that each pixel — or individual picture element — of the original photograph is displayed using a single pixel on the screen. (Things are a bit more complicated than that when using modern high-resolution monitors, though I’ll let that description stand for now.) 100% magnification crops let us look very closely at what is going on in photographas “at the pixel level.” In this case, the full original image from which these small examples were extracted would be equivalent to prints at a width of roughly 10-12 feet.
The right side of the example shows this tiny section of the photograph before sharpening. The left side shows the results of fairly typical sharpening. Indeed, it appears that the slight blurring of the objects in the crop has decreased, and this is especially apparent where there is a clear demarcation between light and dark areas, such as the contrast between the vertical branch on the left side and the sky behind it.
There are two main sharpening settings of interest to us:
- Amount determines the strength or magnitude of the change in brightness/contrast between adjacent light and dark areas. A small amount won’t produce much change, but with a large amount the dark areas will become noticeably (perhaps too noticeably!) darker and the adjacent light areas will become quite a bit lighter.
- Radius, usually measured in pixels (or fractions of pixels), determines the width of the area affected by the change in brightness. If the radius is many pixels wide the change in brightness between adjacent light and dark areas will occur more gradually. With a very small radius (which can be as small as a fraction of a pixel) the change happens more abruptly.
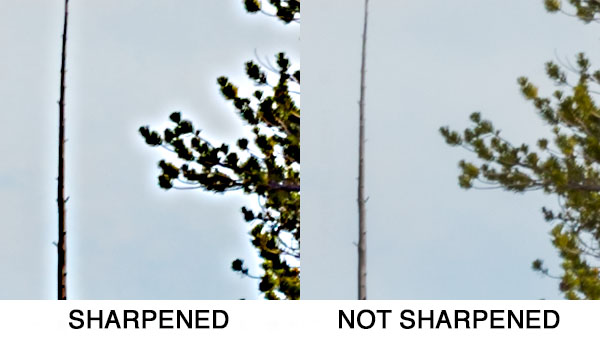
To see how this works, here is a gross example of sharpening in which very large radius and amount levels have been applied.
Here the effect is very (or should I write terribly!?) visible. The radius is many pixels wide and the amount is very high, too. It is plainly obvious that the light areas (the sky) become much lighter along the edge of the dark areas (the branches). While it may be less obvious, by comparing the sharpened and not sharpened examples you can also see that the dark areas adjacent to sky have become much darker. That ugly-looking light band around the branches is what we call a “sharpening halo” — and this is something you want to avoid!
(Accept my apology, but once you understand this you may start noticing sharpening halos in a lot of online photographs, and perhaps you’ll notice them in some prints as well!)
Broadly speaking, there are two basic approaches to adjusting radius and amount when sharpening a photograph, and most often you’ll want to apply both techniques. Each has a different goal as part of the process of optimizing your photograph, and each deals with the halo issue in a different way.
Sharpening for Detail
The type of sharpening that makes the most sense to photographers is usually that which has the effect of more clearly delineating fine details. This typically uses a rather small radius — the exact setting varies, but for very large original images it might be 1 pixel or less. A large enough amount value is used make a distinct difference in the contrast at edges. The following example, the same one that appeared first near the beginning of this article, applies an amount of 150 (quite a bit) and a radius of .7 (not very wide at all.)
The amount is enough to produce a stronger contrast at the immediate edge of contrasting areas, but with the radius so small that halos are essentially too small to see. (If you look very closely at this 100% crop you might be able to see a slight halo next to parts of the branch on the left — but this would be completely invisible in a typical display of the whole photograph, particularly as a large print.)
So, a basic rule is that we tend to increase amount for sharpening fine details and decrease radius to avoid creating visible halos. In a photograph with lots of very fine detail you might use an even higher amount and a smaller radius, while in a photograph with less fine detail you could consider reversing that. It is a bit of a balancing act, and the object is to find the best pair of settings that will optimize detail while not creating visible halos.
Sharpening for Contrast (a.k.a Clarity)
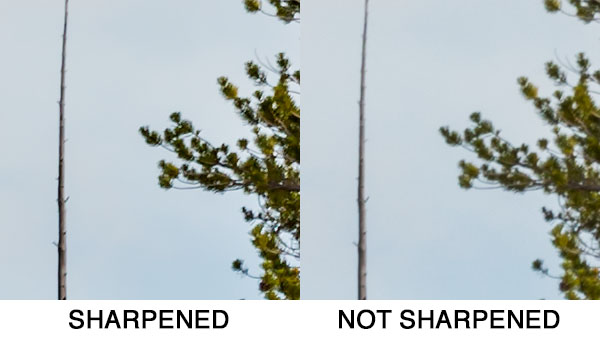
Since we recognize that sharpening is actually affecting contrast, by using somewhat different amount and radius settings we can bring increased “clarity” to the scene. (In fact, this is basically what the “clarity” slider does in Adobe software products, though it does go a bit behind this.) Here we’ll take an opposite approach to diminishing the visibility of halos — instead of making the radius very small we will make it quite large, but at the same time we’ll keep the amount rather small, too. The effect is subtle, especially in the small area shown in these crops, but it can create a striking increase in the clarity of the full image. Some describe it as “removing haze” from some scenes. In this case I will lower amount all the way to about 15, but I’ll increase the radius from a pixel or less all the way up to 50 pixels.
As I said, the difference is subtle in this small crops, but it is visible. Take a careful look at the vertical branch on the left. In terms of fine detail it is really no sharper than it was before, and it is still noticeably soft. However, it is certainly darker by comparison to the sky. Take a look at the pine needle branches on the right. Notice that overall they, too, are now darker in comparison to the sky, though no sharper. However, if you look very closely you may notice that they are darker where they are closer to sky and they have been changed less near the far right edge of the frame. (I have heard this technique described as “local contrast enhancement.”) If you are a very careful viewer, you may be able to see the subtle and relatively wide halo around the pine needle branches — compare the two images to see if you can see this difference.
A few years ago we often manually applied this form of local contrast enhancement sharpening to files in Photoshop. However today Adobe has added a “clarity” slider to their software (Lightroom and the Adobe Camera Raw module of Photoshop) which largely accomplishes the same thing, though with a bit of Adobe “special sauce” added.
Combining Sharpening Methods
Ideally we usually combine both types of sharpening — large amount/small radius for details and small amount/large radius for clarity. The following example applies both types.
Compare the two and you should be able to see that we have increased the visibility of fine detail and increased the general contrast between adjacent areas for clarity.
It is important to keep in mind that there is not one specific group of settings that will always give you perfect sharpening. The settings vary a lot depending on what you are trying to accomplish (are you after a high level of clarity or would you prefer a softer look?) and the nature of the image (is it crammed full of important small details or is it more about soft, smooth gradients?).
Is That All There Is To Sharpening?
Well, not quite. First, it takes some practice to get a feel for the right balance of amount and radius and for when to apply how much and get the effect you seek with you photograph. In addition, some photographs are complex enough that no single setting works ideally for the entire image — and techniques like selective sharpening are used to sharpen different areas of the image in varying ways. It is also possible that sharpening that is beneficial for some details will be bad in other ways, for example increasing the visibility of noise. Finally, an additional layer of sharpening may be needed if you print, especially if you print big.
Hmmm… Sounds like I may need to write a follow-up article! :-)
Questions or comments? Feel free to leave them via the comment link.
NOTES:
[1] How small, you ask? The crops shown on this page are 300 x 300 pixels — with two displayed side by side. They came from a camera that produces images that are 8688 pixels wide, or nearly 30 times wider than the crops.
© Copyright 2015 G Dan Mitchell – all rights reserved.
 G Dan Mitchell is a California photographer and visual opportunist. His book, “California’s Fall Color: A Photographer’s Guide to Autumn in the Sierra” is available from Heyday Books and Amazon.
Blog | About | Flickr | Twitter | Facebook | Google+ | 500px.com | LinkedIn | Email
All media © Copyright G Dan Mitchell and others as indicated. Any use requires advance permission from G Dan Mitchell.
Discover more from G Dan Mitchell Photography
Subscribe to get the latest posts sent to your email.


Very helpful Dan, thanks. BTW, John Ricca is coming for our first lesson this Wednesday.
Thanks, Mark — glad to hear it is useful to you! Say “hi” to John for me!