(Note: Though Canon no longer sells this lens, it is still around and may be a useful lens for photographers using DSLRs.)
Sometimes it seems like the Canon 24-105mm f/4L IS lens doesn’t get the respect it deserves. It probably doesn’t help that it is often described as a “kit lens” because Canon bundles it with some of their full frame DSLRs. Having a maximum aperture of only f/4, it lacks the f/2.8 aperture found on some of the other Canon L zooms. It uses a “telescoping” zoom design that extends the front element when the focal length changes, and some mistakenly associate this design with lower quality lenses. It certainly doesn’t have the panache of the high-end, large-aperture primes, with their big f/1.4 or f/1.2 maximum apertures, nor of the big and impressive f/2.8 L zooms, nor the exotic and equally expensive tilt/shift lenses——nor does it have their correspondingly large selling price.

In addition, like all lenses, it falls short of theoretical perfection in some ways. It exhibits barrel distortion (a bowing-out effect near the edges of the frame) at the 24mm end of the focal length range. Vignetting can be visible at f/4. Over time the lens, like others that use this design, can develop “zoom creep,” which may allow the lens to extend under its own weight when it is pointed down.
But enough of that.
The fact is that this lens does a number of things very well, and that it can do some things that virtually none of the alternatives can do at all or can do as well. If the things it does well are important in your photography, as they often are in mine, the 24-105mm lens starts to look very attractive or even downright indispensable. Let me start my exploration of what this lens can do, and do well, by using some photographs I made on a 2012 visit to Portland, Oregon.
Because photography was only one of several objectives of this trip, and because I was flying and I wanted to travel light, I made several specific decisions about the photography equipment that I would take. It was a foregone conclusion that I was not going to take the full kit on this trip. Not only would I not need all of that gear, but it wasn’t going to be necessary for the photography I anticipated. I made a decision to forego carrying a tripod. I decided that I wanted to fit all of my gear in a small (for me) Crumpler 6 Million Dollar Home shoulder bag. I first considered carrying only a small set of three prime lenses for my Canon 5D Mark II, but the more I thought about it the more I was convinced that the flexibility of zooms would be more useful – so I carried three: the Canon EF 17-40mm f/4 L, the Canon 24-105mm f/4L IS, and the Canon EF 70-200mm f/4L IS, along with an extra battery.
Portland is a city of gardens: the extensive rose garden at Washington Park, the famous Japanese Garden very close by, the compact and intimate Lan Su Chinese Garden, the Pittock Mansion grounds, and many others. While photographing gardens was not my initial plan, their attractions proved irresistible, and it turned out that I photographed several of them.
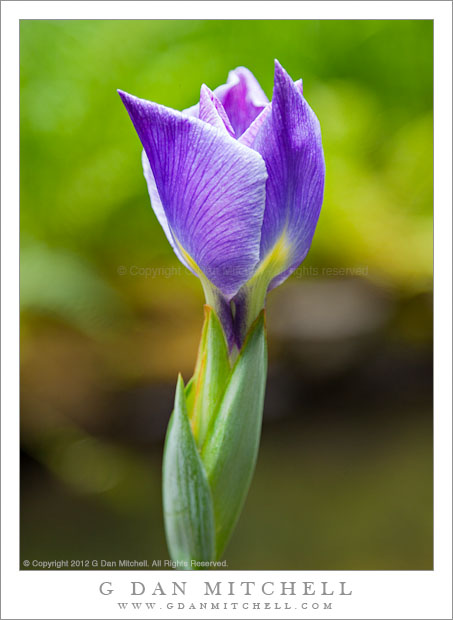
The photograph of the emerging iris blossom is my first example of a photograph made with the 24-105mm lens. Working in fairly deep shade, there was not a lot of light. I wanted a close view of the flower illuminated from above and with the graceful curve of its stem, and I wanted to isolate it to some degree from the very busy and complex background of the surrounding garden. I chose to shoot at f/4, the largest aperture on this lens, in order to deal with the low light, but more importantly to blur the background. I shot at nearly the longest focal length of the lens, both to increase the “bokeh” background blur and to narrow down the area in that distant background so that I would have more control over its placement behind the flower. I worked very close, near the minimum focusing distance of the lens. I increased the ISO to 200. As a result of these decisions, I found myself shooting at a shutter speed of 1/45 second, much slower than the proverbial “one-over-the-focal-length” shutter speed.
In the end, the fact that I could make this photograph in these conditions was due to a combination of features of this lens: the availability of the 100mm+ focal length (to isolate the flower and control the background), image-stabilization (so that I could effectively hand hold the camera at 1/45 second),and the close-focusing ability of the lens. Some might suggest that a larger-aperture prime (such as my Canon 135mm f/2.0L) would have been useful here – but I wouldn’t have wanted to shoot at a larger aperture as the flower itself required the DOF of the f/4 aperture. (Note the softness at the base of the stem below the flower.) And that background is quite soft enough as is. At the same time, the lens supplies plenty of resolution to render the fine details of the blossom.

A day or two earlier we had been wandering around downtown Portland. Having already visited Stumptown Coffee (twice!) and picked up our pink box of Voodoo Doughnuts (yum!), we were looking for other attractions. We walked north into Portland’s Chinatown, where we soon found the Lan Su Chinese Garden, took a peek through the entry gate, and decide to buy tickets and go inside.
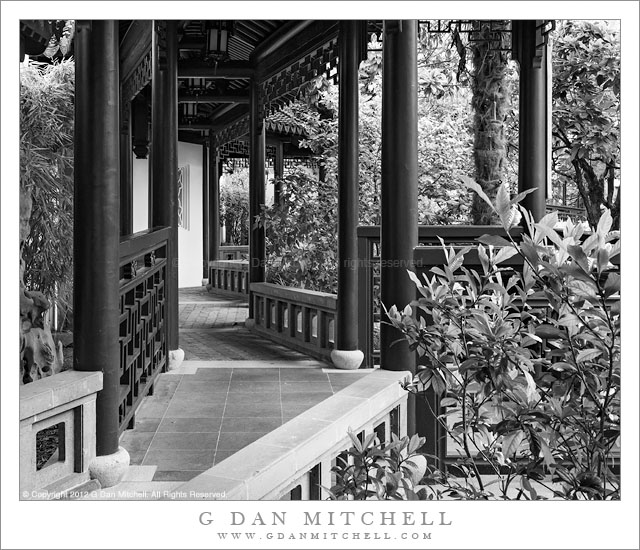
The garden is a beautiful surprise, located in an otherwise unremarkable urban area, hidden behind walls, and occupying a small square downtown block. I made few photographs, mostly enjoying the quiet tranquility of the place and thinking about the way its many elements worked together. I slowly worked my way around the garden in a clockwise direction, and as I started down the east side I saw this view along the zigzagging walkway, with beautiful shaded light filtering through the garden’s plants. I moved forward and backward, and left and right, until I found an arrangement of the columns, low walls, walkway, white walls, and plants that I liked. I knew that getting all of this in focus would be a challenge since there was quite a bit of distance between the very close leaves (at far right) and the far end of the walkway, so I settled on an aperture of f/16 for its larger DOF. My ability to move once I found this point of view was essentially non-existent in this compact and densely filled space, and when I framed the scene from this spot I ended up shooting at 45mm. Exposure was going to be tricky because the scene include a few specks of direct sun on vegetation and interesting details in the black-painted shadows under the roof at upper left. I went a bit past the usual expose-to-the-right exposure, figuring that I could reclaim a few highlights in post if necessary and knowing that I would have to work in post to pull up some detail from those shadows. I increased ISO to 400, which is fine on the 5D2 – but I didn’t really want to go higher for this kind of shot. Having made all of those necessary decisions, the shutter speed was essentially pre-determined… and it ended up being 1/10 second!
At 1/10 second at 45mm, hand holding the shot would be a serious challenge with a non-IS lens. It isn’t quite impossible, but getting a photograph with the level of detail resolution that I wanted in this case would have been very tough. This was really a shot that would normally require a tripod. (And, if I had used a tripod, I would most likely also have exposure-bracketed as a way of dealing with the huge dynamic range.) But I had no tripod, so 1/10 second it would be. And, once again, anyone who is tempted to think that a large aperture prime would have been useful here needs to remember that this shot required a very small aperture – so there would have been no advantage at all from having a f/1.4 lens.
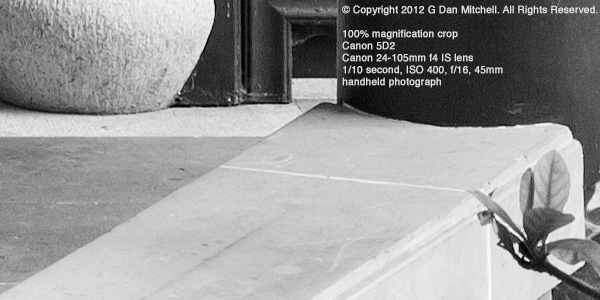
And how did the lens handle these challenges? Here is a 100% magnification crop of the final image:

Not bad for a 1/10 second handheld shot! Keep in mind that the 100% crop presented here is equivalent to looking at a small section from a print that would be five feet or more across. Once again, it is hard to imagine how I would have made this photograph with a different lens, given all of the circumstances surrounding it. I was able to precisely frame from a very limited camera position by zooming to 45mm. Image stabilization allowed me to work at 1/10 second and shoot at f/16 in low light to obtain the necessary large DOF. And the resolution of the image is excellent – certainly enough to make a very large print.
And what a about the barrel/pincushion distortion that this lens can exhibit? Clearly, this is a photograph that would reveal that problem, given the many parallel vertical lines in the image, some of which are near the frame edges. (It is cropped, but mostly from the left side.) Here, current post-processing software provides that solution. In this case I used Adobe Photoshop CS6, where Adobe Camera Raw (ACR) can automatically compensate for the characteristics of the lens. I don’t always use this feature, but when I need to – as I did in this photograph – it works beautifully, and it does not degrade the image quality in any significant way that I can see. Here I let ACR correct for barrel/pincushion distortion – to make ensure that those straight verticals are actually straight – and I also had to use it to level the image. As careful as I (thought I) was at the time of the exposure, I had not held the camera exactly level. In addition, I applied a mild compensation for perspective convergence.
So, what would I have needed in order to make this photograph if I had not had the 24-105mm lens and was unwilling to correct in post? Here is the list: a 45mm tilt/shift prime lens and a tripod and prior knowledge that this was exactly the photograph that I wanted to make. Or perhaps a 35mm prime, focus and exposure bracketed—with perspective correction and cropping in post. And how would the result have been different? Probably not in any way that you could see. (Note that I’m not downplaying the importance of tripods – which I almost always use – or of tilt/shift lenses – which can be tremendously useful in certain situations.)
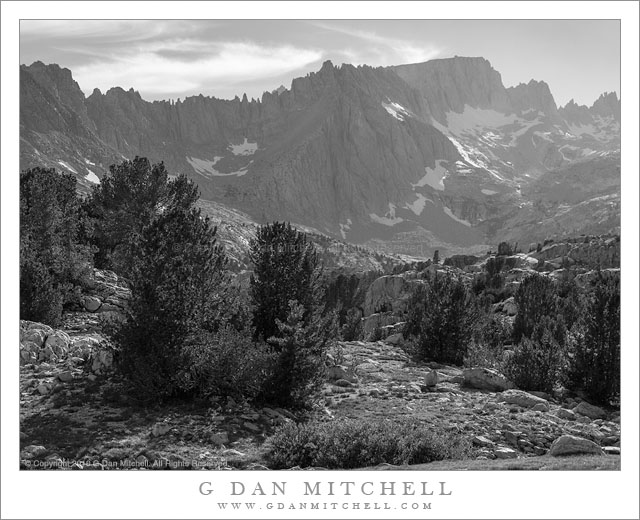
One more thing before I close this article. When used on a full-frame camera, the 24-105mm focal length range is very useful. 24mm is well into the wide-angle range, and some might say it gets you to the start of the ultra-wide range. While I occasionally find shorter focal lengths to be useful, most of the time 24mm is wide enough. At the long end, 105mm is also a very useful focal length. It gives you what many regard as the “portrait” short telephoto lengths, and it long enough to significantly narrow the angle of view and/or bring a subject “closer” to you. While I often carry lenses that cover a focal length range from 16mm to 400mm (and longer with TCs), I have also been known to go out equipped with only this lens. A few years ago I did a week-long backpack trip in a remote part of the southern Sierra Nevada range, and because we were covering some difficult terrain I minimized my camera equipment – I took the 5D2 body, the 17-40mm and 24-105mm lenses, and a small tripod. At the end of the week I was surprised (and somewhat chagrined!) to find that I had not used the 17-40 at all – the 24-105 had let me cover every shot that I needed to make.

Let me end with a couple of summary conclusions:
- Despite what some will tell you, the 24-105mm IS lens is not only a tremendously useful lens but it is also a very good lens for a wide range of photography. In some situations it can be the most flexible and most appropriate choice available, and it can produce excellent results.
- Be careful about judging lenses superficially, based on what you read in this or that photography forum. Instead, think critically about your own photography, how you shoot and what you do with your photographs, and consider all equipment options rationally and objectively with your own needs in mind.
You might also find this article interesting and relevant:
You can purchase the Canon 24-105mm f/4L IS at B&H through links at this website and help support the blog. If this article helped you make a purchase decision, please consider supporting the blog by purchasing from site-sponsor B&H. Thanks!
 G Dan Mitchell is a California photographer and visual opportunist. His book, “California’s Fall Color: A Photographer’s Guide to Autumn in the Sierra” is available from Heyday Books and Amazon.
Blog | About | Flickr | Twitter | Facebook | Google+ | 500px.com | LinkedIn | Email
All media © Copyright G Dan Mitchell and others as indicated. Any use requires advance permission from G Dan Mitchell.
Discover more from G Dan Mitchell Photography
Subscribe to get the latest posts sent to your email.

I am really frustrated with mine. Any time I shoot under the rule (1/focal length for shutter speed) the shots are not sharp. I was under the impression IS gives you a couple stops. I just picked up a 70-200mm f4 IS and can shoot 1/50 at 200mm and they are all crystal clear. Am I missing something or is there a chance my IS is not functioning? I don’t have the steadiest of hands, and blamed that, but the 70-200mm has me thinking its my lens not my hands. Input please!?!?
Jarred:
If I had an issue like that I would first want to try to isolate the source of the softness. If you have a tripod it would be a good idea to try some shots with that so that you can completely eliminate camera motion as the source of your blur. Ideally, use a remote release cable and either mirror lock-up or live view mode to make some carefully focused shots. Turn IS off. If your camera has live view, try turning AF off on the lens and manually focusing at 10x magnification. Shoot a relatively flat subject using a middle aperture such as f/8.
If this doesn’t result in a sharp photograph, either something else is vibrating the camera or else you might have a focusing issue with the lens or camera, or possibly the lens is simply out of adjustment. I had an issue like this with my 24-105 some years back – it was soft on one side of the frame – and I had to send it in for adjustment.
Once you determine that the lens is capable of producing a sharp image, the next step is to check AF performances. If the first test on the tripod does provide sharp photographs you can repeat it using AF instead of manual focus. Again using the tripod and the remote release, now turn AF on and leave IS off. Point that camera at a subject that is in a plane parallel to the sensor and allow the AF system to set focus. You might try more than one shot to check for focus consistency. If the camera previously focused well when you worked manually, but not does not when you use AF… you may have an AF adjustment problem with the lens and/or camera.
If the camera AF’s correctly, then you can try the test using IS to make sure that something isn’t wrong there. That seems unlikely, but it can’t be ruled out as a possibility. You might also want to try shooting handheld, perhaps with the same settings that worked well for you when the camera was on the tripod. This could reveal something in your technique that could cause the problem – though that doesn’t seem too likely if you get sharp images with the longer lens.
Good luck sorting this out!
Dan
Tripod is fine. I use the lens a lot, and as long as my shutter speed is at least 1/focal length, the shots are great. Awesomely sharp. I just thought that the IS was supposed to buy you a couple stops so I could shoot 1/50 at 105mm and still get a sharp shot.
In normal shooting you should be able to handhold the camera/lens at 2-3 stops longer shutter speed. If you are getting very sharp results on the tripod but not when handholding the camera, there aren’t too many possibilities left to consider. One is always that there is something about how you are handling the camera, though your note that you don’t have the issue with the 70-200 seems to make that less likely. (Still worth trying some very careful handheld shots to make sure.) Two is the possibility that there is a problem with the function of the IS system on this lens or even that it is not working. If you think the lens is not working correctly, send it in to Canon for inspection and repair.
Do keep in mind that the IS system does have some outer limits to what it can cover, especially at the very wide end. As I understand it, these systems compensate for vibration in certain typical frequency ranges that sort of align with specific shutter speed ranges. So, if I’m not mistaken, you might get, for example, a bit more advantage at the long end (where your three stops slower could be about 1/15 second or so) than at the widest end (where it would be 1/3 second). Even IS isn’t going to solve vibration problems at that long of a shutter speed.
Good luck,
Dan
Great tip! I’ll give it a try thanks!
I think that, after a certain point, sharpness is for the photographer, not the audience. I love to look at MY very sharp images, like those from the 135 f/2, but I don’t care to be that critical of others’ images and I know the bride couldn’t care less as long as she looks beautiful. This is how I feel about the 24-105; it is sharp,but because the 24-70ii is sharper, I lust for it. And when the 24-70iii is released, I’ll lust for that too, although I’ll probably be too old to perform.
In our house, I’m the one who sharpens the knives; it doesn’t bother my wife that she can’t perform surgery with our cutlery.
I use this lens probably 85-90 percent of the time on my Canon 5D Mark II body. In fact, it basically stays on the 5D in my Lowepro backpack ready at a seconds notice. This lens keeps on surprising me on its sharpness (resolution) when I blow up an image in post thinking what I see is a large dust spot in the sky and turns out to be a well defined plane or bird. I have see a Canon patent on a version II of this lens but I don’t know, this lens works for me.
I found the 24-105 extremely rugged too. Mine once dropped 4ft on a concrete floor, it then rolled some 6ft through sand and rocks, before ending up some 2ft deep in the water of a swamp lake. I took it out, let it dry for two days, cleaned it and it still works as if it was new (except for a few scratches).
Oh, why it dropped? Someone stole it from my camera (shooting with one camera, second on my back), but I of course felt the weight change, turned around and went for the thief. During the short struggle the lens dropped and the guy ran.
I have owned and used the 24-70 f/2.8 and 24-105 f/4 for years. In my experience the 24-105 is sharper and naturally more versatile. I eventually sold my 24-70 in favor of the 24-105, and I now use the 24-105 for 50% or more of my photography. The barreling is trivial to correct in Lightroom.
Dan,
Thank you for being an inspiration of continued excellent work, and a voice of reason in the photographic community.
Great imagery does all the speaking, where forum minutia, magic, and 3D effect fail. Carry on good sir!
I had the 17-40L f/4 and was not thrilled with its images; got this 24-105L f/4 and love it! The images are smoother and have a better look.