Updated August 13, 2015 to add a second dynamic range adjustment example.
Ongoing development and refinement of digital camera technology continues to improve cameras and the technical quality of the images they produce. Color accuracy improves, dynamic range expands, sensor resolution increases, AF accuracy gets better, and so on.
The Canon EOS 5Ds and the Canon EOS 5Ds R continue this process. Their most notable feature is the 50.6 megapixel (MP) sensor, currently the highest sensor photo site density available on full frame digital cameras. (Nikon and Sony both produce 36MP sensor cameras using Sony sensors, and Sony has introduced a camera with a 42MP sensor. Note that the differences between 36MP, 42MP, and 50.6MP are less than you might expect.)
When it comes to dynamic range — the ability of the sensor to record a wide range of luminosity levels from very bright to quite dark in a single exposure — Sony is the current champion, and cameras using their sensors have the largest available dynamic range among comparable cameras. (Some MF cameras have more dynamic range capability than any current full frame camera. )
(All current digital cameras capture images with more dynamic range than we can display on monitors or in prints — the display media cannot keep up with the capture technology. Consequently, the primary advantage of greater dynamic range comes in post-production, where the photographer will find more useful scene data in darker areas that can be “pushed” or otherwise recovered while maintaining useful image quality.)
If you can get more dynamic range without giving up anything else, there is no reason not to have it. In marginal situations, that extra bit of dynamic range might enable you to get a bit more image data in a single exposure, while a photographer with a camera providing less dynamic range is a bit more likely to have to use exposure bracketing or HDR techniques (which combine multiple images in post-production), use a graduated neutral density filter, or possibly find ways to suppress noise in shadow areas of scenes with very wide dynamic range. That said, all current high quality digital cameras capture a wide dynamic range — much larger, for example, that was possible with typical film media. (Note, however, that no currently available full frame camera can capture in a single exposure the largest dynamic range scenes that you may encounter.)
With all of that in mind, I thought I’d share a couple examples of files from the Canon 5Ds R that have been pushed quite a bit.
First Example
The first scene (photographed with the Canon EOS 5Ds R and the Canon EF 24-70mm f/2.8L II lens) included one of the classic dynamic range challenges — bright sunlit sky and sparkling pine needles provide the brightest tones, while a group of backlit trees provide much darker areas in the scene. When I encounter a scene like this one, even if I’m certain that I can make a single exposure work, I often bracket my exposure “just in case” and to have more image data than I might actually need. To bracket means to capture a sequence of exposures that are optimized for different areas of luminosity. In this case I made five exposures, varying the shutter speed by 2/3 stop each time — the longest was 1/50 second (nice shadow detail but blown out highlights), and the shortest was 1/320 second (no blown out sky, but lots of very black areas in the shadows.) Here the set of original raw file images:

It turned out that the middle image provided a good exposure, from which I could create a fine photograph in post — pulling the highlights back a bit and pushing the darkest shadows enough. However, for the purpose of this example I am going to work with the darkest exposure, the one using the shortest exposure at 1/320 second. The following shows that image opened in Adobe Camera Raw (ACR) for initial post-processing.
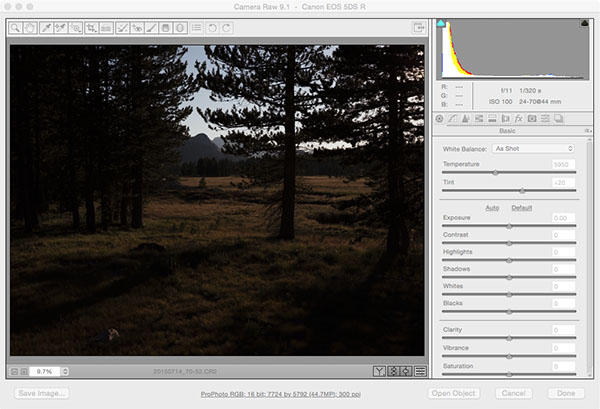
(Note that the design of this website automatically downsizes some images. To see the full size images as uploaded, please click on the images to open them in a new window or tab.)
This exposure is darker than necessary, even for the brightest sky tones. The right end of the histogram curve falls short of the right side of the display, so there was still a bit of headroom for bright tones. Much of the scene is black or near black, including the shaded sides of the trees and their darkest foreground shadows.
I made some rather radical adjustments to the image in ACR as follows.
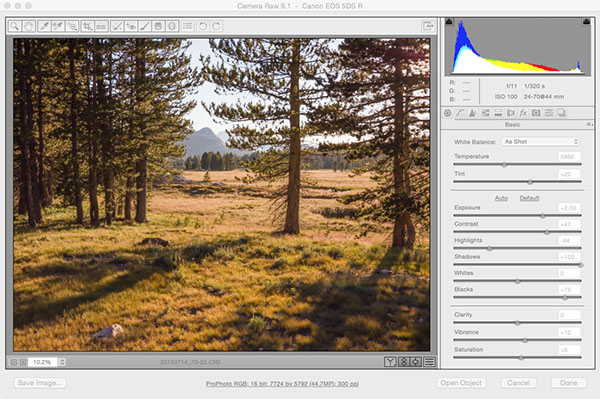
The overall quality of the scene is much improved, but what changes were necessary to get there?
- Exposure was pushed to +2.00
- Contrast was increased to +47
- Highlights was reduced to -44 to compensate for the other increases and avoid blown highlights
- Shadows was raised all the way to +100
- Blacks was raised to +75
- Small adjustments were made to increase Vibrance to +12 and Saturation to +6.
- Noise reduction was increased: Luminosity to 50 and Chroma to 25
I opened the converted file in Photoshop and extracted a 600 pixel x 450 pixel 100% magnification crop from a dark area of the trees on the left side of the image, producing the following example.
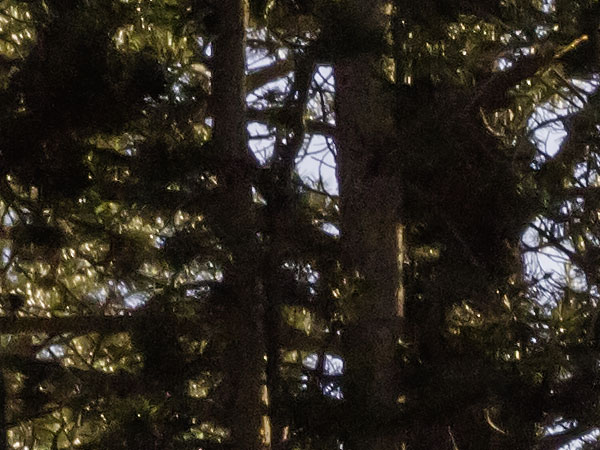
Almost all of this area would have been black in the original raw file conversion, with the exception of where sky peeks through the branches. At this magnification you can see some noise if you look carefully into the darkest and near-dark areas, but it is minimal. I am certain that it would not be an issue even in a very large print. (And keep in mind that the exposure that I would actually use for making a print of this scene would be the one with a 1 1/3 stop longer exposure, which does not require such radical pushing.)
Second Example
In early August 2015 I spent a few days at a wonderful back-country location in the eastern Sierra Nevada, backpacking in and setting up a base camp with some friends. On the second evening we were surprised to see wildfire smoke appear above the Sierra crest to our west, apparently from a fire on the other side of the range.
The smoke turns the light a wild bronze/orange color, and when I saw the strangely colored spectral reflections on the surface of the lake I decided to photograph the effect. The scene was very challenging to expose, as it contained both the blindingly bright disk of the sun itself and backlit rocks whose camera-facing sides were in quite deep shadows, especially right down near the waterline.
What follows is not meant to be a beautiful photographic interpretation or a final post-processing of the image. Instead I simply took one of these very dark frames and quickly ran it through a post-processing workflow to quickly bring light to the shadows so that I could see the effect on noise and dynamic range.
Here is what the original raw file looked like when opened in Adobe Camera Raw (ACR) without any modifications.
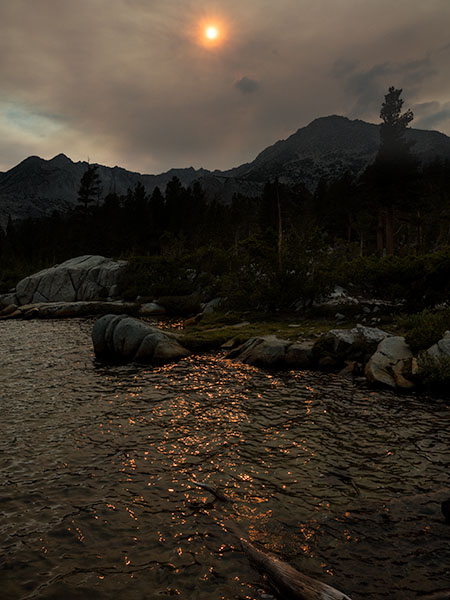
And here is a screenshot of the settings for this image as seen above.
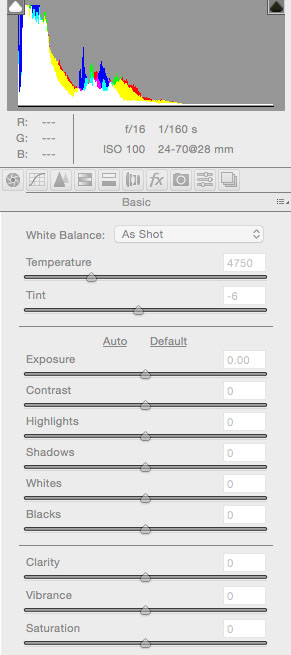
The darkest areas in the original image, such as those under shaded rocks along the waterline, had “L” Lab values of 0 and 1 for the most part, which means that luminosity was equivalent to complete black or the very lowest non-black value. The histogram display also shows this where the values bump up against the left edge of the display. Here is a 100% magnification crop of one of the very darkest areas — it is so dark that you may not quite be able to see it in the above images. It is one of those black shaded areas beneath the waterline rocks near the right edge of the frame.
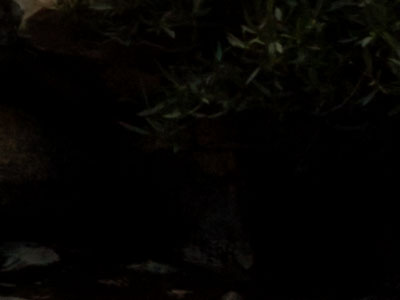
Yes, that is very dark, and the darkest areas essentially have a luminosity of zero.
Now let’s see what we can get out of this file. First, here is where we’ll end up after applying some radical adjustments in ACR.
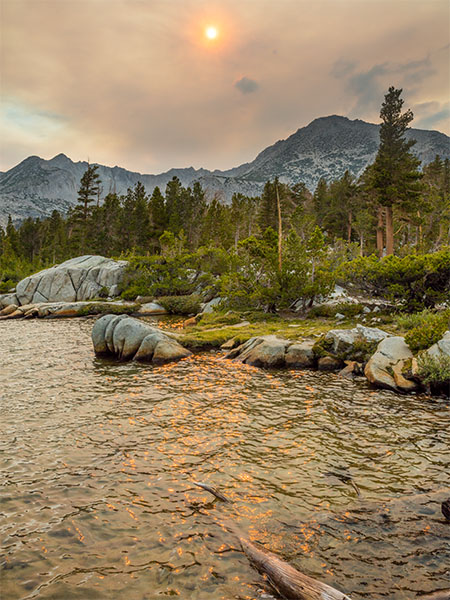
Here is a screenshot of the ACR adjustments that produced this modification of the original image.
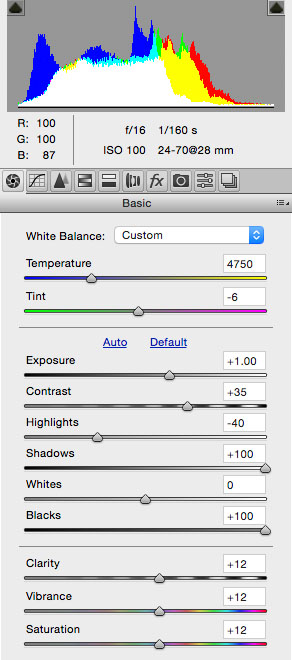
Because the image of the sun itself is within the frame, I had to be careful to not increase the light tones much at all. This was also important to keep the texture of the smoke cloud above the mountain. This meant that I limited my increase of “exposure” to +1.00, and even then I had to reduce highlights to -40 to control the very bright sun and keep the clouds from becoming too light. This left the shadows still very dark, so I raised both “Blacks” and “Shadows” to their maximum possible settings in ACR of +100. I increased contrast to compensate for some resulting compression of mid tones. (The clarity, vibrance, and saturation settings are not particularly important to the dynamic range adjustments.)
Those areas underneath the waterline rocks near the far right still hold some fully black luminosity levels, as they should, but a great deal of detail has been recovered. Here is a 100% crop of the same area shown in the earlier nearly black crop.
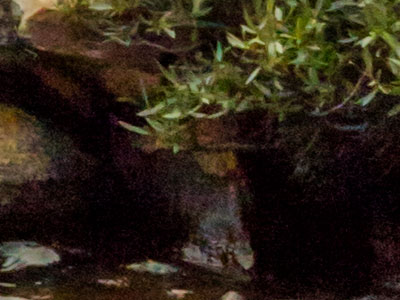
Obviously, this section is no longer completely black. The leaves are plainly visible and have good color and the less-black rocks now have revealed texture, color, and detail. Noise is certainly visible in this radically adjusted image, mostly luminosity noise but also a bit of chroma (or color) noise. What about that noise? There are a few things to say about this.
- As mentioned earlier, some other camera systems would potentially have somewhat less visible noise, including the Sony/Nikon full frame cameras and several medium format cameras/backs.
- However, while we can see it on the screen in a 100% magnification crop, this noise would be entirely invisible in a print, even a rather large one. Here we are looking at a section of an image that would be less than 1.5 inches wide in a print with a 30 inch width.
- If we want to reduce the noise further it is a simple matter to apply some basic noise reduction. Here is a modification of the 100% crop shown above, but now with some luminosity and chroma noise reduction and a bit of sharpening applied.
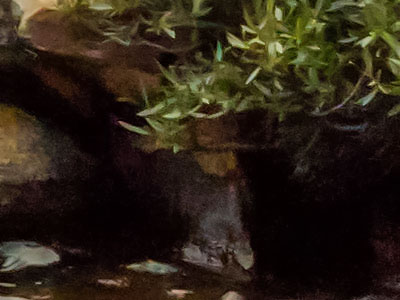
If you are used to looking at 100% crops and you consider the nature of the original source image, this tiny worst-case section of the radically adjusted print starts to look quite good — though some printers might prefer the previous image with a bit more noise, knowing that it will not be visible in their print. This is a subjective matter, but the results will be good either way. As an experienced printer, I can guarantee that you would see no problems at all here in a large print.
What does it mean?
I’ve been around enough discussions of dynamic range and various brands’ abilities in this area to know that this issue is both subjective and subject to what might be termed “camera politics.” With that in mind, there is probably nothing I can write that everyone will agree with, and what we see here will be viewed from a range of subjective points of view.
What do we know? We know that it is possible to push files like these in the way I pushed them and get the results shown here. ;-) We know that there are other cameras using Sony sensors that can, from the evidence I have seen, produce an even larger dynamic range. If having the very largest possible dynamic range is your only or most important criterion for camera selection, it may be important to you to consider a camera with one of those Sony sensors. If your selection criteria are a bit broader and you select these Canon cameras, you will find that they produce excellent files with a large dynamic range that include image data that can be pushed a great deal in post and still give you an excellent final image. (And, no matter what camera/sensor you use, you will still encounter some situations where no camera’s dynamic range is enough.)
All that I’ll add to that for right now is that I am very happy with the performance shown it these examples, and I don’t expect to be limited in any way by the performance of this sensor.
5Ds and 5Ds R Articles:
- The Canon EOS 5Ds R — Autofocus Torture Test
- The Canon EOS 5Ds R — Dynamic Range Examples
- The Canon EOS 5Ds R — A Resolution Example
- Canon 5DS R: A Printing Test
- Looking at Canon 5Ds RAW Files: Noise and Dynamic Range.
- Canon EOS 5Ds and 5Ds R Release Near?
- Canon 5Ds and 5Ds R Pre-orders Available
All images © Copyright 2015 G Dan Mitchell – all rights reserved.
Links in this article go to site-sponsor B&H photography with whom I have an affiliate relationship. When you purchase through these links your price is the same, but a small percentage is returned to help support this website. Mentioned in this article:
- Canon EF 24-70mm f/2.8L II lens
- Canon EOS 5Ds DSRL (with anti-alias filtering)
- Canon EOS 5Ds R DSLR (without until-alias filtering)
The Sony and Nikon cameras referred to in this article:
- Nikon D810 — 36MP full frame DSLR
- Sony A7R — 36MP full frame mirrorless camera
- Sony A7RII — 42MP full frame mirrorless camera (currently available for pre-order with shipping in early August)
 G Dan Mitchell is a California photographer and visual opportunist. His book, “California’s Fall Color: A Photographer’s Guide to Autumn in the Sierra” is available from Heyday Books and Amazon.
Blog | About | Flickr | Twitter | Facebook | Google+ | 500px.com | LinkedIn | Email
All media © Copyright G Dan Mitchell and others as indicated. Any use requires advance permission from G Dan Mitchell.
Discover more from G Dan Mitchell Photography
Subscribe to get the latest posts sent to your email.

Hi Dan, congratulations for you great work! I found this article while looking for fresh reviews about the 5DSR (that I just bought coming from a 5DII too) and regarding the second example, I couldn’t resist to ask you why you didn’t expose using the ETTR (exposing to the right) technique.. I mean, without a real risk to blown-out the highlights this seems to me like the perfect case..
Good question, and I can see why you would ask when looking at an exposure that seems to have been “exposed to the left” and then brought back in post. But it actually was exposed to the right!
The real meaning on the “expose to the right” (ETTR) concept is based on placing the brightest tones in the scene as far to the right (or bright) edge of the histogram as possible without blowing them out. In this photograph, the “right” is produced by the very bright highlights in the distant clouds, and I wanted to make sure that they were not blown out. (I very much dislike the detail-free effect of blown out clouds.) The issue here was that when producing an exposure that pushed those clouds about as far to the right as possible I ended up with rather dark shadows that needed boosting in post.
Previously, with cameras whose dynamic range was more limited, we only had a few says of dealing with this. We might make multiple exposure, with some optimized for highlights and other for shadows, and then blend them in post. Or we might decide to sacrifice either highlight or shadow detail. But in this case I was able to save the highlights (by exposing them to the right) and keep the shadows, by bringing them back in post.
Dan
Thanks for your timely article, Dan. Michael Frye recently advised that I consider the Sony rather than upgrade to the Canon 5Ds R, but I’ve heard the menu system for the Sony is just horrible. I also really dislike the digital viewfinder, although I heard that you get used to it. That said, I’m looking for better dynamic range than my Canon 5D Mark II and images that can hold detail when enlarged to oversized prints. I’m still leaning toward the Canon…
Charlotte, thanks for posting.
The fact that you know a large number of photographers who use every imaginable brand and model of camera is a reminder that great photography (like yours and Michael’s and so on) can be done with any of these camera systems — Sony, Canon, Nikon, and several others.
With that in mind, I am pretty convinced that switching among such brands for improvements in the quality of photographs is rarely the best decision. There is an element of “the grass is greener on the other side of the fence,” and after the switch things turn out to be less different than we might have expected. Sometimes the other product is actually better in at least some ways — for example, it is true that the Sony sensor used in Sony and Nikon cameras can handle a bit more dynamic range. Yet… one has to look at the whole package: the negatives of making a switch and learning a new interface, the questions of lens compatibility for ones own photography, the magnitude and significance of the quality difference, and much more.
As you know, I have the greatest respect for Michael, who is not only a great photographer and very knowledgable about this stuff but also a friend, so you should take seriously what he says about his experience with the Sony system. Yet, my experience with the 5DsR, especially for the sort of photography that you do, has been almost[1] entirely positive and mostly very positive. I don’t feel the least bit limited in terms of image quality, including the aspects of dynamic range and noise. The camera size issue is real, but less significant when I look at the small impact it makes on my entire kit of lenses, tripod, and so forth.
I also moved from the 5DII to the 5DsR. I tend to be conservative about upgrading cameras — I’m not one to jump from camera to camera as new models come out. (Michael is, from what I’ve seen, the same way — which, confusingly enough, gives greater weight to his decision to switch! ;-) When it comes to the megapixel count, I feel that 22MP is enough for most people, but that for landscape photography that will be printed large there are advantages to having more. Yet I also feel that the differences tend to be relatively insignificant until the number of megapixels roughly doubles. And the 5DsR more than doubles that of the 5DII.
There is one other positive to this switch that I discovered, and it is counter to what some people probably hope for when they get a new camera. Oddly, the 5DsR feels very familiar to this 5DII user — and I hardly think about it being a “new” camera at all when I photograph. From my perspective that is a good thing!
In any case, there are lots of interesting and compelling options out there right now — from Sony, Canon, Nikon, and others. Good luck!
Dan
[1] Since I wrote “almost entirely positive,” I should elaborate. No camera is perfect and there are a few small things about the 5DsR that I wish were different:
Like I said, pretty minor stuff. :-)