I have shot a few thousand frames with my Canon EOS 5D Mark II now. I’ve photographed a variety of subjects including a few days of rainy professional bicycle stage racing, several landscape subjects, and a productive evening of night photography with The Nocturnes at Mare Island Naval Shipyard. I plan to eventually write up something resembling a comprehensive report on my experience, but so far there hasn’t been time. With that in mind, here is a short piece on one new feature in this camera and my experience with it.
Among the photographic subjects that interest me is night photography, often of urban and industrial subjects, but occasionally of wild landscapes also. There are a number challenges to shooting in very dark conditions, but one of the more interesting is getting good focus in conditions where auto-focus often can’t find a target to work with and where it is too dark to manually focus. (I wrote a bit about this in a recent piece: “Hints for Night Photography.”)
During my last Mare Island shoot I discovered that Live View provides a very useful option for focusing at night. On the 5D II, the Live View mode raises the mirror and lets you look at a “live view” of your scene on the rear LCD. In very dim light the trick is to find something that might provide a manual focus target, center the rectangular LCD indicator over that “something,” zoom in to 10x magnification on this object, and then focus manually on the LCD image. I was amazed at the low light levels at which this works quite well. A vertical line in a wall, the edge of a window, a bit of cyclone fence, or a small light – any of these become decent manual focus targets using Live View.
When I started my Mare Island evening shoot, using this camera for the first time at night, I mostly did things the old fashioned way. By the end of the evening, in any very dim situation I was successfully and much more quickly getting good focus using Live View. I’m confident that night photographers are going to find that this is a very powerful and useful feature.
Earlier today I saw a post in which the author stated that correcting for perspective in post-processing would lead to serious problems:
There is quite a bit of loss in image definition if you do a significant amount of correction for converging verticals in an image editor. You can get far better results with a view camera or a tilt/shift lens. If you only photograph for the web, then maybe the image editor approach is ok, but for reasonably large prints?
While that point of view is widely held and often repeated, in my experience a blanket statement like this is not totally correct – it may come down to the definition of “significant.” I find that in many cases the degradation of the image is so small as to be insignificant or even invisible at 100% magnification, and it is most often completely invisible even in fairly good size prints. (This is not to suggest that those making severe corrections, in architectural photography for example, would not be better served by using a tilt/shift DSLR lens or a MF or LF system.)
Rather than just accepting statements like this, I like to test them. In the past I’ve tested and written about the option of correcting for lens distortions in post- processing: A Test: Correcting Lens Distortion in Post Processing. Here I want to extend this concept to using post-processing techniques for the correction of perspective distortion and for leveling the image.
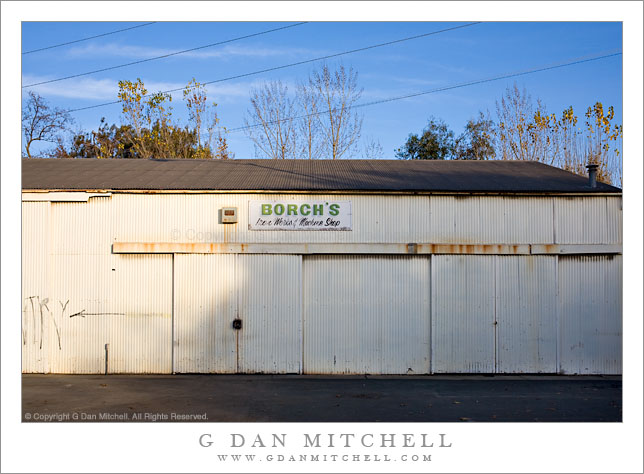
The photograph I’ll use was shot handheld using a full-frame Canon 5D with the EF 35mm f/2 lens, one of my favorites for street photography. First a small version of the final photograph:
Yup, that’s what happens when you shoot street and shoot handheld. ;-)
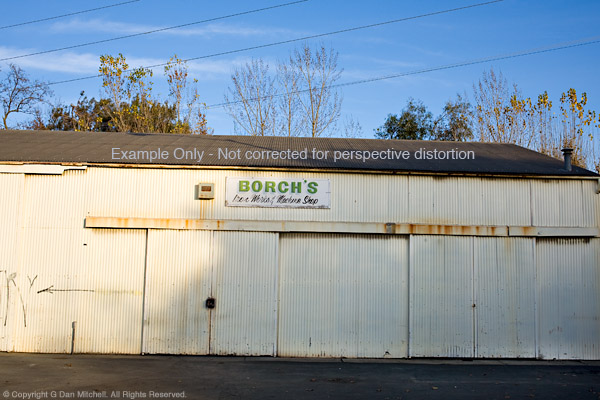
In this example we can clearly see several problems that need fixing. First, the image is not level – it tilts down to the right. Second, the vertical lines begin to converge toward the top of the image. Third, since the camera’s sensor was not perfectly parallel to the building wall, the right side of the building recedes and gets smaller as the horizontal lines become closer together toward the right edge.
In my view, the uncorrected version of this photograph is not usable. On the other hand, I’m not likely to start doing street photography with a tripod and a tilt shift lens any time soon! Correction in post seems to be a reasonable option. (And, to cut to the chase, the corrected version seen above really does make a nice print.)
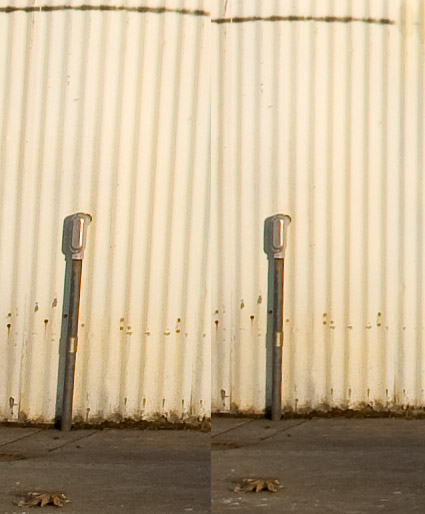
The next image includes two versions of roughly the same section of the photograph at 100% magnification. The crops come from the lower left area of the full image and include the conduit on the wall in the area in full sun. I could have used a section from all the way in the corner, but given the low contrast in that area the difference between the samples would be even harder to see – so I’ll stick with the section where the conduit provides a more visible contrast and frame of reference. Depending on your monitor, this resolution is equivalent to looking at a small section from a print that would be perhaps 50″ or 60″ wide. (Hint: that would be a very big print for a DSLR original – significantly larger than almost anyone ever produces! Made many 60″ x 40″ prints recently?)
I believe that if you know what to look for and you inspect this 100% crop very closely you can detect a small difference in the “sharpness” of the two photographs – but it is quite subtle even when viewed at 100%. In practical terms, however, this tiny effect that is just barely visible under close inspection at 100% in side-by-side comparisons on the screen is entirely insignificant in a print. Even with a very close inspection it would be quite invisible in a print of, say, 18″ x 24″ and probably even larger. Bottom line: Both would produce very sharp prints at very large sizes and essentially no one would comment that one is sharper than the other… though quite a few might notice that the corrected image looks a whole lot less distorted in the spatial sense.
Note: Article text edited/updated for clarity on 4/27/13.
This reinforces my belief that any degradation to the image quality that occurs when lens distortion, perspective, and/or horizontal level are corrected carefully during the post-processing stage can be very minimal and in the majority of situations will be invisible in prints.
G Dan Mitchell is a California photographer and visual opportunist. His book, “California’s Fall Color: A Photographer’s Guide to Autumn in the Sierra” is available from Heyday Books and Amazon.
George Hincapie of Team Columbia comes through the first turn of the prologue time trial stage at the 2009 Amgen Tour of California in Sacramento, California.
For anyone wondering how to photograph individual riders at a bicycle race, the time trial stages can provide your best opportunities. In contrast to the road stages where the whole pack may fly past you – once! – at 30 mph, in a time trial the riders come by one at a time.
The key, I think, is to pick a spot where the riders are likely to be in interesting situations and positions, such as at this tight u-turn at the end of the first straightaway. Here the riders had to slow down considerably in order to get through the turn, they were headed directly towards me as they came by, the bike angles in the turn can be dramatic, and the riders are often looking on up the road as they come through the turn.
Also, think about the lighting. Although it is cloudy in this shot, I also picked this location because I knew that the rider’s faces would be illuminated by sunlight. If the riders are backlit you’ll get very little facial detail unless you use fill flash. Also, if possible, take a look at what is in the background of the prospective shot. At one point yesterday I failed to pay enough attention and ended up with a series featuring out of focus blue outhouses in the background! :-)
One key is to get the rider in the right location within the frame. Once I figure out the right focal length for the distance to the turn from my position, I try to concentrate on the rider’s head, keeping it in the upper right corner of the frame (using this shot as an example). Otherwise it is all too easy to center the riders face in the frame and lose the bike and end up with a lot of nothing in the upper portion of the shot.
Focus can be tricky, and I think you have to figure out the best approach depending upon how well your camera/ lens can autofocus, what focal length you use, and whether you are going to try for one shot of each rider to use burst mode and capture several. In this case I used the AI Servo autofocus setting and I did have burst mode enabled, though in perhaps half the cases I only held the shutter release down long enough to capture a single frame. Although I used a fairly automated approach for focus, I set exposure manually. In a different situation I might even switch AF off entirely also, instead manually focusing on a specific point in the turn and then timing shots for when the riders arrive there.
This photograph is not in the public domain. It may not be used on websites, blogs, or in any other media without explicit advance permission from G Dan Mitchell.
(Revisions: April 21, 2017; March 8, 2018; December 18, 2018 July; July 2019.)
Building with Green Windows, Moonlight
A reader wrote and asked how I determine exposure times for night photography, and I decided my answer so that others can see it. Once I started writing, I decided to go ahead and share more basic techniques that can be very useful for night photography, too — including things like focus, etc. This isn’t a comprehensive coverage of the subject, but it does touch on a few key ideas.
First, for information about the techniques of nocturnal photography (and for some great examples of the photographic results and for workshop opportunities) I recommend a visit to the web site of The Nocturnes, the San Francisco Bay Area night photography group more or less run by Tim Baskerville. I’ve joined them on many night photography shoots, and the resources at their web site provide a ton of basic information that will save you many frustrating nights of trial and error. (I’m a member of a related group, Studio Nocturne SF, a collective of photographers who do night photography and exhibit as a group.)
Since so much of the basic information is available there, I’ll just add a few techniques and ideas that I find useful, especially for shooting with DSLRs. Here they are, in no particular order.
Consider using your camera’s long exposure noise reduction system — On my Canon DSLRs this setting causes the camera to make a second “dark frame” exposure following your “real” exposure. You might be tempted to forego this option since it doubles the time required for each exposure – your 60 second exposure will be followed by a 60 second dark frame exposure, while you stand there and twiddle your thumbs. (Or, do what I do – start composing your next shot.) DSLRs are subject to increased noise and “hot pixels” with very long exposures, but the dark frame provides the camera’s software with a reference that contains only the noise and hot pixels, and it can use this to map out (or subtract) the noise, etc from the image.
Support Columns, Purple and Green Wall
(Experiment with your own camera to discover the exposure lengths that benefit from the use of this setting. Modern digital cameras are less susceptible to noise issues than these cameras used to be. Some of the most recent digital cameras will not really need to use this feature much, if at all.)
Rely on your histogram to check exposure — do not rely on how the shot looks in the display. If the shot looks like what you see at night, in most cases it will be way underexposed — and, as a result, you’ll have a very noisy image and you may end up with artifacts like noise and banding. Instead, use an exposure that produces a balanced histogram curve — or, “expose to the right,” as many of us like to say. Your exposure may look brighter than the scene looks in person, but you can darken things in post and thus reduce visible noise even further. With many subjects, a well-exposed night photograph will look just as bright as one made in daylight.
Shoot wide open at high ISO to calculate basic exposure – If you have a f/1.4 lens and can set your camera to ISO 3200 or higher, do so. Let your camera make an automatic exposure and use that as a starting point. For example, if you get a decent (though noisy and otherwise awful looking) exposure at ISO3200, f/1.4, and 1 second you can work backwards from there to get a better exposure. Switching back to ISO 100 means that you need 5 stops more light, so your exposure time will go from 1 second to 32 seconds. (Count 1, 2, 4, 8, 16, 32.) Changing your aperture back to a more reasonable f/8 means another 5 stops or about a 17 minute (!) exposure – if my quick calculations are correct. (Update: I understand that if you can do this at ISO 6400 you can do a straight conversion from seconds to minutes – e.g. if the exposure at some aperture is 1 second at ISO 6400 the claim is that it will be 1 minute at ISO 100 at that same aperture.)
Man in White, Mosco Street
Apertures and ISOs that work in the daytime are good starting points for long exposure night photography — If f/8 at ISO 100 is your preference for daytime landscapes, then there is a good chance that these will be about right for night time landscapes as well. It just takes longer — sometimes a lot longer. If you are shooting a subject that would use larger apertures and smaller DOF in the daytime, you can probably use similar apertures at night. (This advice is mostly intended for those shooting from the tripod. When shooting handheld in very low light you may have no choice but to use a large aperture and a higher ISO. Fortunately today’s cameras are very good performer at higher ISO values, and some post-processing noise-reduction will usually produce a good image.)
Find something to focus on — Getting good focus stymies many night photographers. There are several approaches that you can try, and the right choice will vary depending on the shot.
If there is a relatively bright spot in your composition – perhaps a light bulb, a reflection, the moon, etc. — place an autofocus point right on top of it and see if it will acquire focus. Then switch AF off and recompose the shot if necessary.
Sometimes there is nothing in the scene that will provide enough light/contrast for autofocus to work. Look around for something outside of your composition that is about the same distance away — focus on that, switch AF off, and recompose.
Temporarily place a light in the scene — a bright flashlight or your smartphone will work — and focus on it.
You may be able to create a usable focus point by shining a laser pointer beam into the scene and focusing on it. Sometimes a bright enough handheld light or flashlight will be enough.
If you have one “must work” shot to make and plenty of time, you could set up the shot and determine focus during the daylight and leave the camera in position for your night exposure. (A potential focus shift due to temperature changes is real but likely inconsequential.)
Manual focus may be a possibility – either by trying to get a point light source such as a bright star (or your laser pointer, or a light placed in the scene, etc.) to focus manually through the viewfinder or by relying on the distance scale on the lens barrel.
Since perfect focus may be more elusive at night you have another reason to consider smaller apertures with their greater depth of field — they are a bit more forgiving of less-than-absolutely-perfect focus.
If your camera has a “live view” feature, you may be able to manually focus in light light levels at which neither AF nor traditional manual focusing will work – highly recommend for night photography work! See the exposure simulation feature on your camera.
With very long exposures, precise exposure time is less critical than you think — When shooting in the daytime very small changes in absolute exposure time make a bit difference. If you shoot at 1/100 second, increasing the exposure time to 1/50 second doubles the exposure. But at night things are a bit looser. If you are making a 6 minute exposure, you’d have to be off by six minutes to double the exposure or by three minutes to cut it in half. With that in mind, a few seconds hardly matter at all. I don’t bother with automated timers. I just count seconds (or chimpanzees, or hippopotamuses, or whatever…) or use my watch. That said, if you do have a timer you can probably let your mind wander a bit more while you enjoy your nighttime surroundings during the long exposure.
Daytime exposure tricks often work just as well at night — When photographing high dynamic range scenes during the day I may make two exposures — one for shadows and one for highlights — and use masks to combine them in post. The same situation often arises at night, especially if you have a shot that includes dark areas and bright artificial light sources. You may need to make one exposure that gets some detail from the shadows and a second that avoids blowing out the bright light sources.
Lens hoods are extra important with night photography — That may seem completely counter-intuitive, but when shooting at night you often have light coming from many more directions than when you shoot in sunlight, and the potential for flare increases. (You also may be a bit more likely to bump your lens into something, and the hood offers some physical protection.)
People in front of a San Francisco storefront at night
Try shooting handheld — While most night photography is going to require a tripod, modern digital cameras often work effectively enough at high ISOs that you can shoot many subjects without a tripod. For example, I now do almost all of my urban night photography handheld, shooting with relatively large aperture prime lens at ISO1600-6400 or even higher.
Try a small mirrorless camera — For some kinds of night photography, such as my night street photography, a small digital camera can be ideal. For one thing, the small cameras are often unobtrusive and less likely to draw attention to you. Many of them work very well at high ISO settings, and all ow you to shoot handheld in typical urban environments. Their electronic displays can often give you a usable view of your scene even in extremely low light.
That’s a quick list. Hope you find it useful! Have a question or something to add? Leave a comment below!
G Dan Mitchell is a California photographer and visual opportunist whose subjects include the Pacific coast, redwood forests, central California oak/grasslands, the Sierra Nevada, California deserts, urban landscapes, night photography, and more. Blog | About | Flickr | Twitter | Facebook | Google+ | 500px.com | LinkedIn | Email
Photographer and visual opportunist. Daily photos since 2005, plus articles, reviews, news, and ideas.
Manage Consent
To provide the best experiences, we use technologies like cookies to store and/or access device information. Consenting to these technologies will allow us to process data such as browsing behavior or unique IDs on this site. Not consenting or withdrawing consent, may adversely affect certain features and functions.
Functional
Always active
The technical storage or access is strictly necessary for the legitimate purpose of enabling the use of a specific service explicitly requested by the subscriber or user, or for the sole purpose of carrying out the transmission of a communication over an electronic communications network.
Preferences
The technical storage or access is necessary for the legitimate purpose of storing preferences that are not requested by the subscriber or user.
Statistics
The technical storage or access that is used exclusively for statistical purposes.The technical storage or access that is used exclusively for anonymous statistical purposes. Without a subpoena, voluntary compliance on the part of your Internet Service Provider, or additional records from a third party, information stored or retrieved for this purpose alone cannot usually be used to identify you.
Marketing
The technical storage or access is required to create user profiles to send advertising, or to track the user on a website or across several websites for similar marketing purposes.