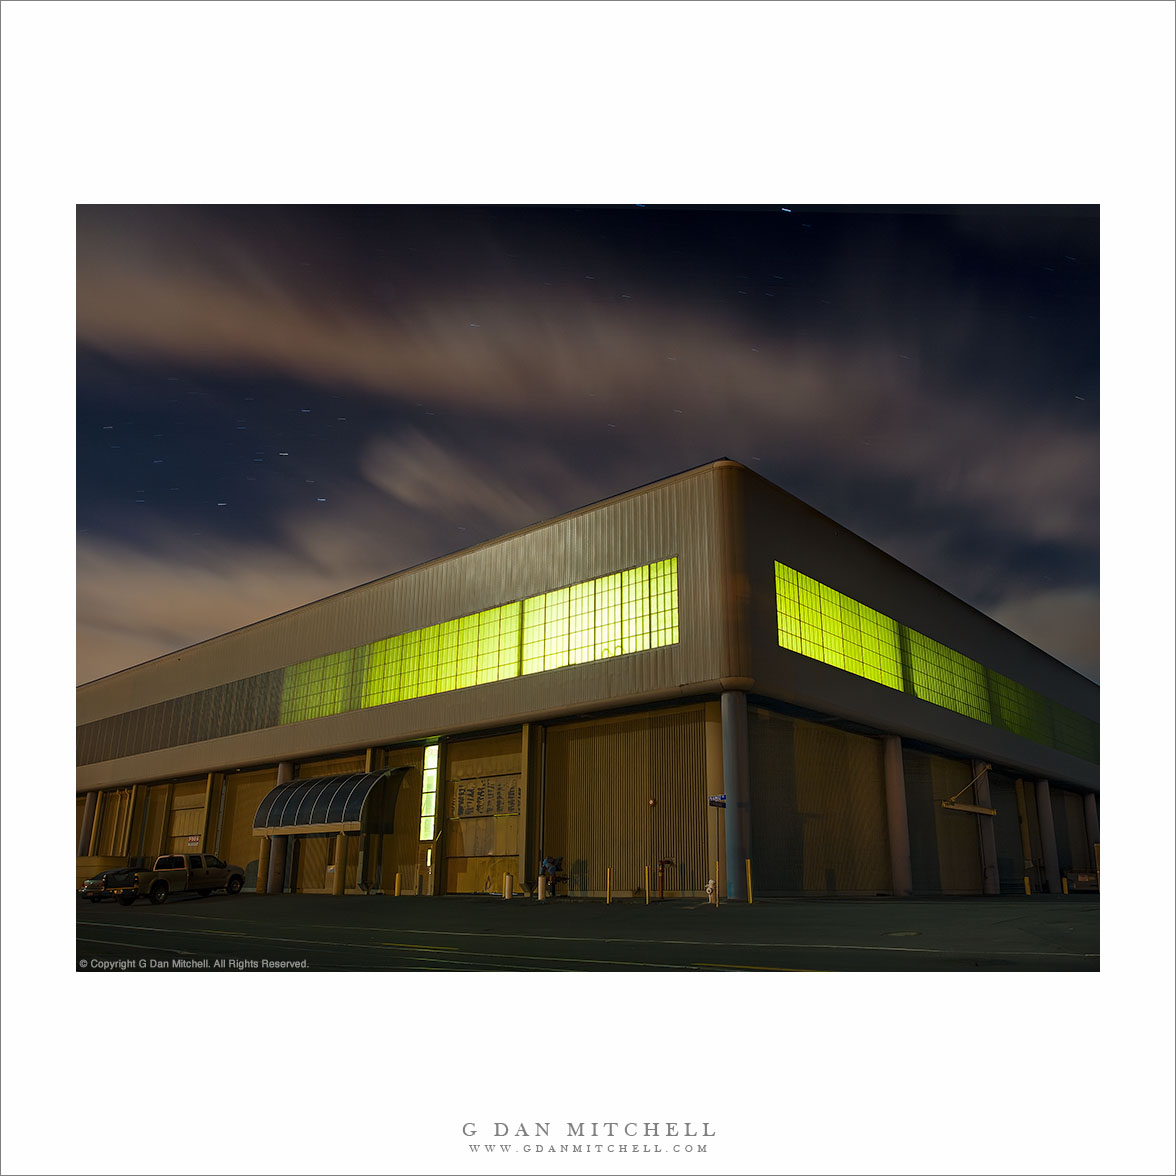
Yellow Buildings, Shadows, Moving Clouds – Night photograph of two large yellow buildings, shadows, and streaks for clouds moving across the sky above the Mare Island Naval Ship Yard, California.
THIS WEEKEND!
Studio Nocturne 2012 Open Studio returns for the tenth year to Fort Mason Center for San Francisco Open Studios, October 13-14, 2012, 11am-6pm – with a Preview Reception on Friday, Oct. 12, from 6-9pm. This year, ten intrepid Night Photographers (“NPrs”) again participate in the event (PLUS twenty Bay Printmakers!) once again showing in the huge “Fleet Room” in Landmark Bldg. ‘D’ (ground level). This annual event is always fun, free – plan to attend! See the link for more information.
Yes, yours truly is one of the photographers whose work will be on display. If you are in the San Francisco Bay Area and wonder what my work looks like in print form… come on down! While a good portion of my 15 prints are of night or near-night subjects, some of my natural and urban landscape will also be shown.
The artist reception for “Mare Island Nocturnes,” an exhibit of night photography done at the iconic Mare Island Naval Ship Yard and featuring the work of San Francisco Bay Area night photographers is this Sunday, August 14 at 2:00-4:00 p.m. on Mare Island. The exhibit is sponsored by The Nocturnes and the Mare Island Historic Park Foundation, and is part of the year-long celebration of the 20th year of The Nocturnes, the influential San Francisco Bay Area night photography group. I hope to see you there!
The Mare Island Naval Ship Yard is a remarkable historical and visual treasure. The place was the major west coast ship yard for the Navy since early in the 1800, and was decommissioned in the 1990s. While portions of the island have been and continue to be “redeveloped,” the historic core of historic ship yard buildings remains. This area has been a favorite of night photographers for some years and a lot of wonderful photographic work has emerged from this subject. I have photographed there many times during the past five years or so.
The exhibit runs through September 15 at the Mare Island Historic Park Foundation Museum, 1100 Railroad Avenue, Mare Island – see the flyer below for specific days and times of viewing.
The reception for the artists is on Sunday, August 14 from 2:00-4:00 p.m. Five of my prints are in the show, including “Yellow Buildings, Shadows, Moving Clouds,” the image shown above. I’ll be at the reception – hope to see you there!
Press release follows:
“Mare Island Nocturnes” Night Photography Exhibit Press Release
Tomorrow morning I plan to be at Muir Woods very early to follow up on some of the photography I did there last weekend. After that I may make a brief visit to San Francisco to see my son, or I may shoot some coastal stuff near Muir Woods. Sometime in the mid-afternoon I’ll head over to Mare Island Naval Shipyard in Vallejo for a round of night photography with the folks from The Nocturnes.
All in all, a great opportunity to explore the capabilities of the new camera body.
G Dan Mitchell is a California photographer and visual opportunist. His book, “California’s Fall Color: A Photographer’s Guide to Autumn in the Sierra” (Heyday Books) is available directly from him.
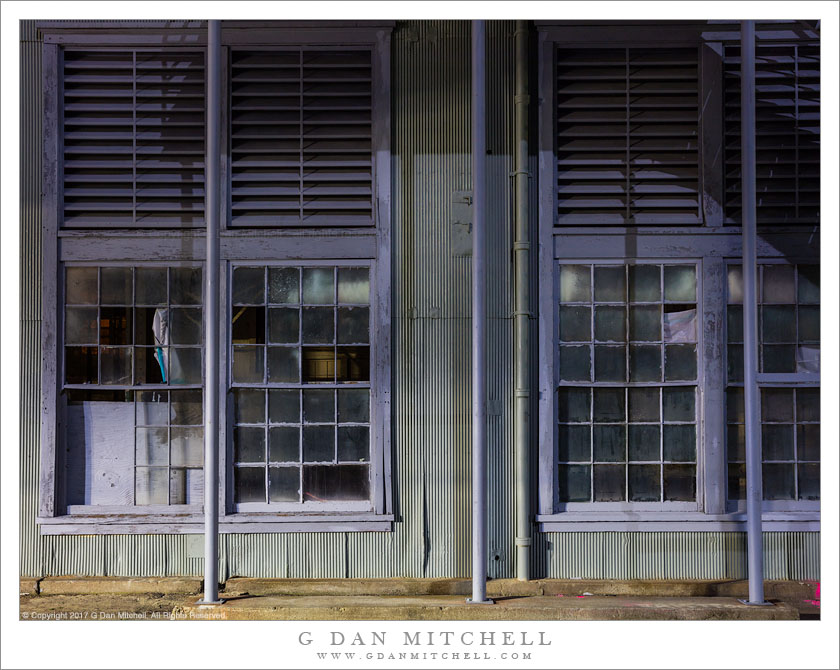
“Building with Green Windows, Moonlight” — Night photography of a building with green windows under moonlight at Mare Island Naval Shipyard, Vallejo, California.
A reader wrote and asked how I determine exposure times for night photography, and I decided my answer so that others can see it. Once I started writing, I decided to go ahead and share more basic techniques that can be very useful for night photography, too — including things like focus, etc. This isn’t a comprehensive coverage of the subject, but it does touch on a few key ideas.
First, for information about the techniques of nocturnal photography (and for some great examples of the photographic results and for workshop opportunities) I recommend a visit to the web site of The Nocturnes, the San Francisco Bay Area night photography group more or less run by Tim Baskerville. I’ve joined them on many night photography shoots, and the resources at their web site provide a ton of basic information that will save you many frustrating nights of trial and error. (I’m a member of a related group, Studio Nocturne SF, a collective of photographers who do night photography and exhibit as a group.)
Since so much of the basic information is available there, I’ll just add a few techniques and ideas that I find useful, especially for shooting with DSLRs. Here they are, in no particular order.
Consider using your camera’s long exposure noise reduction system — On my Canon DSLRs this setting causes the camera to make a second “dark frame” exposure following your “real” exposure. You might be tempted to forego this option since it doubles the time required for each exposure – your 60 second exposure will be followed by a 60 second dark frame exposure, while you stand there and twiddle your thumbs. (Or, do what I do – start composing your next shot.) DSLRs are subject to increased noise and “hot pixels” with very long exposures, but the dark frame provides the camera’s software with a reference that contains only the noise and hot pixels, and it can use this to map out (or subtract) the noise, etc from the image.
Support Columns, Purple and Green Wall
(Experiment with your own camera to discover the exposure lengths that benefit from the use of this setting. Modern digital cameras are less susceptible to noise issues than these cameras used to be. Some of the most recent digital cameras will not really need to use this feature much, if at all.)
Rely on your histogram to check exposure — do not rely on how the shot looks in the display. If the shot looks like what you see at night, in most cases it will be way underexposed — and, as a result, you’ll have a very noisy image and you may end up with artifacts like noise and banding. Instead, use an exposure that produces a balanced histogram curve — or, “expose to the right,” as many of us like to say. Your exposure may look brighter than the scene looks in person, but you can darken things in post and thus reduce visible noise even further. With many subjects, a well-exposed night photograph will look just as bright as one made in daylight.
Shoot wide open at high ISO to calculate basic exposure – If you have a f/1.4 lens and can set your camera to ISO 3200 or higher, do so. Let your camera make an automatic exposure and use that as a starting point. For example, if you get a decent (though noisy and otherwise awful looking) exposure at ISO3200, f/1.4, and 1 second you can work backwards from there to get a better exposure. Switching back to ISO 100 means that you need 5 stops more light, so your exposure time will go from 1 second to 32 seconds. (Count 1, 2, 4, 8, 16, 32.) Changing your aperture back to a more reasonable f/8 means another 5 stops or about a 17 minute (!) exposure – if my quick calculations are correct. (Update: I understand that if you can do this at ISO 6400 you can do a straight conversion from seconds to minutes – e.g. if the exposure at some aperture is 1 second at ISO 6400 the claim is that it will be 1 minute at ISO 100 at that same aperture.)
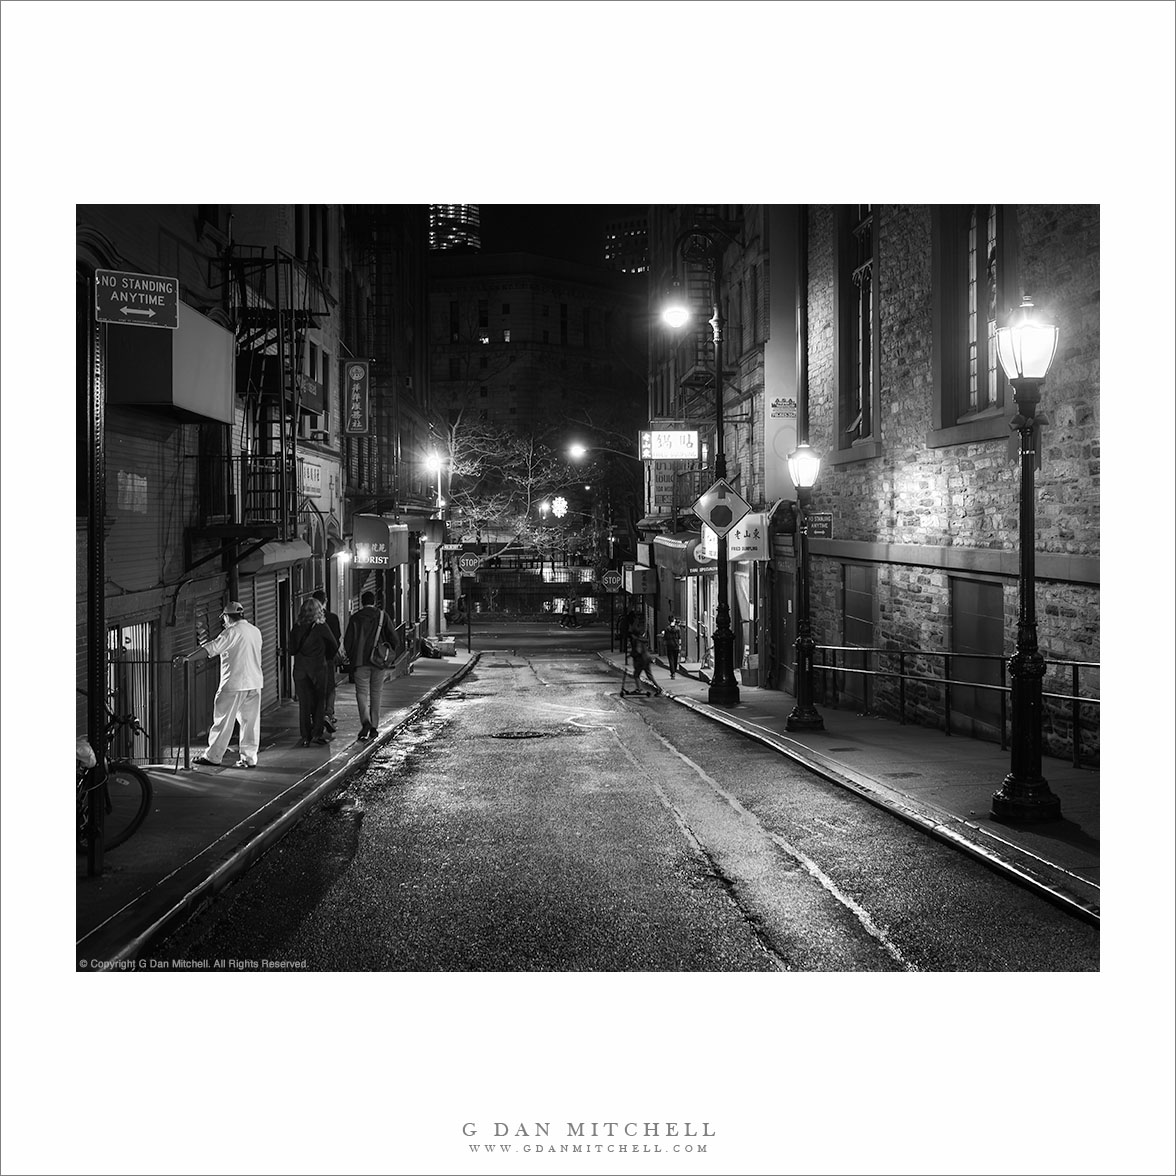
“Man in White, Mosco Street” — A man dressed in white takes a break outside of a Mosco Street kitchen, New York
Apertures and ISOs that work in the daytime are good starting points for long exposure night photography — If f/8 at ISO 100 is your preference for daytime landscapes, then there is a good chance that these will be about right for night time landscapes as well. It just takes longer — sometimes a lot longer. If you are shooting a subject that would use larger apertures and smaller DOF in the daytime, you can probably use similar apertures at night. (This advice is mostly intended for those shooting from the tripod. When shooting handheld in very low light you may have no choice but to use a large aperture and a higher ISO. Fortunately today’s cameras are very good performer at higher ISO values, and some post-processing noise-reduction will usually produce a good image.)
Find something to focus on — Getting good focus stymies many night photographers. There are several approaches that you can try, and the right choice will vary depending on the shot.
If there is a relatively bright spot in your composition – perhaps a light bulb, a reflection, the moon, etc. — place an autofocus point right on top of it and see if it will acquire focus. Then switch AF off and recompose the shot if necessary.
Sometimes there is nothing in the scene that will provide enough light/contrast for autofocus to work. Look around for something outside of your composition that is about the same distance away — focus on that, switch AF off, and recompose.
Temporarily place a light in the scene — a bright flashlight or your smartphone will work — and focus on it.
You may be able to create a usable focus point by shining a laser pointer beam into the scene and focusing on it. Sometimes a bright enough handheld light or flashlight will be enough.
If you have one “must work” shot to make and plenty of time, you could set up the shot and determine focus during the daylight and leave the camera in position for your night exposure. (A potential focus shift due to temperature changes is real but likely inconsequential.)
Manual focus may be a possibility – either by trying to get a point light source such as a bright star (or your laser pointer, or a light placed in the scene, etc.) to focus manually through the viewfinder or by relying on the distance scale on the lens barrel.
Since perfect focus may be more elusive at night you have another reason to consider smaller apertures with their greater depth of field — they are a bit more forgiving of less-than-absolutely-perfect focus.
If your camera has a “live view” feature, you may be able to manually focus in light light levels at which neither AF nor traditional manual focusing will work – highly recommend for night photography work! See the exposure simulation feature on your camera.
With very long exposures, precise exposure time is less critical than you think — When shooting in the daytime very small changes in absolute exposure time make a bit difference. If you shoot at 1/100 second, increasing the exposure time to 1/50 second doubles the exposure. But at night things are a bit looser. If you are making a 6 minute exposure, you’d have to be off by six minutes to double the exposure or by three minutes to cut it in half. With that in mind, a few seconds hardly matter at all. I don’t bother with automated timers. I just count seconds (or chimpanzees, or hippopotamuses, or whatever…) or use my watch. That said, if you do have a timer you can probably let your mind wander a bit more while you enjoy your nighttime surroundings during the long exposure.
Daytime exposure tricks often work just as well at night — When photographing high dynamic range scenes during the day I may make two exposures — one for shadows and one for highlights — and use masks to combine them in post. The same situation often arises at night, especially if you have a shot that includes dark areas and bright artificial light sources. You may need to make one exposure that gets some detail from the shadows and a second that avoids blowing out the bright light sources.
Lens hoods are extra important with night photography — That may seem completely counter-intuitive, but when shooting at night you often have light coming from many more directions than when you shoot in sunlight, and the potential for flare increases. (You also may be a bit more likely to bump your lens into something, and the hood offers some physical protection.)
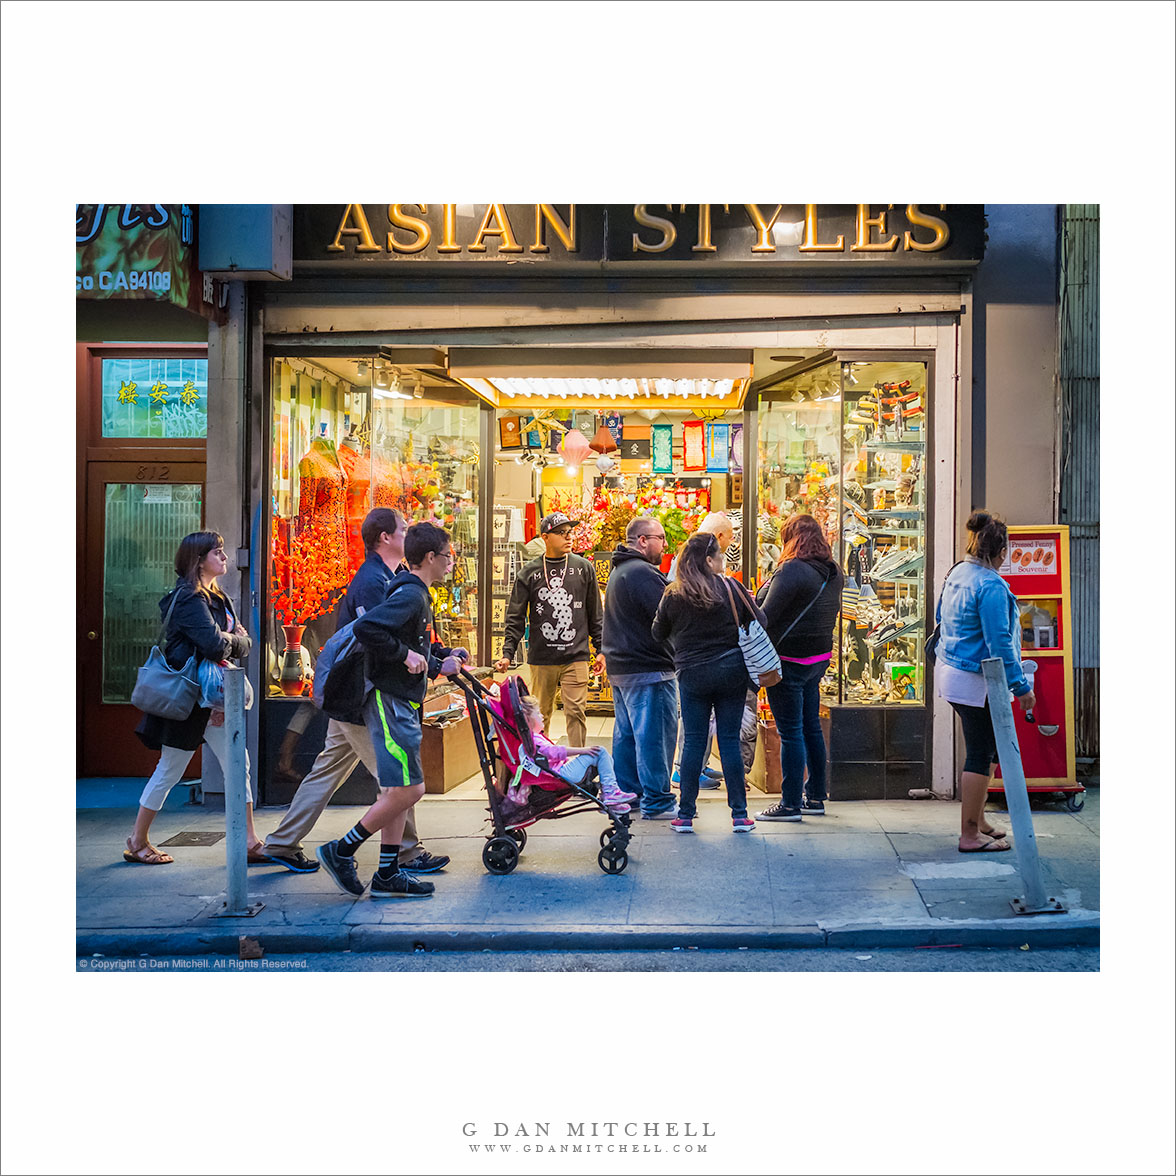
“Asian Styles” — People in front of a San Francisco storefront at night
Try shooting handheld — While most night photography is going to require a tripod, modern digital cameras often work effectively enough at high ISOs that you can shoot many subjects without a tripod. For example, I now do almost all of my urban night photography handheld, shooting with relatively large aperture prime lens at ISO1600-6400 or even higher.
Try a small mirrorless camera — For some kinds of night photography, such as my night street photography, a small digital camera can be ideal. For one thing, the small cameras are often unobtrusive and less likely to draw attention to you. Many of them work very well at high ISO settings, and all ow you to shoot handheld in typical urban environments. Their electronic displays can often give you a usable view of your scene even in extremely low light.
That’s a quick list. Hope you find it useful! Have a question or something to add? Leave a comment below!
Leave a comment or question using the form. (If you are reading this on the home page, click the article title to see the full article and the comment form.
nd others as indicated. Any use requires advance permission from G Dan Mitchell.
Photographer and visual opportunist. Daily photos since 2005, plus articles, reviews, news, and ideas.
Manage Consent
To provide the best experiences, we use technologies like cookies to store and/or access device information. Consenting to these technologies will allow us to process data such as browsing behavior or unique IDs on this site. Not consenting or withdrawing consent, may adversely affect certain features and functions.
Functional
Always active
The technical storage or access is strictly necessary for the legitimate purpose of enabling the use of a specific service explicitly requested by the subscriber or user, or for the sole purpose of carrying out the transmission of a communication over an electronic communications network.
Preferences
The technical storage or access is necessary for the legitimate purpose of storing preferences that are not requested by the subscriber or user.
Statistics
The technical storage or access that is used exclusively for statistical purposes.The technical storage or access that is used exclusively for anonymous statistical purposes. Without a subpoena, voluntary compliance on the part of your Internet Service Provider, or additional records from a third party, information stored or retrieved for this purpose alone cannot usually be used to identify you.
Marketing
The technical storage or access is required to create user profiles to send advertising, or to track the user on a website or across several websites for similar marketing purposes.