Tag Archives: Commentary

Fujifilm X-Pro2

Fujifilm just released their newest camera, the X-Pro2. Since I have been relying on an earlier Fujifilm camera (the original X-E1) for over three years — and liking the results a whole lot — it seemed like time to move up to the newer, more refined body. My new X-Pro2 arrived a few days ago, and so far I’m quite impressed. (My time with the camera has been limited thus far, and I’ll share a much more detailed report once I have had a chance to use it extensively.)
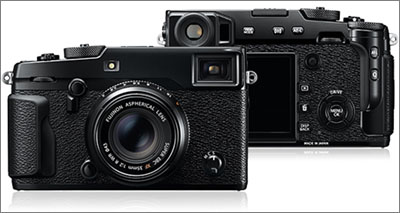
Fujifilm X-Pro2
Fujifilm X-Pro2 with the new XF 35mm f/2 WR lens

The Fujifilm “x-trans” sensor cameras are appealing for a number of reasons:

  • Small, light mirrorless designs offer an alternative to larger DSLR systems.
  • The x-trans sensor produces excellent image quality and uses a photo site layout that is designed to minimize aliasing without using anti-aliasing filters.
  • The Fujifilm lenses are truly top-notch, from primes to zooms, and there is a complete and diverse selection of available lenses.

Until now all of these cameras have use 16 megapixel (MP) 1.5x cropped sensor designs. 16MP is plenty for almost all photographers, and I make beautiful 18″ x 24″ prints from the files. One of the main updates on the X-Pro2 is the addition of an optimized 24MP sensor. If anything, this sensor improves the low light performance and dynamic range of the 16MP versions, and it provides a bit more resolution.

The X-Pro2 also improves on many of the ideas behind the original (and now a bit long in the tooth, though quite inexpensive) X-Pro1. Both cameras use a hybrid viewfinder that incorporates both an optical viewfinder (OVF) and an electronic viewfinder (EVF), both of which have advantages in various situations. The OVF works beautifully with many primes, eliminates shutter blackout, and allows the photographer to see what is going on just outside the borders of the image. The design overlays an electronic display on top of the optical image. These features are very useful to those doing street photography and similar things.

The EVF works well with all lenses, from ultra wide to telephoto and especially with zoom lenses. It can be advantageous in very low light, such as night street photography. It also shows the precise frame edge lines and can display even more image data than the OVF.

The camera feels light but also solid and well-constructed, and it recalls classic rangefinder cameras.

I got mine with the new XF 35mm f/2 WR lens, one of five newer lenses that are optimized to autofocus more quickly on the X-Pro2 (and, presumably, future X-series cameras). It is also weather resistant. I can report that it focuses quickly and accurately in a wide range of situations. Since I also have my older XF 35mm f/1.4 lens, I haven’t yet decided whether I will end up valuing the extra stop of the f/1.4 lens enough to give up the faster AF and smaller size of the new f/2 lens.

That’s all I’ll say for now, but expect more in the not-too-distant future as I gain more experience with the camera. For now, I don’t see any reason to not recommend it.

  • Fujifilm X-Pro2 digital camera body — $1699 at B&H or Adorama
  • Fujinon XF 35mm f/2 WR lens — $399 / $299* with X-Pro2 at B&H or Adorama (*limited time offer)

(If you find this website and posts like this useful and you are going to get one of these products, consider making your purchase through links on this site. Your price will be the same, but the purchases help support the operation of the site. Thanks!)

Also see:  Taking Stock of the Fujifilm X-E1, X-E2, S-T1 Mirrorless Cameras


G Dan Mitchell is a California photographer and visual opportunist. His book, “California’s Fall Color: A Photographer’s Guide to Autumn in the Sierra” is available from Heyday Books and Amazon.
Blog | About | Flickr | Twitter | FacebookGoogle+ | 500px.com | LinkedIn | Email


All media © Copyright G Dan Mitchell and others as indicated. Any use requires advance permission from G Dan Mitchell.

Getting Skunked at Point Reyes

Yesterday I got sort of “skunked”* at Point Reyes National Seashore – yet, again. ;-)

I get to shoot there from time to time – a beautiful and interesting place that is not so far from me that I can’t drive there and back in a day. I find it fascinating in many ways, but also a bit difficult to get my brain around how to photograph it. While I can show up in the high Sierra – that region from the lodgepole forests well up above timberline – and almost immediately find a wealth of subjects, at Point Reyes I have to search and look a lot!

There are, I think, several reasons for this. Frankly, a place like Point Reyes, as spectacular as it can be in the right places and at the right times, often does not call attention to itself in the same ways that some more dramatic landscapes do. Much of the park is covered with a low, dense forest, and other places are largely bucolic and grass-covered hillsides. I love the beaches and the estuaries and inlets, but they tend to offer peaceful quiet more than stunning features.

A part of it is the need to know where, when, and how to look. A few weeks ago I hiked on a long trail past the of the estuary areas, on a day that was mostly foggy. At first, it was difficult for me to see any photographs in this particular landscape, even though I like the fog and enjoyed being there. Liking a place and seeing how to make photographs of it can be quite different things. However, on that afternoon and evening I did get the sense of this landscape enough to make a few photographs that I believe “work.” They are not necessarily the photographs I thought that I would make, but instead photographs that I found as I spent more time just looking and getting the sense of the place.

I also have to get lucky and/or change my expectations at Point Reyes. The weather there is, as is often the case on the Pacific coast, quite variable. Yesterday, on one side of main ridge along Tomales Bay the sun was out. But I could see that further north there were wisps of fog, and I started developing some ideas about photographs that might include sun and perhaps a bit of fog. But when I crossed the ridge to go to Limantour the fog line was just inland from the coast and those ideas were not possible. I did make some photographs – and I think I’m going to like at least a few of them – but I also spent a lot of time walking and looking and not photographing, just enjoying the foggy atmosphere (which, when the wind came up, reminded me of the coming winter) and the sounds.

* For those who might not know, “skunked” is an American English idiom that essentially means “defeated or frustrated,” though in a manner that might be a bit self-deprecating and perhaps humorous.

© Copyright 2012 G Dan Mitchell – all rights reserved.

G Dan Mitchell is a California photographer whose subjects include the Pacific coast, redwood forests, central California oak/grasslands, the Sierra Nevada, California deserts, urban landscapes, night photography, and more.
Blog | About | Flickr | Twitter | FacebookGoogle+ | 500px.com | LinkedIn | Email

Text, photographs, and other media are © Copyright G Dan Mitchell (or others when indicated) and are not in the public domain and may not be used on websites, blogs, or in other media without advance permission from G Dan Mitchell.

Myth: Diffraction and Motion Blur Worsen With More Megapixels

They don’t.

Another post that I wrote just before this one (“Why Your 21MP File “Looks Softer” Than Your 12MP File at 100%“) explains why pixel-peeping* photographers might imagine that cameras with greater photosite density (e.g. – “more megapixels”) might produce “softer” photographs, based on what they observe when they compare 100% magnification images on the screen. These cameras do not produce softer images – the results will either be equal to or better than those from lower photosite density cameras in this regard. You can follow the link to read the original post.

A reader wrote and suggested that perhaps the images from the camera with greater photosite density really are softer, but the cause is a greater susceptibility to diffraction blur or motion blur.

No. Neither is the case.

These are two additional misconceptions that can be fed by (yet again!) pondering 100% magnification crops on the screen without thinking through the actual (non-) effect of what you see there when it comes to actual photographs. Continue reading Myth: Diffraction and Motion Blur Worsen With More Megapixels

An Itinerant Photographer and His iPad: A First Report

I returned last night from a week-long visit to New York City. While this wasn’t just a photography visit, enough photography was part of the plan that I had to carry a reasonable amount of equipment. Typically I would bring along my Macbook, but this time I decided to leave the laptop at home and see if I could get by with just an iPad instead.

I knew that this would necessitate some compromises in the way I usually operate on the road. For example, serious photography applications like Photoshop and Lightroom simply don’t run on the iPad, so there would be no possibility of doing real post-processing work on the road. The iPad doesn’t have a “real” keyboard, instead providing an on-screen “virtual keyboard” – more on that below. On the positive side, the iPad is positively tiny compared to any real laptop. It makes my 13″ Macbook seem terribly bulky by comparison. The iPad slips easily into the external pocket of my Crumpler Eight Million Dollar Home camera bag, and doesn’t add enough weight to the package to be worthy of note. The battery life is tremendous and the charger is very small.

What follows is an early report on certain aspects of iPad use by the traveling photographer – or at least this mobile photographer. Continue reading An Itinerant Photographer and His iPad: A First Report