Tag Archives: post

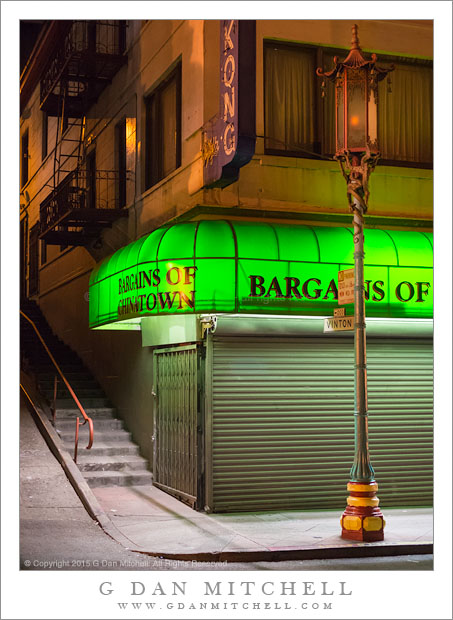
Bargains of Chinatown

Bargains of Chinatown
Night photograph of a closed Chinatown shop, San Francisco

Bargains of Chinatown. San Francisco, California. September 5, 2015. © Copyright 2015 G Dan Mitchell – all rights reserved.

Night photograph of a closed Chinatown shop, San Francisco

In early September I again joined a group of folks who like to photograph San Francisco urban and street subjects after dark. Most of the group met before sunset, did a bit of street photography, joined for dinner at a place along the edge of Chinatown, and then headed out for a couple of hours of photographing in the urban nightscape. Once again we passed through Chinatown — hard to resist when we were already there! — and on down into areas closer to Market Street.

Late in the evening it was time for me to head back to my car, so I said good-bye to the rest of the group and headed back the way I had come, walking alone this time. It was now much later, and this area pretty much shuts down — surprisingly so for a Saturday night in The City. But this meant that the earlier crowds were gone and the scene was a lot quieter and slower. When I passed this corner earlier the shop was open and there were quite a few people around, but now the shutters were closed and the green light washed over the urban landscape of sidewalks and steps leading up toward a dark alley. After years of doing night photography the “old way” — tripod and long exposures — I’m still amazed that I can wander out and shoot stuff like this using a small handheld camera these days.


G Dan Mitchell is a California photographer and visual opportunist. His book, “California’s Fall Color: A Photographer’s Guide to Autumn in the Sierra” is available from Heyday Books and Amazon.
Blog | About | Flickr | Twitter | FacebookGoogle+ | 500px.com | LinkedIn | Email


All media © Copyright G Dan Mitchell and others as indicated. Any use requires advance permission from G Dan Mitchell.
Controlling Highlights (A Napkin Drawing)

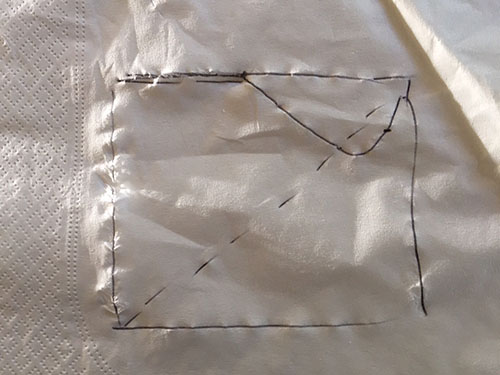
Earlier this month some friends and I got together in San Francisco, as we do every month, to share prints and talk photography. One friend shared prints of some beautiful night photographs he had made of a San Francisco subject. As we looked for little things that could make excellent prints even better we got to talking about highlights and how to control them. There are quite a few ways to do this, and I drew a little picture on a napkin to illustrate one technique I sometimes use to get a bit more detail out of areas that appear to be nearly pure white. The drawing looked a lot like the following.

Drawing on a napkin

It doesn’t look like much here, but trust me when I say that it made sense at the time. My friend picked up the napkin and took it with him as a reminder… and then a few days later contacted me to say he had lost the “napkin notes” from our conversation. He asked if I would mind describing the technique again. I said I’d do it — and three weeks later I finally got around to writing it up in this article!

Photographers using digital cameras have to watch out for over-exposing highlights. While we can recover a lot of detail from dark shadows, especially with current digital cameras, there is much less headroom at the bright end of the spectrum. When the exposure is too bright it is easy to end up with lost details in high luminosity areas. Go a little too far and you end up with that bane of digital photography, blown highlights, where the bright areas are simply pure white, leaving little or no hope of recovering the lost details. Continue reading Controlling Highlights (A Napkin Drawing)

Sharpening Basics: A Primer

(Minor updates to this article were made in February 2019.)

Sharpening is a very important step for optimizing digital photograph files. If you let your camera save images in the common .jpg format (a compressed image format that is often used on the web) the camera is applying sharpening to the image produced by the camera sensor. If you use the raw format (a high quality format that retains the original sensor data of the exposure) you will find that the photograph looks soft until you apply sharpening during the post production phase.

Sharpening optimizes the visibility of details that are already in your photograph. It is a matter of more clearly revealing what is in the photograph than  a matter of creating detail where there was none. Most sharpening works by increasing the contrast between light and dark areas in the image — what we call sharpening as actually more about adjusting the relative brightness of adjacent portions of the photograph.

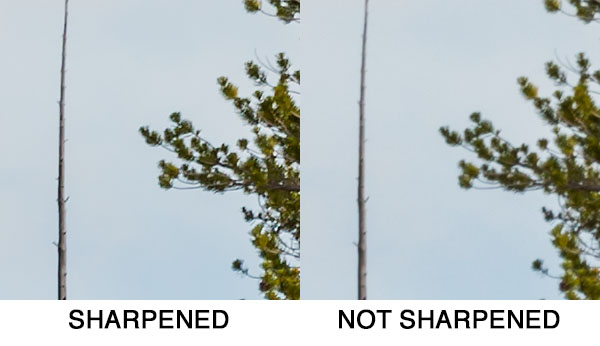
Typical sharpening

The image above is an example of a small section of a photograph.[1] It is a “100% magnification crop” of a tiny area from a much larger photograph made with a high megapixel DSLR camera. A “100% magnification crop” is an image displayed so that each pixel — or individual picture element — of the original photograph is displayed using a single pixel on the screen. (Things are a bit more complicated than that when using modern high-resolution monitors, though I’ll let that description stand for now.) 100% magnification crops let us look very closely at what is going on in photographas “at the pixel level.” In this case, the full original image from which these small examples were extracted would be equivalent to prints at a width of roughly 10-12 feet.

The right side of the example shows this tiny section of the photograph before sharpening. The left side shows the results of fairly typical sharpening. Continue reading Sharpening Basics: A Primer

A Photograph Exposed: Technique and Interpretation in Post

(“A Photograph Exposed” is a series exploring some of my photographs in greater detail.)

Island and Trees, Tuolumne River
“Island and Trees, Tuolumne River” — Trees grow on a small ,rocky island in the Tuolumne River, Yosemite National Park

If you follow this website you may have seen this photograph before — it is one of two that were the subjects of an earlier article (“A Photograph Exposed: One Subject, Two Compositions“) focusing on compositional decisions I made when I photographed this Sierra Nevada subject. In this companion article I want to look at the next step — going from that original exposure to the final (at least for now!) interpretation of the subject that you see above, and the how and why of post-processing the image.

For me, post-processing is as much a part of the creative process of photography as is composing and making the exposure. In fact, many of the decisions that I make at the time of exposure anticipate what I may do during the post-processing stage. These decisions recognize that the camera does not “see” the same way that we do, and that simply trying to produce an exposure that looks the exactly like the actual scene is often both hopeless and counterproductive.

Continue reading A Photograph Exposed: Technique and Interpretation in Post