Tag Archives: print

A Photograph Exposed: “Submerged Boulders, Lake, and Cliffs”

(“A Photograph Exposed” is a series exploring some of my photographs in greater detail.)
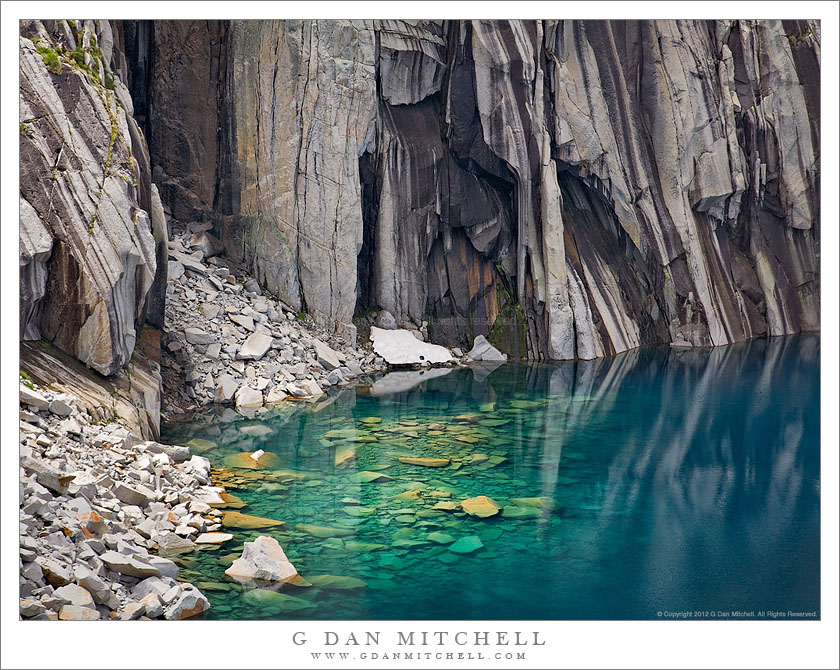
Submerged Boulders, Lake, and Cliffs
Sunlight illuminates submerged boulders near the cliff face along the High Sierra Trail – Sequioa National Park.

Submerged Boulders, Lake, and Cliffs. Sequoia National Park, California. August 6, 2008. © Copyright G Dan Mitchell – all rights reserved.

I have backpacked in California’s Sierra Nevada range for quite a few decades. A number (a large number!) of years ago my wife and I went on a two-week trans-Sierra backpack trip that traversed the range from west to east between Crescent Meadow and Whitney Portal,  following a route known as the “High Sierra Trail.” On the third morning we left our camp and began the stiff ascent toward the pass we had to cross to enter the Kern River drainage. Near the top of the steepest part of the climb the trail momentarily leveled out and we found ourselves facing a high, rockbound lake with a perfectly vertical patterned rock face dropping straight into the water on the far side. The view seemed familiar – and I realized that it was a scene captured by Ansel Adams (“Frozen Lake and Cliffs“) in the early 1930s.  (I also later realized that there is a wonderful and well-known photograph of the subject by Vern Clevenger.)

My wife and I were enthusiastic about photography in those days, too, and we carried a couple of Pentax SLRs and a few lenses and many rolls of film into the back-country. But I don’t think I came back with more than a few “snapshots” of this lake on that trip.

Fast-forward a few decades to 2008 when a group of my backpacking friends decided to follow this same trans-Sierra route — and, of course, I had to join them. Once again, I found myself ascending the trail toward that small bowl, but this time I had a plan to photograph the lake and the equipment to do it right. I recalled parts of the climb from my previous trip, but I had probably forgotten more than I remembered during the intervening decades. As the trail traverses a beautiful wet section full of wildflowers (which I had forgotten) I could tell that the lake was just ahead, and soon I topped a small saddle and saw the familiar scene before me.

As planned, I set to work doing some of the photography that I had contemplated before the trip. To be honest, I mainly worked from more or less the location that Adams must have used, though the conditions were a bit different on this day – the light was changeable as broken clouds passed above, and there was very little snow, much less ice, left at the lake. After perhaps 30 or 45 minutes of work, my hiking partners were getting restless and it was time to move on. I felt that I had worked this scene about as much as possible under the circumstances – and I did get a photograph of the “classic view” that I like a great deal — so I loaded up my heavy 9-day backpack load, put away the camera, and strapped the tripod to the outside of the pack. I hoisted the load and slowly started up the switchbacks immediately above the lake.

A couple of switchbacks up the trail I happened to look back at the lake from a slightly higher vantage point, and from here the astonishing deep blue color of the lake and the apron of rocks falling into the water became visible. My first reaction was a combination of “Wow!” and “No way am I taking this pack off and setting all that stuff up again!” Continue reading A Photograph Exposed: “Submerged Boulders, Lake, and Cliffs”

Holiday Photographs – There’s Still Time

If you are interested in ordering a print for a holiday gift – or for yourself – there is still time… but not much! Almost all of my photographs are available as prints. I can print many of them at sizes of up to 24″ x 36″. Smaller sizes are also available of course.

Prints ordered during the next 72 hours or so can be shipped via 2-3 day mail on Monday and should arrive by Christmas. If you are in the San Francisco Bay Area I can probably push that timing a bit – and if I’m out doing photography in your area I might even be able to deliver a print to you myself.

How I Sharpen – An Overview

(I originally wrote this article way back in 2009. Some portions were revised in February 2019 to reflect changes to sharpening tools and some different ideas I have developed regarding sharpening settings. It was updated and modified again in 2023.)

I just posted something elsewhere about how I sharpen for prints and I figured I’d get some extra mileage out of it by posting it here as well. First, few disclaimers…

  • The title of this article originally referred to a “quick overview.” Clearly, it is too long for that! But there are whole books on sharpening, so by contrast I think this qualifies as a quick description. In fact, I’ve left a lot out of the description!
  • There are people with far more expertise on this topic than I have, and I have no illusions that this description represents the “right” way to do this, much less the “best” way!

The subject of how to sharpen photographs in post for print or electronic output is one that confuses many people… and a subject to which many books, online articles, and forums posts have been devoted. There are any number of ways to get the desired results via sharpening, and different techniques are called for depending upon taste, the nature of the image, and the final form of presentation: size? print? jpg? etc…

Here is a general description of what I do when I print. I’ve left some variations out of this description. The description also covers software that I use in my workflow — you might prefer something different, but you might still be able to adapt these ideas. You’ll note at least one controversial method later in the list, but try it before you dismiss it. The approach I use could well be “over-kill” if you just want to pump out a bunch of jpgs to share with friends and family or if you want to make some small prints — my end goal is good sized prints, and I work on each one rather carefully rather than mass-processing them and printing a bunch at one time.

And please understand that I’m most certainly not implying that my way is the right way. It works for me, and that people who view my prints often remark on their sharpness and detail. (And a few other things, too, I hope! :-)

Continue reading How I Sharpen – An Overview

OS X 10. 6 “Snow Leopard” installed – and printer problems ensue.

I was actually on the beta test list for “Snow Leopard,” so I have been using it without problems for a while – but not on the computer I use for my photographic work but rather on a separate laptop. After the very trouble-free experience on the test machine I went ahead and installed in on my photography workstation yesterday.

Today I tried to print. Ouch!

The first problem I encountered was that the Epson 2200 sitting next to my computer no longer appeared in the the printer dialogs in Photoshop. Knowing that Snow Leopard supposedly will add new drivers as needed I tried to use the 10.6 preference panel to add drivers for the 2200. No luck – the system didn’t even see the connected printer.

I finally went to the Epson web site and followed their instructions which include:

  1. Install Rosetta from Apple install disk.
  2. Download the most recent pre-10.6 drivers for my printer and install.
  3. Download and run their updater for drivers under 10.6

Done. Now I can see the printer via its Firewire connection… but not, as far as I can tell, via its USB connection.

So, I fire up Photoshop and try to make a test print using a black and white image. Things seem to be going more or less OK as I work my way through the usual setup and print process: Photoshop manages colors and all. But the print emerges looking very green and way too dark. I attempt to download and reinstall the Epson profile for the Epson Premium Lustre paper I’m using at the moment. Installer downloads… but won’t run.

I do a restart and try the profile installer one more time – still no go. Since the photo was one that I had not previously printed I decide to remove one variable and instead print a color image that I had successfully printed right before installing the update to OS X. Again… very greenish and far too dark.

There is no joy here at the moment…

Update 8/31/09:

  • I will try to continue reporting on my CS4/Epson 2200/Snow Leopard printing issue as I continue to try to understand and resolve it. This may take a while, as I don’t have any urgent printing business to take care of.
  • As a – otherwise very successful – beta tester of Snow Leopard, I should not have allowed my enthusiasm for the new OS and otherwise good experience with it on the test machine to blind me to the standard practice of waiting a while to install on my production machine. Some of us never learn!
  • Other than this issue – serious to me, but probably a non-issue to most – the upgrade has otherwise been positive. One pleasant surprise was that the installation gave me back 125GB of space on my main drive!
  • I welcome any information about the printer issue that you may have. Please either leave a comment or send me an email.