Tag Archives: Technique

Some Thoughts on Black and White Conversion in Photoshop

Every so often you run across an article that offers some unfortunate advice on an important subject – perhaps it offers outdated advice or suggests a less effective technique. I saw such an article today on methods for converting color digital images to black and white in Photoshop. Sometimes seeing such an article encourages me to write something about the same topic as a counterpoint – and that is what led to this post.

I cannot claim to be the master of this conversion process, and I recognize that there are several ways to do it that are both effective and different that what I’ll describe. In addition, this will be more or less an overview rather than a detailed tuturial. IN any case, I want to offer some ideas that might be a bit more contemporary, flexible, and powerful than those I read about in that article. Continue reading Some Thoughts on Black and White Conversion in Photoshop

Canon EOS 5D Mark II: Live View and Night Photography

I have shot a few thousand frames with my Canon EOS 5D Mark II now. I’ve photographed a variety of subjects including a few days of rainy professional bicycle stage racing, several landscape subjects, and a productive evening of night photography with The Nocturnes at Mare Island Naval Shipyard. I plan to eventually write up something resembling a comprehensive report on my experience, but so far there hasn’t been time. With that in mind, here is a short piece on one new feature in this camera and my experience with it.

Among the photographic subjects that interest me is night photography, often of urban and industrial subjects, but occasionally of wild landscapes also. There are a number challenges to shooting in very dark conditions, but one of the more interesting is getting good focus in conditions where auto-focus often can’t find a target to work with and where it is too dark to manually focus. (I wrote a bit about this in a recent piece: “Hints for Night Photography.”)

During my last Mare Island shoot I discovered that Live View provides a very useful option for focusing at night. On the 5D II, the Live View mode raises the mirror and lets you look at a “live view” of your scene on the rear LCD. In very dim light the trick is to find something that might provide a manual focus target, center the rectangular LCD indicator over that “something,” zoom in to 10x magnification on this object, and then focus manually on the LCD image. I was amazed at the low light levels at which this works quite well. A vertical line in a wall, the edge of a window, a bit of cyclone fence, or a small light – any of these become decent manual focus targets using Live View.

When I started my Mare Island evening shoot, using this camera for the first time at night, I mostly did things the old fashioned way. By the end of the evening, in any very dim situation I was successfully and much more quickly getting good focus using Live View. I’m confident that night photographers are going to find that this is a very powerful and useful feature.

A Test: Correcting Perspective in Post-Processing

Earlier today I saw a post in which the author stated that correcting for perspective in post-processing would lead to serious problems:

There is quite a bit of loss in image definition if you do a significant amount of correction for converging verticals in an image editor. You can get far better results with a view camera or a tilt/shift lens. If you only photograph for the web, then maybe the image editor approach is ok, but for reasonably large prints?

While that point of view is widely held and often repeated, in my experience a blanket statement like this is not totally correct – it may come down to the definition of “significant.” I find that in many cases the degradation of the image is so small as to be insignificant or even invisible at 100% magnification, and it is most often completely invisible even in fairly good size prints. (This is not to suggest that those making severe corrections, in architectural photography for example, would not be better served by using a tilt/shift DSLR lens or a MF or LF system.)

Rather than just accepting statements like this, I like to test them. In the past I’ve tested and written about the option of correcting for lens distortions in post- processing: A Test: Correcting Lens Distortion in Post Processing. Here I want to extend this concept to using post-processing techniques for the correction of perspective distortion and for leveling the image.

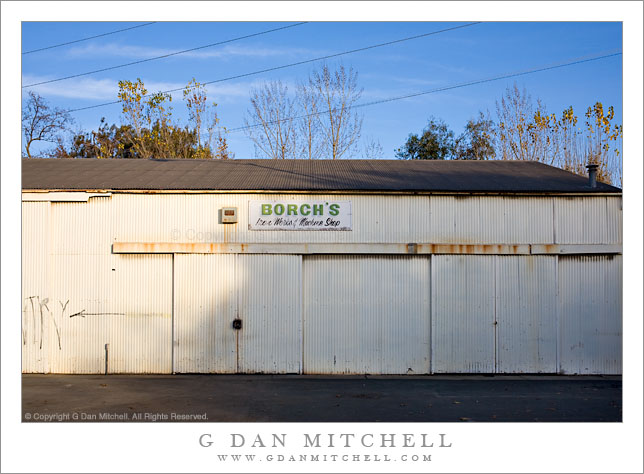
The photograph I’ll use was shot handheld using a full-frame Canon 5D with the EF 35mm f/2 lens, one of my favorites for street photography. First a small version of the final photograph:


Borch’s Iron Works and Machine Shop – old metal shop building in the downtown area of San Jose, California. © Copyright G Dan Mitchell – all rights reserved.

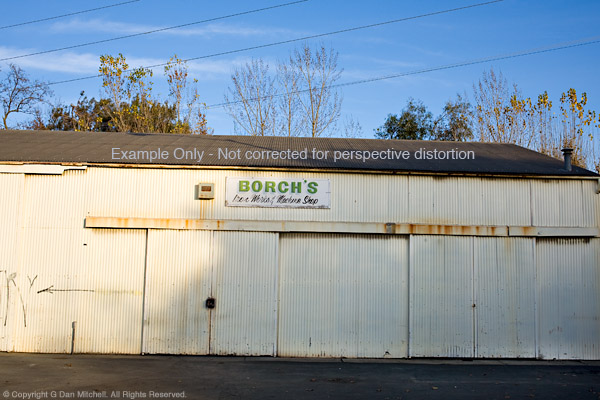
Next is the same image with the same post-processing, except that the corrections to horizontal alignment and perspective have been left out:


Borch’s Iron Works and Machine Shop – old metal shop building in the downtown area of San Jose, California. Uncorrected version. © Copyright G Dan Mitchell – all rights reserved.

Yup, that’s what happens when you shoot street and shoot handheld. ;-)

In this example we can clearly see several problems that need fixing. First, the image is not level – it tilts down to the right. Second, the vertical lines begin to converge toward the top of the image. Third, since the camera’s sensor was not perfectly parallel to the building wall, the right side of the building recedes and gets smaller as the horizontal lines become closer together toward the right edge.

In my view, the uncorrected version of this photograph is not usable. On the other hand, I’m not likely to start doing street photography with a tripod and a tilt shift lens any time soon! Correction in post seems to be a reasonable option. (And, to cut to the chase, the corrected version seen above really does make a nice print.)

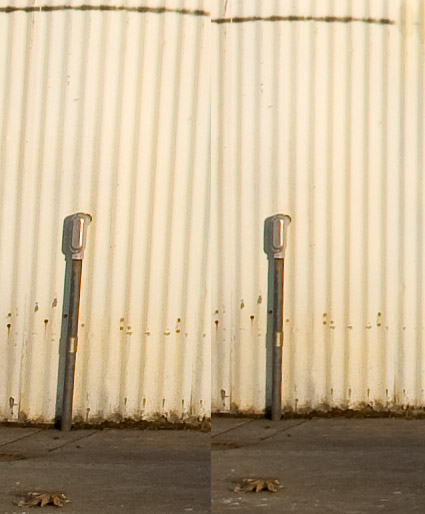
The next image includes two versions of roughly the same section of the photograph at 100% magnification. The crops come from the lower left area of the full image and include the conduit on the wall in the area in full sun. I could have used a section from all the way in the corner, but given the low contrast in that area the difference between the samples would be even harder to see – so I’ll stick with the section where the conduit provides a more visible contrast and frame of reference. Depending on your monitor, this resolution is equivalent to looking at a small section from a print that would be perhaps 50″ or 60″ wide. (Hint: that would be a very big print for a DSLR original – significantly larger than almost anyone ever produces! Made many 60″ x 40″ prints recently?)


100% magnification from lower left area of ‘Borch’s Iron Works and Machine Shop’ – two versions. © Copyright G Dan Mitchell – all rights reserved.

I believe that if you know what to look for and you  inspect this 100% crop very closely you can detect a small difference in the “sharpness” of the two photographs – but it is quite subtle even when viewed at 100%. In practical terms, however, this tiny effect that is just barely visible under close inspection at 100% in side-by-side comparisons on the screen is entirely insignificant in a print. Even with a very close inspection it would be quite invisible in a print of, say, 18″ x 24″ and probably even larger. Bottom line: Both would produce very sharp prints at very large sizes and essentially no one would comment that one is sharper than the other… though quite a few might notice that the corrected image looks a whole lot less distorted in the spatial sense.

Note: Article text edited/updated for clarity on 4/27/13.

This reinforces my belief that any degradation to the image quality that occurs when lens distortion, perspective, and/or horizontal level are corrected carefully during the post-processing stage can be very minimal and in the majority of situations will be invisible in prints.


G Dan Mitchell is a California photographer and visual opportunist. His book, “California’s Fall Color: A Photographer’s Guide to Autumn in the Sierra” is available from Heyday Books and Amazon.

Blog | About | Flickr | FacebookEmail

Links to Articles, Sales and Licensing, my Sierra Nevada Fall Color book, Contact Information.


All media © Copyright G Dan Mitchell and others as indicated. Any use requires advance permission from G Dan Mitchell.


George Hincapie, 2009 Tour of California

George Hincapie, 2009 Tour of California

George Hincapie, 2009 Tour of California. Sacramento, California. February 14, 2009. © Copyright G Dan Mitchell – all rights reserved.

George Hincapie of Team Columbia comes through the first turn of the prologue time trial stage at the 2009 Amgen Tour of California in Sacramento, California.

For anyone wondering how to photograph individual riders at a bicycle race, the time trial stages can provide your best opportunities. In contrast to the road stages where the whole pack may fly past you – once! – at 30 mph, in a time trial the riders come by one at a time.

The key, I think, is to pick a spot where the riders are likely to be in interesting situations and positions, such as at this tight u-turn at the end of the first straightaway. Here the riders had to slow down considerably in order to get through the turn, they were headed directly towards me as they came by, the bike angles in the turn can be dramatic, and the riders are often looking on up the road as they come through the turn.

Also, think about the lighting. Although it is cloudy in this shot, I also picked this location because I knew that the rider’s faces would be illuminated by sunlight. If the riders are backlit you’ll get very little facial detail unless you use fill flash. Also, if possible, take a look at what is in the background of the prospective shot. At one point yesterday I failed to pay enough attention and ended up with a series featuring out of focus blue outhouses in the background! :-)

One key is to get the rider in the right location within the frame. Once I figure out the right focal length for the distance to the turn from my position, I try to concentrate on the rider’s head, keeping it in the upper right corner of the frame (using this shot as an example). Otherwise it is all too easy to center the riders face in the frame and lose the bike and end up with a lot of nothing in the upper portion of the shot.

Focus can be tricky, and I think you have to figure out the best approach depending upon how well your camera/ lens can autofocus, what focal length you use, and whether you are going to try for one shot of each rider to use burst mode and capture several. In this case I used the AI Servo autofocus setting and I did have burst mode enabled, though in perhaps half the cases I only held the shutter release down long enough to capture a single frame. Although I used a fairly automated approach for focus, I set exposure manually. In a different situation I might even switch AF off entirely also, instead manually focusing on a specific point in the turn and then timing shots for when the riders arrive there.

This photograph is not in the public domain. It may not be used on websites, blogs, or in any other media without explicit advance permission from G Dan Mitchell.

keywords: george, hincapie, team, columbia, highroad, bike, bicycle, cycling, professional, road, race, time trial, prolog, prologue, amgen, tour, of, california, sacramento, usa, lean, yellow, white, helmet, turn, angle, rider, sports, stock