Urban Reflections

Urban Reflections
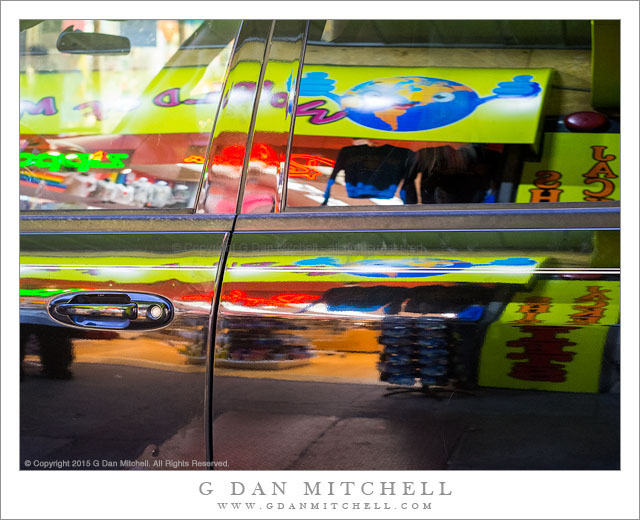
Reflected image of lights in San Francisco’s Chinatown

Urban Reflections. San Francisco, California. July 25, 2015. © Copyright 2015 G Dan Mitchell – all rights reserved.

Reflected image of lights in San Francisco’s Chinatown

This photograph comes from a late-July evening spent doing night street photography in San Francisco, this time working the area between North Beach and Union Square… which of course means largely the Chinatown district. We began photography at dusk a few streets up from the touristy main drag, walking along Stockton street as the last shops closed up for the day. From here we wandered down narrow streets to the main drag, Grant, arriving there as darkness came on.

Even though it was a Friday night during the height of tourist season, there were not all that many people here, at least by the sometimes extraordinarily crowded standards of this area. Some shops were still open — catering to the out-of-town visitors — but many had closed or were closing. Nonetheless, the street held a wild variety of bright lights. At several points I forced myself to take a break from the “normal” street photography stuff and try to look at things in different ways. Here I had decided to look at light reflected in other objects, in this case a parked car.


G Dan Mitchell is a California photographer and visual opportunist. His book, “California’s Fall Color: A Photographer’s Guide to Autumn in the Sierra” is available from Heyday Books and Amazon.
Blog | About | Flickr | Twitter | FacebookGoogle+ | 500px.com | LinkedIn | Email


All media © Copyright G Dan Mitchell and others as indicated. Any use requires advance permission from G Dan Mitchell.
Controlling Highlights (A Napkin Drawing)

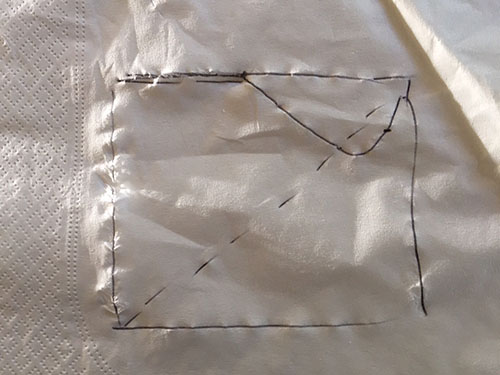
Earlier this month some friends and I got together in San Francisco, as we do every month, to share prints and talk photography. One friend shared prints of some beautiful night photographs he had made of a San Francisco subject. As we looked for little things that could make excellent prints even better we got to talking about highlights and how to control them. There are quite a few ways to do this, and I drew a little picture on a napkin to illustrate one technique I sometimes use to get a bit more detail out of areas that appear to be nearly pure white. The drawing looked a lot like the following.

Drawing on a napkin

It doesn’t look like much here, but trust me when I say that it made sense at the time. My friend picked up the napkin and took it with him as a reminder… and then a few days later contacted me to say he had lost the “napkin notes” from our conversation. He asked if I would mind describing the technique again. I said I’d do it — and three weeks later I finally got around to writing it up in this article!

Photographers using digital cameras have to watch out for over-exposing highlights. While we can recover a lot of detail from dark shadows, especially with current digital cameras, there is much less headroom at the bright end of the spectrum. When the exposure is too bright it is easy to end up with lost details in high luminosity areas. Go a little too far and you end up with that bane of digital photography, blown highlights, where the bright areas are simply pure white, leaving little or no hope of recovering the lost details. Continue reading Controlling Highlights (A Napkin Drawing)

Green Door, Brick Wall

Green Door, Brick Wall
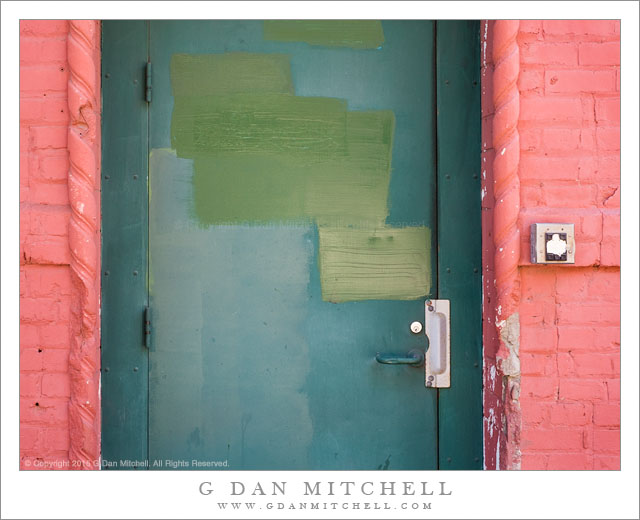
Repainted and patched green door in the brick wall of an old San Francisco building

Green Door, Brick Wall. San Francisco, California. August 14, 2015. © Copyright 2015 G Dan Mitchell – all rights reserved.

Repainted and patched green door in the brick wall of an old San Francisco building

On this mid-August morning I got up early, took the bus to the train and the train to San Francisco, then walked right up into the downtown core of the City. The walk began with among train commuters heading up toward Market Street, past construction zones, freeway interchanges, and lots of traffic. Once at Market Street I turned toward the Bay and walked slowly, stopping frequently to watch and photograph. At the end of Market I turned south and began my walk back to the train station along the Embarcadero.

Eventually I decided to leave the Embarcadero and follow smaller streets to cross back to the Caltrain station. Like so many parts of San Francisco today, this is an area in transition. There are still some gritty old buildings, but things are rapidly evolving in a much more upscale and expensive direction — and for now the gritty and the modern live side by side. But not for long. Given the price of real estate in this area, funky old buildings like the one with this doorway do not have much of a future. I imagine that almost all of them will be knocked down for more condos and townhouses, and those that remain will be cleaned up and gentrified in ways that retain only the stylish chic quality. Two things (at least) caught my attention about this doorway, at least sufficiently to make me stop for a minute and make a few exposures. First is the stark contrast between the pinkish color of the painted bricks and greens of the doorway. Second is the sum effect of paint over graffiti and then painting it over again, which often produces interesting cubist patterns on San Francisco architecture in places like this.


G Dan Mitchell is a California photographer and visual opportunist. His book, “California’s Fall Color: A Photographer’s Guide to Autumn in the Sierra” is available from Heyday Books and Amazon.
Blog | About | Flickr | Twitter | FacebookGoogle+ | 500px.com | LinkedIn | Email


All media © Copyright G Dan Mitchell and others as indicated. Any use requires advance permission from G Dan Mitchell.
Sharpening Basics: A Primer

(Minor updates to this article were made in February 2019.)

Sharpening is a very important step for optimizing digital photograph files. If you let your camera save images in the common .jpg format (a compressed image format that is often used on the web) the camera is applying sharpening to the image produced by the camera sensor. If you use the raw format (a high quality format that retains the original sensor data of the exposure) you will find that the photograph looks soft until you apply sharpening during the post production phase.

Sharpening optimizes the visibility of details that are already in your photograph. It is a matter of more clearly revealing what is in the photograph than  a matter of creating detail where there was none. Most sharpening works by increasing the contrast between light and dark areas in the image — what we call sharpening as actually more about adjusting the relative brightness of adjacent portions of the photograph.

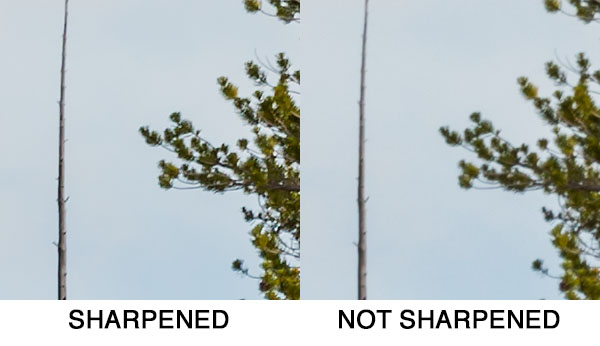
Typical sharpening

The image above is an example of a small section of a photograph.[1] It is a “100% magnification crop” of a tiny area from a much larger photograph made with a high megapixel DSLR camera. A “100% magnification crop” is an image displayed so that each pixel — or individual picture element — of the original photograph is displayed using a single pixel on the screen. (Things are a bit more complicated than that when using modern high-resolution monitors, though I’ll let that description stand for now.) 100% magnification crops let us look very closely at what is going on in photographas “at the pixel level.” In this case, the full original image from which these small examples were extracted would be equivalent to prints at a width of roughly 10-12 feet.

The right side of the example shows this tiny section of the photograph before sharpening. The left side shows the results of fairly typical sharpening. Continue reading Sharpening Basics: A Primer

Photographer and visual opportunist. Daily photos since 2005, plus articles, reviews, news, and ideas.