Tag Archives: large

Reader Question: 5Ds/5DsR Print Quality

Reader “Tom” writes to ask:

I’ve read your reports on the 5Dsr.  I assume by now you have one?  Maybe you have different thoughts now, but you seem to point to the new body being good for large print/detail, but maybe not so great for fine art print. 

If that’s still the case, what would you opt for if leaning towards fine art prints, large, maybe a heavily cropped slice measuring say 16″ x 72″ or so? Minus a mf body. 

I’m looking to switch bodies and thinking the 5dsr or possibly the Nikon d810.  Just curious what your thoughts might be if you ever had time. Thanks.

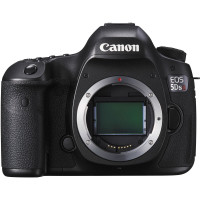
Canon EOS 5Ds DSLR
Canon EOS 5Ds DSLR

It has been a while since I’ve written about the Canon 5DS and the 5DsR cameras here, but since you asked I’ll share more based on my extensive use of the 5DsR over the past months. I have used it to photography everything from landscapes to people to wildlife. I think I see several sub-questions here, so let me respond to each of them.

Are the 5DsR and  5DS good for large prints? Continue reading Reader Question: 5Ds/5DsR Print Quality

Some Thoughts on Aperture and DOF and Related Issues

(This post is slightly adapted from something I recently posted in a photography forum in which hyperfocal distance, “DOF calculation” software, and related issues were under discussion.)

Shooting as a way to learn to understand how things like depth of field or “hyperfocal distance” work is a great idea – it is perhaps the best way to understand these concepts. I firmly believe that it is better than relying on tools such as software DOF (“depth of field”) calculators or tables. Fortunately, it is easy to do some basic experiments related to aperture and DOF and the so-called hyperfocal distance.

(The term hyperfocal distance can be interpreted in a couple of ways. In photography, this is often thought of as the distance at which you might focus in order to place objects at different distances in focus. If there is an object that is 15 feet from the camera and there are important subjects at infinity, the hyperfocal distance lies beyond the object that is 15 feet away and closer than the far away objects that might be in focus with the lens set to “infinity.”)

To find out about the effect of aperture on DOF, try the following:

  1. Put the camera on a tripod and compose some reasonable test image that includes subjects at various distances from the camera position, with a primary subject somewhere between the closest and the furthest.
  2. Focus on your primary subject within the scene.
  3. Shoot a series of images at apertures ranging from the largest to perhaps f/16 – shoot at f/1.4, f/2, f/2.8, etc. You might want to go as far as f/22 on full frame.*
  4. If you want to be a bit more methodical, you can use your DOF tables/software to “calculate” your hyperfocal distance, focus there, and repeat the process – but, frankly, I wouldn’t bother.
  5. Spend some time – likely well under an hour – looking over the results on your computer. If possible, make a few small prints to confirm the relevance (or not) of what you observe on the screen.

Another great way to understand the effect of aperture on the depth of field in your shot is to shoot in live view mode on your DSLR. Here you can press the DOF preview button, zoom in the live view display to 5x or 10x magnification, and pan around the magnified image on the rear display to see a very good approximation of the effect of your aperture choice on elements of the scene at various distances from the camera.

SIMPLIFICATION: A SECRET

Let me share a little secret. From reading some photography forum posts, you might get the idea that lots of photographers are going around making careful and technical calculations of precise hyperfocal distance and DOF and all the rest and then making exactingly accurate choices about aperture for each shot. In general, it doesn’t work that way in the real world, where photographers often tend to select aperture in basically three ways:

  1. In a shot where the subject doesn’t have a lot of depth and DOF isn’t really an issue, we tend to shoot at some default aperture that we believe is more or less optimal for overall resolution, corner resolution, and perhaps vignetting. On full frame, this might frequently be roughly f/8, though there are reasons to vary from that a bit sometimes.
  2. When working a subject on which we want very large DOF, we tend to go straight to the smallest aperture that we feel will produce large DOF and very good resolution. For me, this is typically f/16 on full frame, it might be no smaller than f/11 on cropped sensor cameras. There are situations in which I might use a smaller aperture, but they are very rare and will involve acceptance of some tradeoffs.
  3. When faced with a shot in which we want very narrow DOF, we tend to open up as much as we think we can, perhaps tending toward the largest aperture on the lens we are using. There are some additional factors to consider here, but I’ll leave them out for now in the spirit of simplifying.

So, a simple generalized approach:

  • Shoot at some middle-of-the-road aperture when DOF isn’t a major concern.
  • Shoot at the smallest acceptable aperture when you want large DOF – f/16 on full-frame or f/8-f/11 on crop.
  • Open way up when you want to minimize DOF.

This approach works in a wide range of real-world photographic situations, and it is especially useful to begin with it when you have to work quickly. There will be situations in which these are simply starting points, and you’ll need to make some modifications – for example, in very low light you might not be able to use that very small aperture if you are shooting hand-held, or your largest aperture might produce DOF that is too narrow for some subjects, and so on. But starting with this simple basic concept, using live view DOF preview when appropriate, and learning from experience will likely move you a lot further along on the road towards understanding and making effective use of aperture/DOF than trying to rely on some DOF calculator. (Depite their appearance of accuracy, these calculators depend on a bunch of assumptions that may not match up with your photography.)

* You can stop down further on cameras with larger sensors before you run into issues with diffraction blur, a softening of the overall image that occurs with the smallest apertures. To generalize, while you can stop down to roughly f/16 on a full frame and still produce very sharp images, you might want to avoid such a small aperture on your cropped sensor DSLR, perhaps avoiding anything smaller than about f/11… and you might want to be a bit cautious about using f/11.

© Copyright 2012 G Dan Mitchell – all rights reserved.

G Dan Mitchell is a California photographer whose subjects include the Pacific coast, redwood forests, central California oak/grasslands, the Sierra Nevada, California deserts, urban landscapes, night photography, and more.
Blog | About | Flickr | Twitter | FacebookGoogle+ | 500px.com | LinkedIn | Email

Text, photographs, and other media are © Copyright G Dan Mitchell (or others when indicated) and are not in the public domain and may not be used on websites, blogs, or in other media without advance permission from G Dan Mitchell.

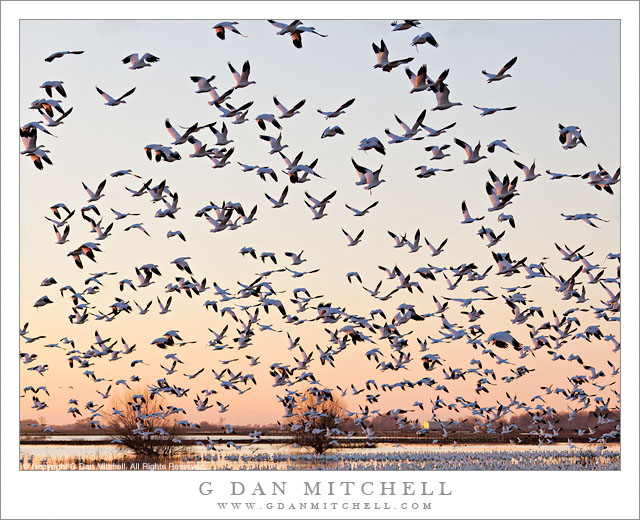
Ross’s Geese in Flight, Central Valley Evening

Ross's Geese in Flight, Central Valley Evening - A large flock of Ross's geese takes flight in the sunset sky above Central Valley ponds, California.
A large flock of Ross's geese takes flight in the sunset sky above Central Valley ponds, California.

Ross’s Geese in Flight, Central Valley Evening. Merced NWR, California. February 8, 2012. © Copyright 2012 G Dan Mitchell – all rights reserved.

A large flock of Ross’s geese takes flight in the sunset sky above Central Valley ponds, California.

Yes. More geese. And I’m sure that before the season ends there will be yet more still. (I have some images tucked away in my mind that I would like to try to convert into actual photographs this year if I can get back out to the Central Valley in the right sort of conditions.) The object here was to try to capture the rising flock filling the sky in this beautiful early evening light.

I think I admitted recently that I’m a newcomer when it comes to these birds. Although I’ve spend years in the outdoors of California, I somehow managed to almost completely miss the annual bird migration much less get a remote sense of its scale and beauty. At some point in the past decade or so I had my first real encounter with the birds that gave me a clue that something I needed to know about was going on. It was an early winter evening – I believe it was on the first evening of a long November drive up highway 5 to Seattle. I was well up the Sacramento Valley as twilight arrived, and for some reason I had stopped – probably pulled out at one of the roadside rest stops. I heard the sound and looked up and saw giant flocks of birds (of what type I hadn’t a clue) stretched out against the sky, and that moment stuck with me. Then last year a chance meeting with a colleague at the espresso stand at my college led me to look for the birds more seriously. As we stood in line, my friend mentioned that she had seen my photography and said something about the birds. I asked where they were, if I recall correctly, and she gave me directions to a place a ways south of Sacramento. I had originally had different plans, but the next morning I headed up there very early, arrived to a completely fogged-in road, but the sound of the birds all around me and occasional misty glimpses of sandhill cranes throughout the fog had me hooked. This year I’ve already been out there several times and I’m ready to go again!

G Dan Mitchell is a California photographer whose subjects include the Pacific coast, redwood forests, central California oak/grasslands, the Sierra Nevada, California deserts, urban landscapes, night photography, and more.
Blog | About | Flickr | Twitter | FacebookGoogle+ | 500px.com | LinkedIn | Email

Text, photographs, and other media are © Copyright G Dan Mitchell (or others when indicated) and are not in the public domain and may not be used on websites, blogs, or in other media without advance permission from G Dan Mitchell.

New Canon ‘Instant Rebate’ – Lenses and Speedlites

11/28/11 – New Canon ‘Instant Rebate’ Prices at B&H

(Note: Check the “Deals” page on this blog for more on this promotion, news about deals from ThinkTank Photo, and other periodic updates.)

UPDATE: Canon extended the ‘instant rebate’ promotion into early February. If you are going to purchase from B&H, the last full day to do so is FRIDAY, FEBRUARY 4, 2012!

The Canon ‘Instant Rebate’ promotion at site sponsor B&H features a lot of interesting gear at even lower prices than were available during a late 2011 promotion. In fact, the selection of lenses and electronic flashes and the size of the discounts seem unusually large.

Click the link to You may purchase directly through the following links to B&H (and help support this blog in the process) or click this link to see the full list of eligible equipment and/or purchase from B&H.  It runs from November 27 through FEBRUARY 4. (Note that B&H has very limited ordering hours on the final day of the promotion.)

Lenses (Note: This is an exceptional list of lenses and the discounts are larger than usual)

Canon EF-S 10-22mm f/3.5-4.5 USM Autofocus Lens (save $90)
Canon EF 16-35mm f/2.8L II USM Autofocus Lens (save $170)
Canon EF 17-40mm f/4L USM Lens (save $60)

Canon Super Wide Angle EF 14mm f/2.8L II USM Autofocus Lens (save $240)
Canon Super Wide Angle EF 20mm f/2.8 USM Autofocus Lens (save $60)
Canon EF 24mm f/1.4L II USM Autofocus Lens (save $180)
Canon EF 35mm f/1.4L USM Wide-Angle Autofocus Lens (save $150)

Canon EF-S 15-85mm f/3.5-5.6 IS USM Lens (save $100)
Canon EF-S 17-55mm f/2.8 IS USM Zoom Lens (save $120)
Canon Zoom Wide Angle-Telephoto EF 24-70mm f/2.8L USM Autofocus Lens (save $120)

Canon Normal EF 50mm f/1.2L USM Autofocus Lens USM (save $180)
Canon 50mm f/1.4 USM Autofocus Lens (save $40)
Canon Normal EF 50mm f/1.8 II Autofocus Lens (save $15)
Canon EF 85mm f/1.2L II USM Autofocus Lens (save $230)
Canon 85mm f/1.8 EF USM Autofocus Lens (save $40)
Canon Telephoto EF 100mm f/2.0 USM Autofocus Lens (save $50)

Canon 50mm f/2.5 Compact Macro Autofocus Lens (save $30)
Canon EF-S 60mm f/2.8 Macro USM Lens (save $60)
Canon Macro Photo MP-E 65mm f/2.8 1-5x Manual Focus Lens (save $110)
Canon EF 100mm f/2.8L Macro IS USM Lens (save $110)
Canon 100mm f/2.8 USM Macro Autofocus Lens (save $60)
Canon Telephoto EF 180mm f/3.5L Macro USM Autofocus Lens (save $170)

Canon 28-300mm f/3.5-5.6L IS USM Autofocus Lens (save $270)
Canon EF 70-200mm f/2.8L IS II USM Telephoto Zoom Lens (save $300)
Canon EF 70-200mm f/2.8L USM Telephoto Zoom Lens (save $150)
Canon EF 70-200mm f/4L IS USM Lens (save $150)
Canon EF 70-200mm f/4L USM Lens (save $75)
Canon EF 70-300mm f/4.5-5.6 DO IS USM Lens (save $140)
Canon EF 70-300mm f/4-5.6L IS USM Telephoto Lens (save $150)
Canon 100-400mm f/4.5-5.6L IS USM Autofocus Lens (save $170)

Canon Telephoto EF 135mm f/2.0L USM Autofocus Lens (save $110)
Canon Telephoto EF 300mm f/4.0L IS Image Stabilizer USM Autofocus Lens (save $140)

Canon 400mm f/5.6L USM Autofocus Lens (save $130)

Canon Wide Tilt/Shift TS-E 17mm f/4L Manual Focus Lens (save $260)
Canon TS-E 24mm f/3.5L II Tilt-Shift Manual Focus Lens (save $230)
Canon TS-E 45mm f/2.8 Normal Tilt Shift Manual Focus Lens (save $150)
Canon Telephoto Tilt Shift TS-E 90mm f/2.8 Manual Focus Lens (save $150)

Speedlites

Canon Speedlite 580EX II (save $50)
Canon 430EX II Speedlite (save $30)
Canon Speedlite 320EX (save $25)
Canon Speedlite 270EX II (save $15)
Canon MT-24EX Macro Twin Lite Ringlite Flash (save $60)
Canon MR-14EX TTL Macro Ring Lite Flash (save $45)