Tag Archives: large

Format Size Comparison Data

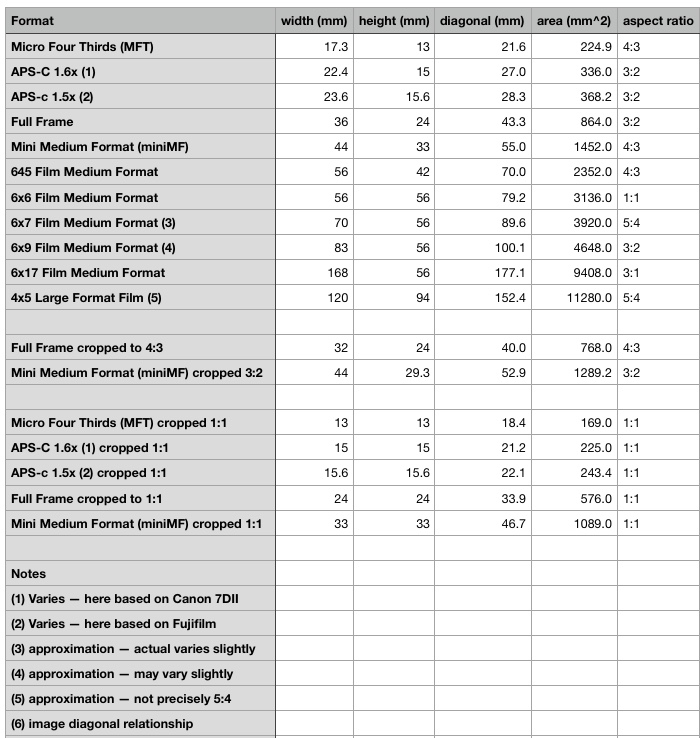
The following charts summarize various data that are useful when comparing formats, either film or digital. (Not all possible comparisons are shown.) Some additional background regarding some of the traditional film formats known as “medium format” is found at the end of this post.

Basic Formats Data
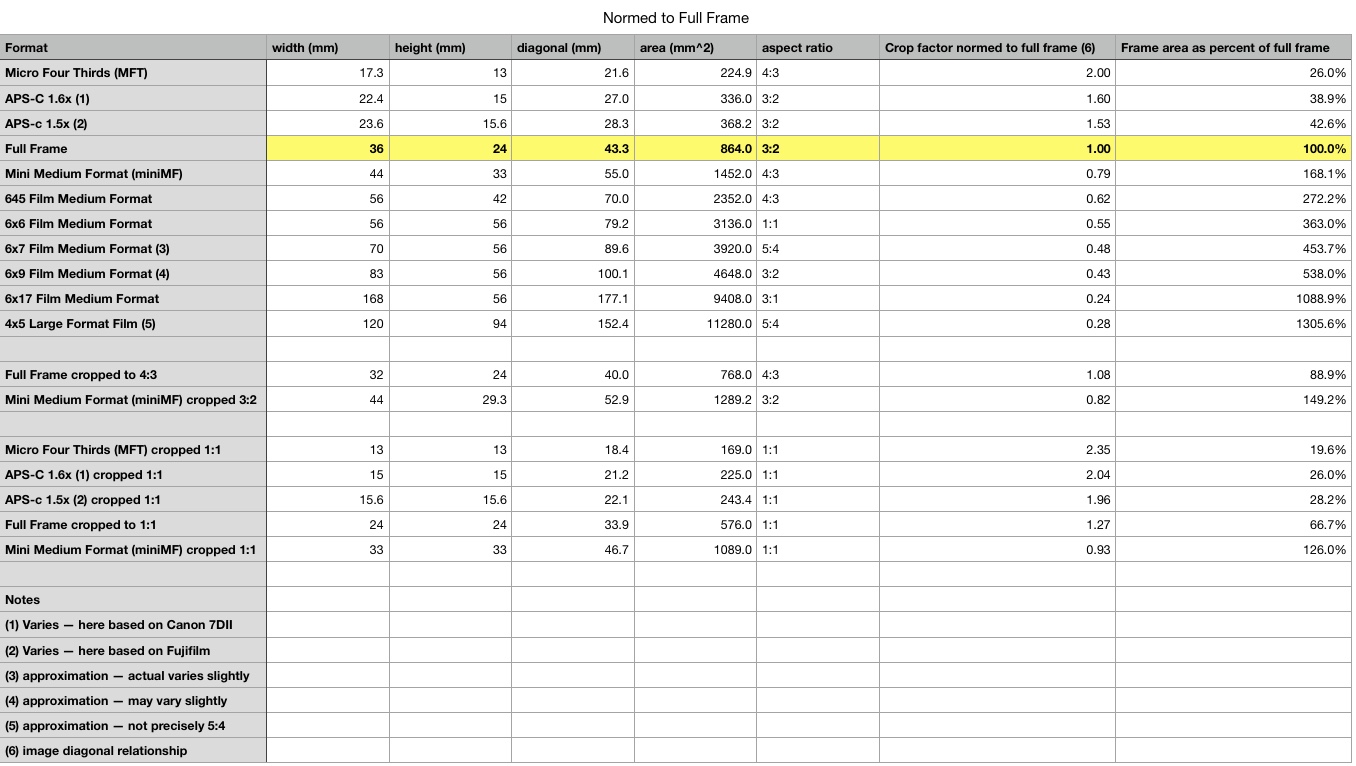
Comparisons Normalized to Full Frame Format
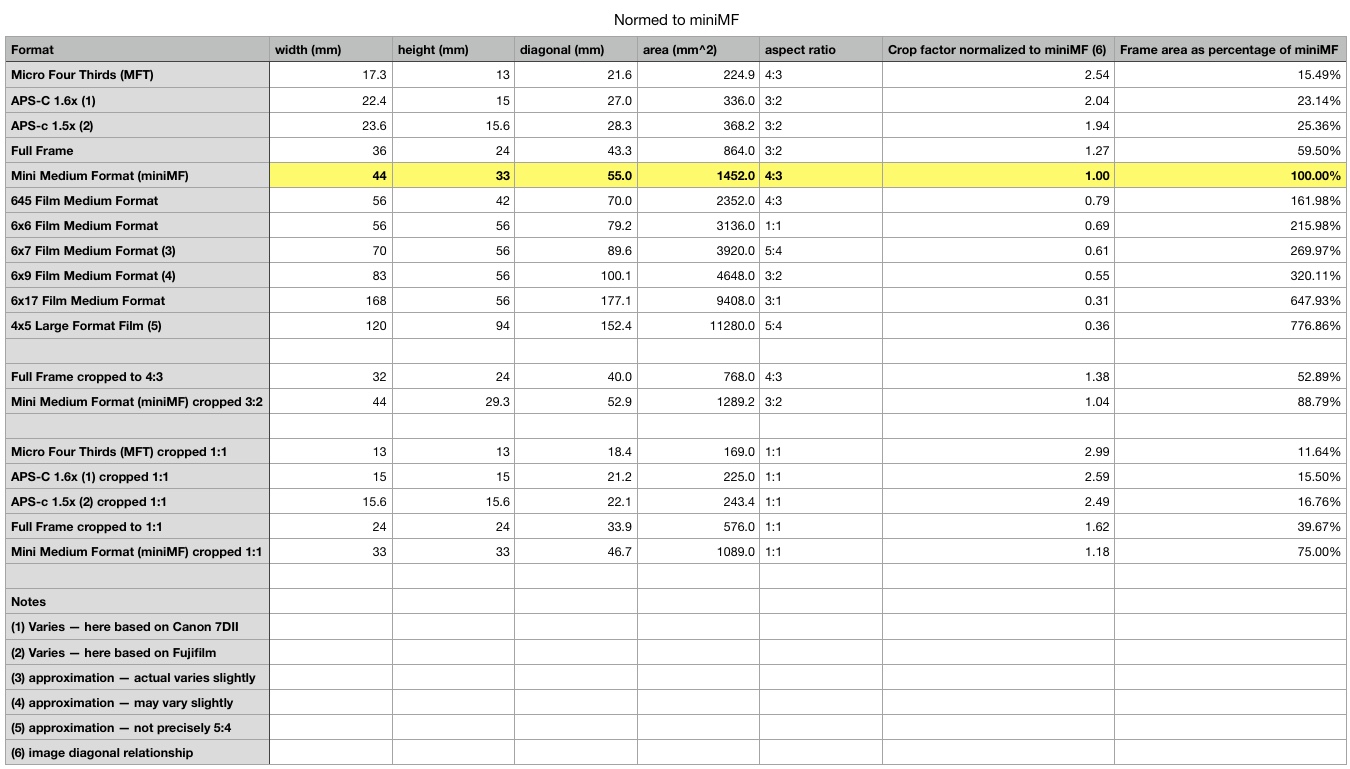
Comparisons Normalized to miniMF 33×44 Format
Comparisons Normalized to 645 Medium Format Film
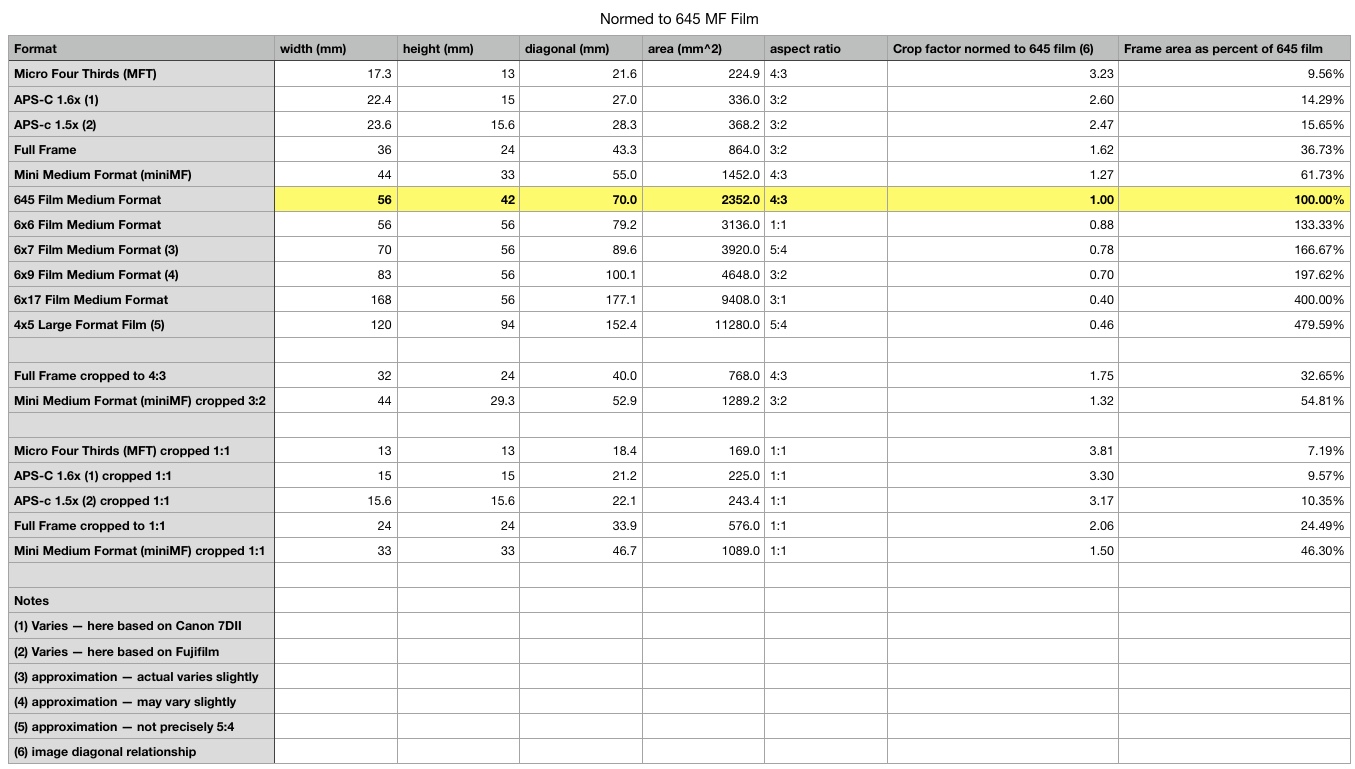
Comparisons Normalized to Full Frame at 4:3 Crop
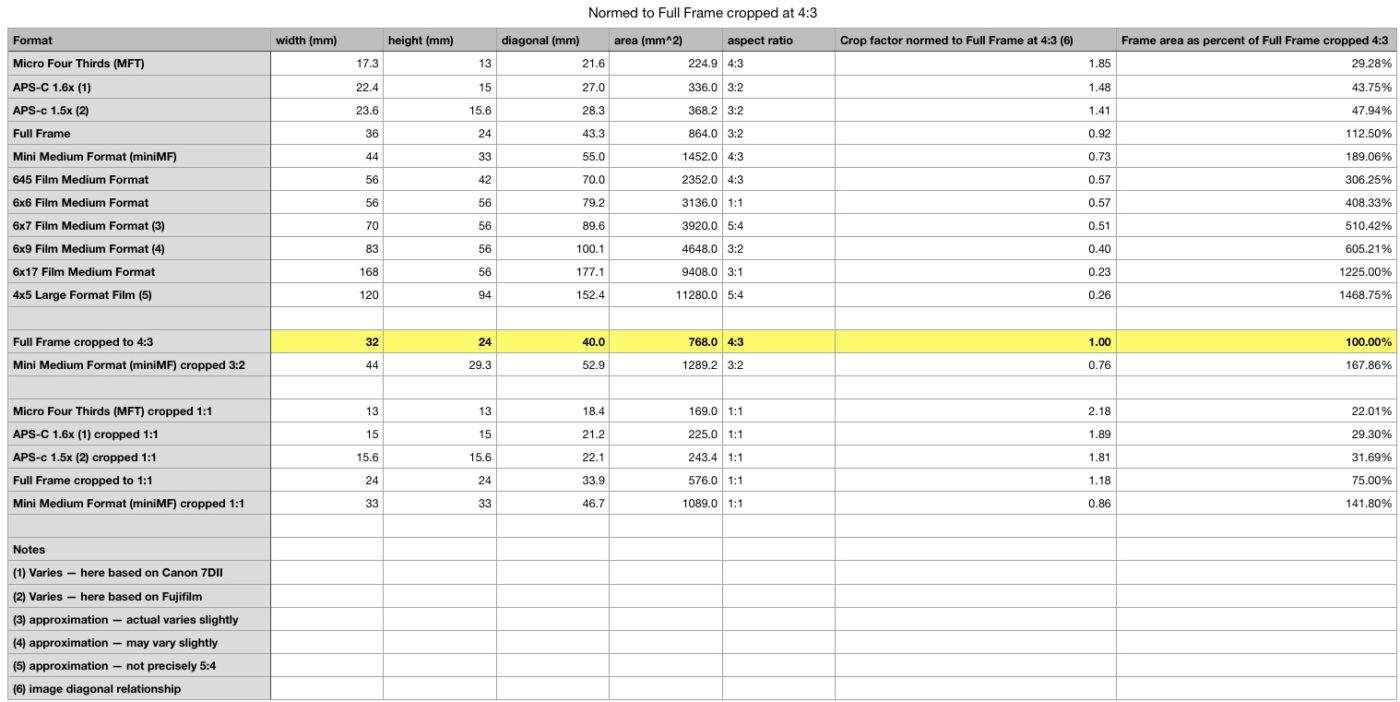
Comparisons of Square Formats Normalized to 6×6 Medium Format Film
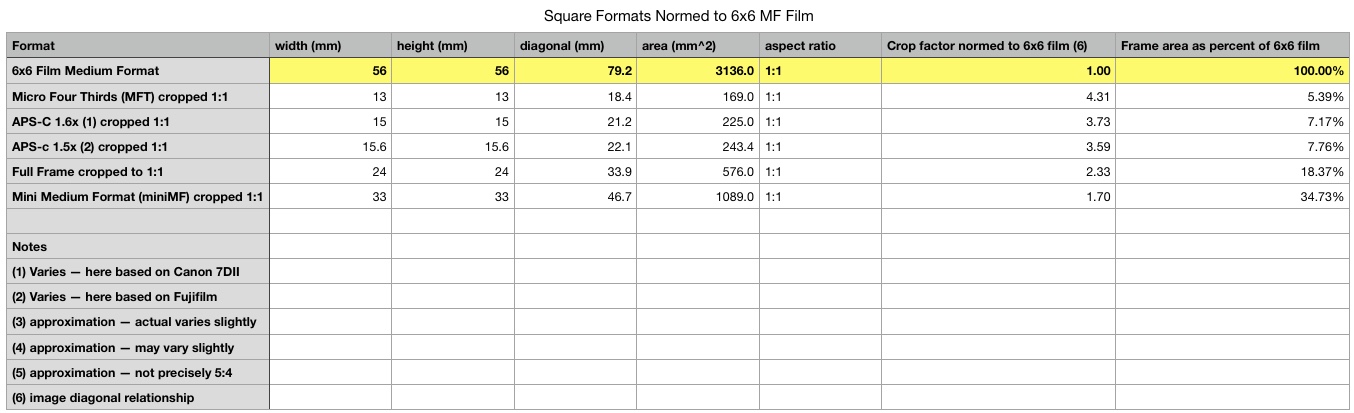
Comparions Normalized to 6×17 “Panoramic” Medium Format Film
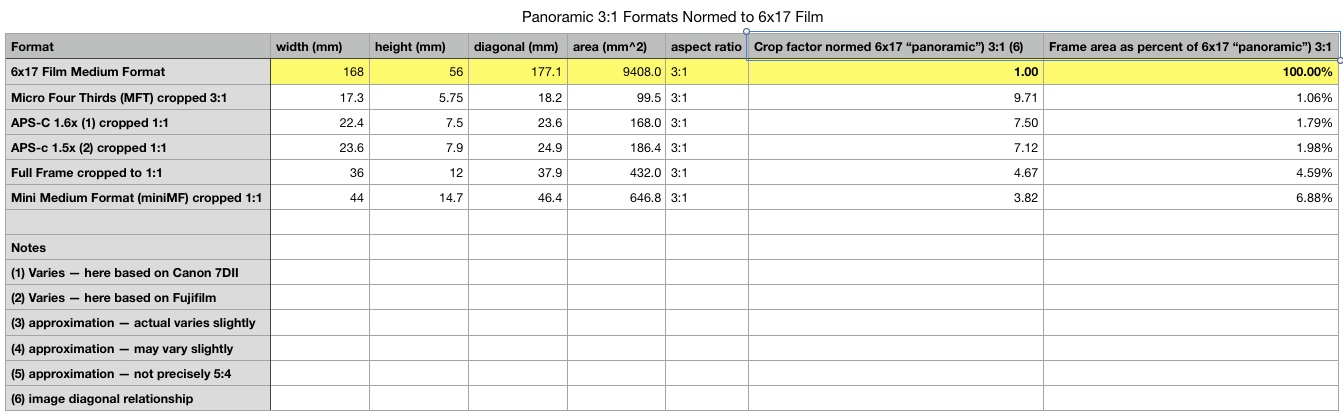
Visual Comparison

The following illustration shows the relative sizes of some common digital and film formats. (Not all variations are shown.) The leftmost group includes common digital formats. The next group — indicated in yellow — includes common traditional formats collectively known as “medium format” film. At the far right is 4×5 “large format” film.
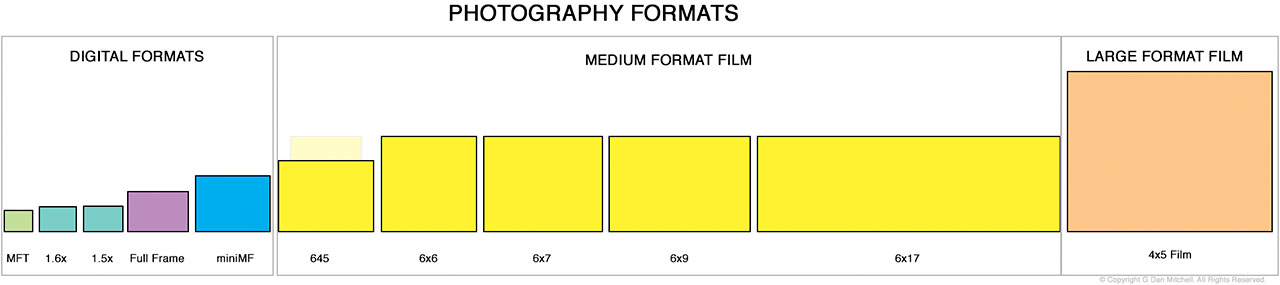
A chart showing the relative sizes of several digital and film photography formats ranging from micro-four-thirds to 4x5 film
A chart showing the relative sizes of several digital and film photography formats ranging from micro-four-thirds to 4×5 film

Notes on this illustration:

  • 645 film is shown in both the “landscape” and “portrait” orientations in order to make clear that it shares the 56mm dimension with the other types of medium format film. (The portrait version is partially hidden the landscape version.)
  • There are multiple variations on “large format film.” Shown here is the most common 4″ x 5″ size, the smallest of the large format film formats typically still in use.

About Medium Format Film

While those of us who have “done photography” for a long time are familiar with the traditional “medium formats,” those without that perspective may be less (or not at all) familiar with the meaning of the term. Medium format” traditionally (for many decades) referred to film formats using (primarily) 120/220 film with a 6cm (60mm) physical width. While details of these formats are included in the tables above, here is a brief contextual overview:

  • 645 format (1) is the smallest of the traditional common film medium formats. It is named based on “6cm x 4.5cm.” In actual use the frame size is slightly smaller than the 6cm film width at about 56mm. (This is typical of film medium formats — the “6” always refers to the physical film width, not the smaller actual image size.)
  • 6×6 format produces a square image of approximately 56mm x 56mm, and is the next larger film medium format above 645.
  • 6×7 format uses the 56mm width-determined dimension for its shorter side, and thus has a larger area than 6×6. (It approximately replicates the 5:4 aspect ratio of LF film.)
  • 6×9 format also keeps the 56mm dimension its shorter side, but expands the longer dimension to produce a 3:2 aspect ratio – like 35mm film and full frame digital.
  • 6×17 format (also known as “panoramic format”) is the largest common medium format. It also uses the 56mm dimension for its short side but greatly extends the long dimension to produce a 3:1 aspect ratio.

(1) While Pentax names its miniMF digital cameras using the “645” term, they do not use 645 format sensors. They use 33mm x 44mm sensors, just like Fujifilm, Hasselblad, and others. Additional note: On a few occasions, Fujifilm has referred to 33mm x 44mm format as “super full frame” and even… “large format!”

(For comparison purposes, note that the dimension that is 56mm on 645 film format is 44mm on miniMF. When comparing to the other medium formats, the analogous comparison is between 56mm and 33mm.)


G Dan Mitchell is a California photographer and visual opportunist. His book, “California’s Fall Color: A Photographer’s Guide to Autumn in the Sierra” is available from Heyday Books and Amazon.

Blog | About | Flickr | FacebookEmail

Links to Articles, Sales and Licensing, my Sierra Nevada Fall Color book, Contact Information.


All media © Copyright G Dan Mitchell and others as indicated. Any use requires advance permission from G Dan Mitchell.
Talus, Reflection

Talus, Reflection
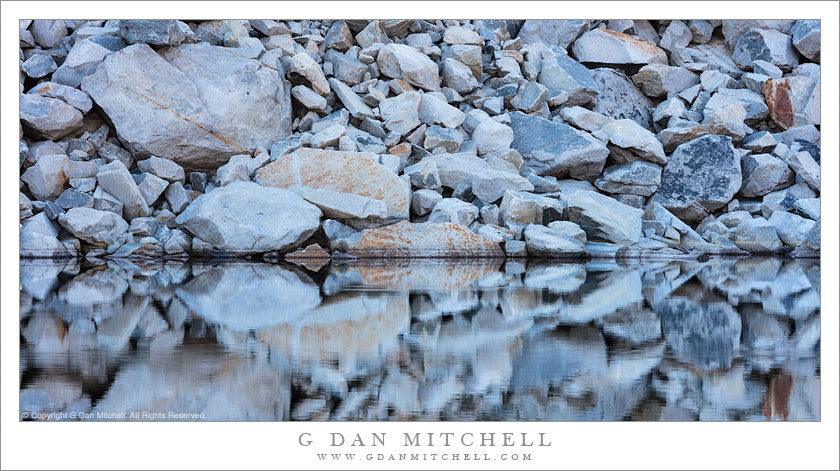
A talus field of large boulders meets the shoreline of an alpine lake

Talus, Reflection. © Copyright 2018 G Dan Mitchell – all rights reserved.

A talus field of large boulders meets the shoreline of an alpine lake

And, yes, another “going with the blue” photograph of talus boulders. It is, I admit, turning into a bit of a theme among my photographs from the September backcountry Eastern Sierra photography week. If you follow my posts you probably already know the following, but for anyone who hasn’t read the previous text… we were camped at a lake in a deep north-south oriented valley with very high peaks on either side. Immediately to the east of our camp, across a nearby lake, was a huge talus slope, full of randomly arranged boulders from top to bottom.

Because of the north-south trend of the canyon, early morning and evening direct light was blocked, and we had long periods of “blue hour” shaded light to work with every day. Yes, the light actually is very blue. It comes from having only the blue sky — a sort of giant natural light panel — as the light sources. The question in post is always how blue to let the scene be, since the actual blue can be shocking to viewers. (Our complex sensory system sees this as less blue — the mental process subconsciously says, essentially, “Yes, this is blue, but I know the actual color of rocks, so I’ll pretend I don’t see the blue!”) The photographer gets to make the subjective call on how blue things should be. At times I’ve gone so far as to completely neutrally the blue tones, and if I did so here you would probably feel that it looked natural. On the other hand, it is interesting to me to “go with the blue” and think about the real color of light and the effect that it has on our perceptions. (To be honest, I have actually reduced the amount of blue in the scene!


See top of this page for Articles, Sales and Licensing, my Sierra Nevada Fall Color book, Contact Information and more.

G Dan Mitchell is a California photographer and visual opportunist. His book, “California’s Fall Color: A Photographer’s Guide to Autumn in the Sierra” is available from Heyday Books and Amazon.
Blog | About | Flickr | FacebookEmail


All media © Copyright G Dan Mitchell and others as indicated. Any use requires advance permission from G Dan Mitchell.

Reader Question: 5Ds/5DsR Print Quality

Reader “Tom” writes to ask:

I’ve read your reports on the 5Dsr.  I assume by now you have one?  Maybe you have different thoughts now, but you seem to point to the new body being good for large print/detail, but maybe not so great for fine art print. 

If that’s still the case, what would you opt for if leaning towards fine art prints, large, maybe a heavily cropped slice measuring say 16″ x 72″ or so? Minus a mf body. 

I’m looking to switch bodies and thinking the 5dsr or possibly the Nikon d810.  Just curious what your thoughts might be if you ever had time. Thanks.

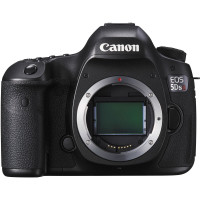
Canon EOS 5Ds DSLR
Canon EOS 5Ds DSLR

It has been a while since I’ve written about the Canon 5DS and the 5DsR cameras here, but since you asked I’ll share more based on my extensive use of the 5DsR over the past months. I have used it to photography everything from landscapes to people to wildlife. I think I see several sub-questions here, so let me respond to each of them.

Are the 5DsR and  5DS good for large prints? Continue reading Reader Question: 5Ds/5DsR Print Quality

Some Thoughts on Aperture and DOF and Related Issues

(This post is slightly adapted from something I recently posted in a photography forum in which hyperfocal distance, “DOF calculation” software, and related issues were under discussion.)

Shooting as a way to learn to understand how things like depth of field or “hyperfocal distance” work is a great idea – it is perhaps the best way to understand these concepts. I firmly believe that it is better than relying on tools such as software DOF (“depth of field”) calculators or tables. Fortunately, it is easy to do some basic experiments related to aperture and DOF and the so-called hyperfocal distance.

(The term hyperfocal distance can be interpreted in a couple of ways. In photography, this is often thought of as the distance at which you might focus in order to place objects at different distances in focus. If there is an object that is 15 feet from the camera and there are important subjects at infinity, the hyperfocal distance lies beyond the object that is 15 feet away and closer than the far away objects that might be in focus with the lens set to “infinity.”)

To find out about the effect of aperture on DOF, try the following:

  1. Put the camera on a tripod and compose some reasonable test image that includes subjects at various distances from the camera position, with a primary subject somewhere between the closest and the furthest.
  2. Focus on your primary subject within the scene.
  3. Shoot a series of images at apertures ranging from the largest to perhaps f/16 – shoot at f/1.4, f/2, f/2.8, etc. You might want to go as far as f/22 on full frame.*
  4. If you want to be a bit more methodical, you can use your DOF tables/software to “calculate” your hyperfocal distance, focus there, and repeat the process – but, frankly, I wouldn’t bother.
  5. Spend some time – likely well under an hour – looking over the results on your computer. If possible, make a few small prints to confirm the relevance (or not) of what you observe on the screen.

Another great way to understand the effect of aperture on the depth of field in your shot is to shoot in live view mode on your DSLR. Here you can press the DOF preview button, zoom in the live view display to 5x or 10x magnification, and pan around the magnified image on the rear display to see a very good approximation of the effect of your aperture choice on elements of the scene at various distances from the camera.

SIMPLIFICATION: A SECRET

Let me share a little secret. From reading some photography forum posts, you might get the idea that lots of photographers are going around making careful and technical calculations of precise hyperfocal distance and DOF and all the rest and then making exactingly accurate choices about aperture for each shot. In general, it doesn’t work that way in the real world, where photographers often tend to select aperture in basically three ways:

  1. In a shot where the subject doesn’t have a lot of depth and DOF isn’t really an issue, we tend to shoot at some default aperture that we believe is more or less optimal for overall resolution, corner resolution, and perhaps vignetting. On full frame, this might frequently be roughly f/8, though there are reasons to vary from that a bit sometimes.
  2. When working a subject on which we want very large DOF, we tend to go straight to the smallest aperture that we feel will produce large DOF and very good resolution. For me, this is typically f/16 on full frame, it might be no smaller than f/11 on cropped sensor cameras. There are situations in which I might use a smaller aperture, but they are very rare and will involve acceptance of some tradeoffs.
  3. When faced with a shot in which we want very narrow DOF, we tend to open up as much as we think we can, perhaps tending toward the largest aperture on the lens we are using. There are some additional factors to consider here, but I’ll leave them out for now in the spirit of simplifying.

So, a simple generalized approach:

  • Shoot at some middle-of-the-road aperture when DOF isn’t a major concern.
  • Shoot at the smallest acceptable aperture when you want large DOF – f/16 on full-frame or f/8-f/11 on crop.
  • Open way up when you want to minimize DOF.

This approach works in a wide range of real-world photographic situations, and it is especially useful to begin with it when you have to work quickly. There will be situations in which these are simply starting points, and you’ll need to make some modifications – for example, in very low light you might not be able to use that very small aperture if you are shooting hand-held, or your largest aperture might produce DOF that is too narrow for some subjects, and so on. But starting with this simple basic concept, using live view DOF preview when appropriate, and learning from experience will likely move you a lot further along on the road towards understanding and making effective use of aperture/DOF than trying to rely on some DOF calculator. (Depite their appearance of accuracy, these calculators depend on a bunch of assumptions that may not match up with your photography.)

* You can stop down further on cameras with larger sensors before you run into issues with diffraction blur, a softening of the overall image that occurs with the smallest apertures. To generalize, while you can stop down to roughly f/16 on a full frame and still produce very sharp images, you might want to avoid such a small aperture on your cropped sensor DSLR, perhaps avoiding anything smaller than about f/11… and you might want to be a bit cautious about using f/11.

© Copyright 2012 G Dan Mitchell – all rights reserved.

G Dan Mitchell is a California photographer whose subjects include the Pacific coast, redwood forests, central California oak/grasslands, the Sierra Nevada, California deserts, urban landscapes, night photography, and more.
Blog | About | Flickr | Twitter | FacebookGoogle+ | 500px.com | LinkedIn | Email

Text, photographs, and other media are © Copyright G Dan Mitchell (or others when indicated) and are not in the public domain and may not be used on websites, blogs, or in other media without advance permission from G Dan Mitchell.