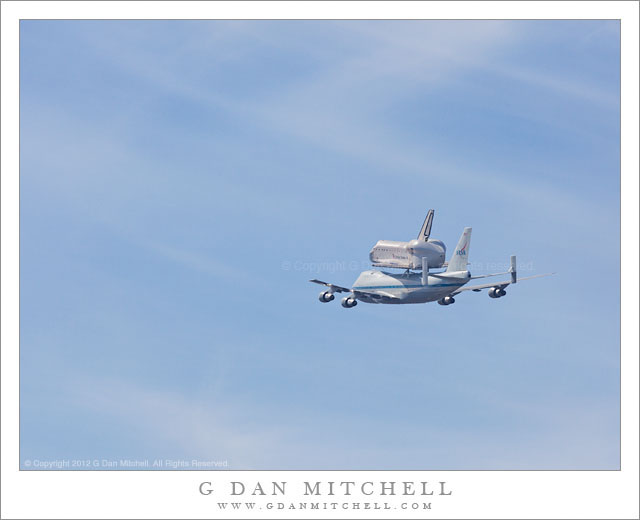
I Swear He is Smiling

Smiling pilot of the carrier aircraft - Space Shuttle Endeavour Flyover - NASA Ames Moffett Field, California. A smiling pilot is visible through the cockpit window of the space shuttle Endeavour during its flyover of the NASA Ames Moffett Field
A smiling pilot is visible through the cockpit window of the space shuttle Endeavour during its flyover of the NASA Ames Moffett Field

Space Shuttle Endeavour Flyover – Smiling Pilot. NASA Ames Moffett Field, California. September 21, 2012. © Copyright 2012 G Dan Mitchell – all rights reserved.

A smiling pilot is visible through the cockpit window of the space shuttle Endeavour during its flyover of the NASA Ames Moffett Field.

Just for fun… this is a 100% magnification crop of a section of one of my photographs of the flyover by space shuttle Endeavour, mounted on its 747 transport aircraft. I made the photograph on September 21, 2012 as it flew over the NASA Ames Moffett Field in the San Francisco Bay Area. While working on the original photograph I was looking closely at it when I realized that the face of the pilot (co-pilot?) is visible in the cockpit window… and I swear he is grinning! :-)

(Since I know some will ask… Canon 5D2 with Canon EF 100-400mm f/4.5-5.6 L IS, handheld.)

G Dan Mitchell is a California photographer whose subjects include the Pacific coast, redwood forests, central California oak/grasslands, the Sierra Nevada, California deserts, urban landscapes, night photography, and more.
Blog | About | Flickr | Twitter | FacebookGoogle+ | 500px.com | LinkedIn | Email

Text, photographs, and other media are © Copyright G Dan Mitchell (or others when indicated) and are not in the public domain and may not be used on websites, blogs, or in other media without advance permission from G Dan Mitchell.

Meadow’s Edge, Lembert Dome, and Mount Dana

Meadow's Edge, Lembert Dome, and Mount Dana - Trees grow at the edges of Tuolumne Meadows as Lembert Dome and Mount Dana rise beyond, Yosemite National Park
Trees grow at the edges of Tuolumne Meadows as Lembert Dome and Mount Dana rise beyond, Yosemite National Park

Meadow’s Edge, Lembert Dome, and Mount Dana. Yosemite National Park, California. September 13. 2012. © Copyright 2012 G Dan Mitchell – all rights reserved.

Trees grow at the edges of Tuolumne Meadows as Lembert Dome and Mount Dana rise beyond, Yosemite National Park.

This photograph includes a bunch of Tuolumne Meadows icons familiar to most anyone who has spent time there – and I’ve spent a lot of time in and around this area over the years! The first obvious icon is the meadow itself, here near the “lower” section before it turns away from the highway and the Tuolumne River heads off towards Glen Aulin and eventually to the abomination of Hetch Hetchy Reservoir. The two prominences rising beyond the meadow are both icon. The closer of the two is Lembert Dome, well known to almost all visitors, especially the many who have hiked to its summit to experience the panoramic view of the area. Beyond Lembert Dome is Mount Dana, the second-highest peak in Yosemite. It is located on the eastern boundary of the park right above the entrance at Tioga Pass. For me, there are other icons in this scene as well, though they may be more personal. The lodgepole pine trees silhouetted along the right edge of the frame are found all over the region. The backlit haze, formed as the morning sun just clears the Sierra crest, is a condition that I strongly identify with Tuolumne – and it is a frequent photographic subject.

This simple shot posed some real technical challenges. Perhaps most obviously, the scene includes an extremely large dynamic range between the very bright areas of sunlit haze along the right shoulder of Mount Dana and the dark silhouettes of the backlit trees. In some situations I might make two exposures and blend them in post, but that does not work so well when thing tree trunks and branches stand against the sky. This is a single exposure that just barely contained the brightest tones, and from which I was able to recover just enough detail in the shadows. The composition might seem a bit odd to some, with the dark mass of the silhouetted trees very close to the right edge of the frame. The idea was to create a sense that the trees, or at least an observer among the trees, is looking out from them into the light-filled open space of the meadow.

G Dan Mitchell is a California photographer whose subjects include the Pacific coast, redwood forests, central California oak/grasslands, the Sierra Nevada, California deserts, urban landscapes, night photography, and more.
Blog | About | Flickr | Twitter | FacebookGoogle+ | 500px.com | LinkedIn | Email

Text, photographs, and other media are © Copyright G Dan Mitchell (or others when indicated) and are not in the public domain and may not be used on websites, blogs, or in other media without advance permission from G Dan Mitchell.

Some Thoughts on Aperture and DOF and Related Issues

(This post is slightly adapted from something I recently posted in a photography forum in which hyperfocal distance, “DOF calculation” software, and related issues were under discussion.)

Shooting as a way to learn to understand how things like depth of field or “hyperfocal distance” work is a great idea – it is perhaps the best way to understand these concepts. I firmly believe that it is better than relying on tools such as software DOF (“depth of field”) calculators or tables. Fortunately, it is easy to do some basic experiments related to aperture and DOF and the so-called hyperfocal distance.

(The term hyperfocal distance can be interpreted in a couple of ways. In photography, this is often thought of as the distance at which you might focus in order to place objects at different distances in focus. If there is an object that is 15 feet from the camera and there are important subjects at infinity, the hyperfocal distance lies beyond the object that is 15 feet away and closer than the far away objects that might be in focus with the lens set to “infinity.”)

To find out about the effect of aperture on DOF, try the following:

  1. Put the camera on a tripod and compose some reasonable test image that includes subjects at various distances from the camera position, with a primary subject somewhere between the closest and the furthest.
  2. Focus on your primary subject within the scene.
  3. Shoot a series of images at apertures ranging from the largest to perhaps f/16 – shoot at f/1.4, f/2, f/2.8, etc. You might want to go as far as f/22 on full frame.*
  4. If you want to be a bit more methodical, you can use your DOF tables/software to “calculate” your hyperfocal distance, focus there, and repeat the process – but, frankly, I wouldn’t bother.
  5. Spend some time – likely well under an hour – looking over the results on your computer. If possible, make a few small prints to confirm the relevance (or not) of what you observe on the screen.

Another great way to understand the effect of aperture on the depth of field in your shot is to shoot in live view mode on your DSLR. Here you can press the DOF preview button, zoom in the live view display to 5x or 10x magnification, and pan around the magnified image on the rear display to see a very good approximation of the effect of your aperture choice on elements of the scene at various distances from the camera.

SIMPLIFICATION: A SECRET

Let me share a little secret. From reading some photography forum posts, you might get the idea that lots of photographers are going around making careful and technical calculations of precise hyperfocal distance and DOF and all the rest and then making exactingly accurate choices about aperture for each shot. In general, it doesn’t work that way in the real world, where photographers often tend to select aperture in basically three ways:

  1. In a shot where the subject doesn’t have a lot of depth and DOF isn’t really an issue, we tend to shoot at some default aperture that we believe is more or less optimal for overall resolution, corner resolution, and perhaps vignetting. On full frame, this might frequently be roughly f/8, though there are reasons to vary from that a bit sometimes.
  2. When working a subject on which we want very large DOF, we tend to go straight to the smallest aperture that we feel will produce large DOF and very good resolution. For me, this is typically f/16 on full frame, it might be no smaller than f/11 on cropped sensor cameras. There are situations in which I might use a smaller aperture, but they are very rare and will involve acceptance of some tradeoffs.
  3. When faced with a shot in which we want very narrow DOF, we tend to open up as much as we think we can, perhaps tending toward the largest aperture on the lens we are using. There are some additional factors to consider here, but I’ll leave them out for now in the spirit of simplifying.

So, a simple generalized approach:

  • Shoot at some middle-of-the-road aperture when DOF isn’t a major concern.
  • Shoot at the smallest acceptable aperture when you want large DOF – f/16 on full-frame or f/8-f/11 on crop.
  • Open way up when you want to minimize DOF.

This approach works in a wide range of real-world photographic situations, and it is especially useful to begin with it when you have to work quickly. There will be situations in which these are simply starting points, and you’ll need to make some modifications – for example, in very low light you might not be able to use that very small aperture if you are shooting hand-held, or your largest aperture might produce DOF that is too narrow for some subjects, and so on. But starting with this simple basic concept, using live view DOF preview when appropriate, and learning from experience will likely move you a lot further along on the road towards understanding and making effective use of aperture/DOF than trying to rely on some DOF calculator. (Depite their appearance of accuracy, these calculators depend on a bunch of assumptions that may not match up with your photography.)

* You can stop down further on cameras with larger sensors before you run into issues with diffraction blur, a softening of the overall image that occurs with the smallest apertures. To generalize, while you can stop down to roughly f/16 on a full frame and still produce very sharp images, you might want to avoid such a small aperture on your cropped sensor DSLR, perhaps avoiding anything smaller than about f/11… and you might want to be a bit cautious about using f/11.

© Copyright 2012 G Dan Mitchell – all rights reserved.

G Dan Mitchell is a California photographer whose subjects include the Pacific coast, redwood forests, central California oak/grasslands, the Sierra Nevada, California deserts, urban landscapes, night photography, and more.
Blog | About | Flickr | Twitter | FacebookGoogle+ | 500px.com | LinkedIn | Email

Text, photographs, and other media are © Copyright G Dan Mitchell (or others when indicated) and are not in the public domain and may not be used on websites, blogs, or in other media without advance permission from G Dan Mitchell.

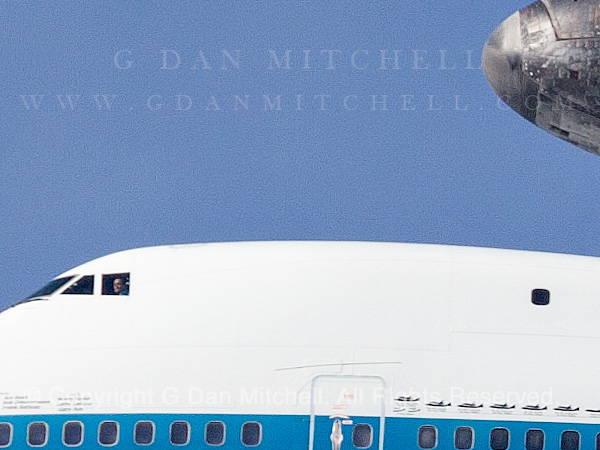
Departure – Space Shuttle Endeavour Flyover #4

Space Shuttle Flyover - Moffett Field #4 - The space shuttle Endeavour departs after flying over the NASA/Ames Research Center Moffett Airfield
The space shuttle Endeavour departs after flying over the NASA/Ames Research Center Moffett Airfield

Departure – Space Shuttle Endeavour Flyover #4. NASA/Ames Moffett Field, California. September 21, 2012. © Copyright 2012 G Dan Mitchell – all rights reserved.

The space shuttle Endeavour departs after flying over the NASA/Ames Research Center Moffett Airfield.

Although I continued to shoot as the shuttle flew to the south and out of the San Francisco Bay Area, this is the last shot in the sequence that I’ll share. Although many in the ground hoped (dreamed?) that the shuttle might circle around and make a second pass – there had been rumors of a 200 ft. altitude flight down the runway – it seemed pretty likely that this was the end of the show, though what a show it had been!

In some ways I like this photograph the most, even though it certainly does not reveal as much of the detail of the space vehicle or its transport plane. On the other hand, it seems to me to be a bit more evocative of the end of this era in American space flight – the shuttle flies away in into an almost empty sky.

G Dan Mitchell is a California photographer whose subjects include the Pacific coast, redwood forests, central California oak/grasslands, the Sierra Nevada, California deserts, urban landscapes, night photography, and more.
Blog | About | Flickr | Twitter | FacebookGoogle+ | 500px.com | LinkedIn | Email

Text, photographs, and other media are © Copyright G Dan Mitchell (or others when indicated) and are not in the public domain and may not be used on websites, blogs, or in other media without advance permission from G Dan Mitchell.

Photographer and visual opportunist. Daily photos since 2005, plus articles, reviews, news, and ideas.